Good news, with fedora-38 the network manager supports Wireguard out of the box!
The only thing required are extra firewall rules in the VPN qube, as explained in the community documentation about VPN.
What you’ll need
This guide assumes you are using a VPN service that has wireguard support, most of them do, but you can also add your own if you have a server.
ProtonVPN has a free plan, it has limits but gives you a fully working VPN and they support WireGuard. This provider is recommended on privacyguides.com for being privacy friendly (no logs)
Create a new qube providing network
Make sure
fedora-40template is installed (instructions) (so far, this works with fedora 38/39/40 and certainly later versions)
Menu » Qubes Tools » Create Qubes VM:
- name: sys-vpn (you pick yours)
- template:
fedora-38 - type:
app qube(or AppVM) - networking: sys-firewall (
 make sure it is NOT “(default) sys-firewall” but instead “sys-firewall)
  Launch settings after creation
- advanced (tab) » Provides network access to other qubes
And then OK. Then the qube settings window should show up (proceed to the next step).
Enable service “network-manager” in sys-vpn
In the settings window that popped up, go to the Services, select network-manager from the drop-down list and click ![]() add. Then save the settings by clicking OK.
add. Then save the settings by clicking OK.
Get your wireguard VPN configuration file
Go your VPN provider and download a configuration file for wireguard (e.g.: vpn.conf)
On your VPN provider download the wireguard configuration for the server you want to connect to.
Here are the download pages for some popular VPN services: Mullvad, ProtonVPN
Use the Qube GUI to set the firewall to the VPN endpoint (this avoids leaks)
This is essentially a killswitch. It is a fail-safe that ensures that if your VPN connection fails, it does NOT let anything through.
This lets pass DNS requests to internal Qubes OS DNS servers and also ICMP, see the next section if you need to block everything
Open the configuration file in a text editor and take note of the IP address right next to Endpoint. If the line looks like the following, then you take note of the IP address as 1.2.3.4.
Endpoint = 1.2.3.4:5555
Open the qube settings for sys-vpn and navigate to the Firewall rules tab and set ![]() Limit outgoing connections to.
Limit outgoing connections to.
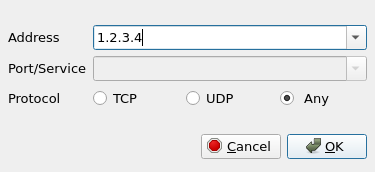
Then click on ![]() to add a new firewall and add your saved IP address(es)
to add a new firewall and add your saved IP address(es)

Hit OK to apply and click OK again to apply the settings.
Block all traffic outside VPN using command line Qubes OS Firewall
To configure killswitch + (DNS) leak protection + ICMP/ping blocking + protection in case of sys-vpn compromise, you can alternatively execute a three-liner in dom0, no nft/iptables needed:
qvm-firewall sys-vpn reset # (1)
qvm-firewall sys-vpn add accept dsthost=1.2.3.4 # (2)
qvm-firewall sys-vpn del --rule-no 0 # (3)
(1) resets firewall to one single rule accepting everything
(2) whitelists specific VPN gateway IP
(3) removes rule (1), so there is just one whitelisted IP from (2) left
Everything else is blocked safely outside sys-vpn.
Configure your VPN in the Network Manager
On the qube on which you downloaded your wireguard configuration (e.g.: vpn.conf), open the file explorer where the file was saved. Then right-click a file and Copy to another AppVM and choose to sys-vpn as the target.
Open your file manager in sys-vpn and find the <NAME>.conf file you just copied. It should in the directory QubesIncoming. Move it to your home directory.
Open the Terminal application on your sys-vpn qube and run the following command (replacing <NAME>.conf with the correct name of the file):
nmcli connection import type wireguard file vpn.conf
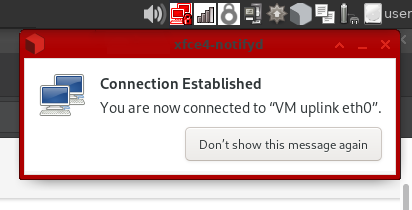
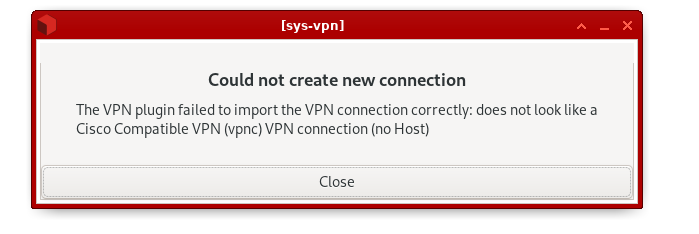
If successful, you should see a notification about successful connection. If that doesn’t happen, something may be wrong with your config file:

You should also see an icon with a padlock
in the top-right corner of your screen (system tray). This indicates that your VPN connection is active. Without a padlock, means that it failed to connect.
Assign a VM to the new Qube network to use the VPN
Now that the VPN is configured, for each qube that you want to connect to the VPN, open its settings and set networking to sys-vpn. If you want this to be the default net qube, then you can set it in the Qubes Global Settings.
After that you’re done ![]()
Some websites aren’t working
This is certainly related to an MTU issue (the packet payload size), I got this issue only with www.duckduckgo.com for instance, so it could be very specific.
A solution is to force the qubes using the VPN provider qube to use a lower MTU, this can be easily achieved using a firewall rule. Add this to /rw/config/qubes-firewall-user-script:
nft add rule ip qubes custom-forward tcp flags syn / syn,rst tcp option maxseg size set rt mtu
Connect to a random VPN at qube start (optional)
If you have multiple VPNs configured in the qube, you may want one to be picked randomly at boot to connect to.
Make sure no VPN are configured for automatic connection at startup, there is a check box in the first tab of the VPN settings for that, it defaults to automatic connection.
Add this code to /rw/config/rc.local
RANDOM_VPN=$(nmcli connection show | awk '/wireguard/ { print $1 }' | sort -R | head -n 1)
nmcli connection up "$RANDOM_VPN"
Hardening (optional)
Killswitch
You may want to force all qubes traffic to go through the VPN and block non-VPN traffic.
Add the rules below in /rw/config/qubes-firewall-user-script in sys-vpn, make sure the qube service “qubes-firewall” is enabled in the qube settings:
# Prevent the qube to forward traffic outside of the VPN
nft add rule qubes custom-forward oifname eth0 counter drop
nft add rule ip6 qubes custom-forward oifname eth0 counter drop
These firewall rules will prevent (at the qube level) routing traffic of the NetVM child qubes through the sys-vpn NetVM. In other words, it blocks network traffic for qubes using sys-vpn as a NetVM if the VPN is not up/working.
If sys-vpn qube is compromised, it is possible to remove that rule from the qube (hence the “qube level” rule) and leak the traffic, although if this happens, it is also possible to directly listen to the network traffic going through sys-vpn.
A better killswitch solution is to use the qube firewall to block all traffic except the host:port destination required to establish the VPN. The firewall rules are applied on sys-vpn NetVM and can’t be modified from sys-vpn itself. Although this is better, it still won’t protect a compromised sys-vpn to listen to the traffic passing there (it’s is actually impossible to protect).
Prevent DNS leak
You may also want to force using a defined DNS server (9.9.9.9 in the current example) and blocking all other DNS servers (this avoids dns leaks)
# Redirect all the DNS traffic to the preferred DNS server
DNS=9.9.9.9
nft add chain qubes nat { type nat hook prerouting priority dstnat\; }
nft add rule qubes nat iifname == "vif*" tcp dport 53 dnat "$DNS"
nft add rule qubes nat iifname == "vif*" udp dport 53 dnat "$DNS"

