Qubes OS Installation - Detached encrypted boot and header

Used device in testing and confirm is worked :
windows vmware (host using old pc) and my laptop.
both are using uefi.

Keep in mind that below are disk i used in the tutorial, you can use 2 flashdrive (1 boot, 1 header) + 1 hdd or whatever you want.

/dev/nvme0n1 = system
/dev/sda = flashdrive

Please watch out any space, slash, periode in command issue / files IT REALLY MATTER


  • After booting into installation in language section, press ctrl + alt + f2

—# WARNING CONFIRM YOUR DISK FIRST BEFORE EXECUTING COMMAND

[anaconda /] dd if=/dev/urandom of=/dev/nvme0n1 bs=1M status=progress
[anaconda /] dd if=/dev/urandom of=/dev/sda bs=1M status=progress

Using /dev/urandom will take longer than /dev/zero but more secure.

  • Create 3 partition in usb drive, just follow below command as i need the rest of space (i need around 20mb) for luks header.
[anaconda /] gdisk /dev/sda
---# efi partition
n
1
2048
1230845
EF00
---# boot partition
n
2
1230848
3278842
8300
---# header partition
n
3
(enter)
(enter)
(enter)

w
Y

—# I use iter time 1 for speeding up decrypt process you should increase it in real installation, see 5.13 for details.

[anaconda /] cryptsetup -c aes-xts-plain64 -h sha512 -s 512 -y -i 1 --use-random luksFormat /dev/nvme0n1
[luks prompt /] YES
[luks prompt /] (enter password)
[luks prompt /] (verify password)
[anaconda /] cryptsetup luksOpen /dev/nvme0n1 luks
[luks prompt /] (enter password)

[anaconda /] pvcreate /dev/mapper/luks
[anaconda /] vgcreate qubes_dom0 /dev/mapper/luks
[anaconda /] lvcreate -n swap -L 4G qubes_dom0 
[anaconda /] lvcreate -T -L 20G qubes_dom0/root-pool 
[anaconda /] lvcreate -T -l +100%FREE qubes_dom0/vm-pool
[anaconda /] lvs 

—#

root-pool 20.00g
swap	  4.00g
vm-pool   19.90g

—#

[anaconda /] lvcreate -V20G -T qubes_dom0/root-pool -n root
[anaconda /] lvcreate -V19.9G -T qubes_dom0/vm-pool -n vm
[anaconda /] mkfs.xfs /dev/qubes_dom0/vm

—# I use xfs because it much faster than ext4 when boot up, btw i dont do benchmark it’s just My Life Experience based on using qubes.
Otherwise :

[anaconda /] mkfs.ext4 /dev/qubes_dom0/vm

  • Back to gui with ctrl + alt + f6.
  • Choose language, timezone, user, and lastly storage.
  • Click refresh on bottom right and rescan disk.
  • Select disk nvme0n1 and sda, storage configuration is Custom.
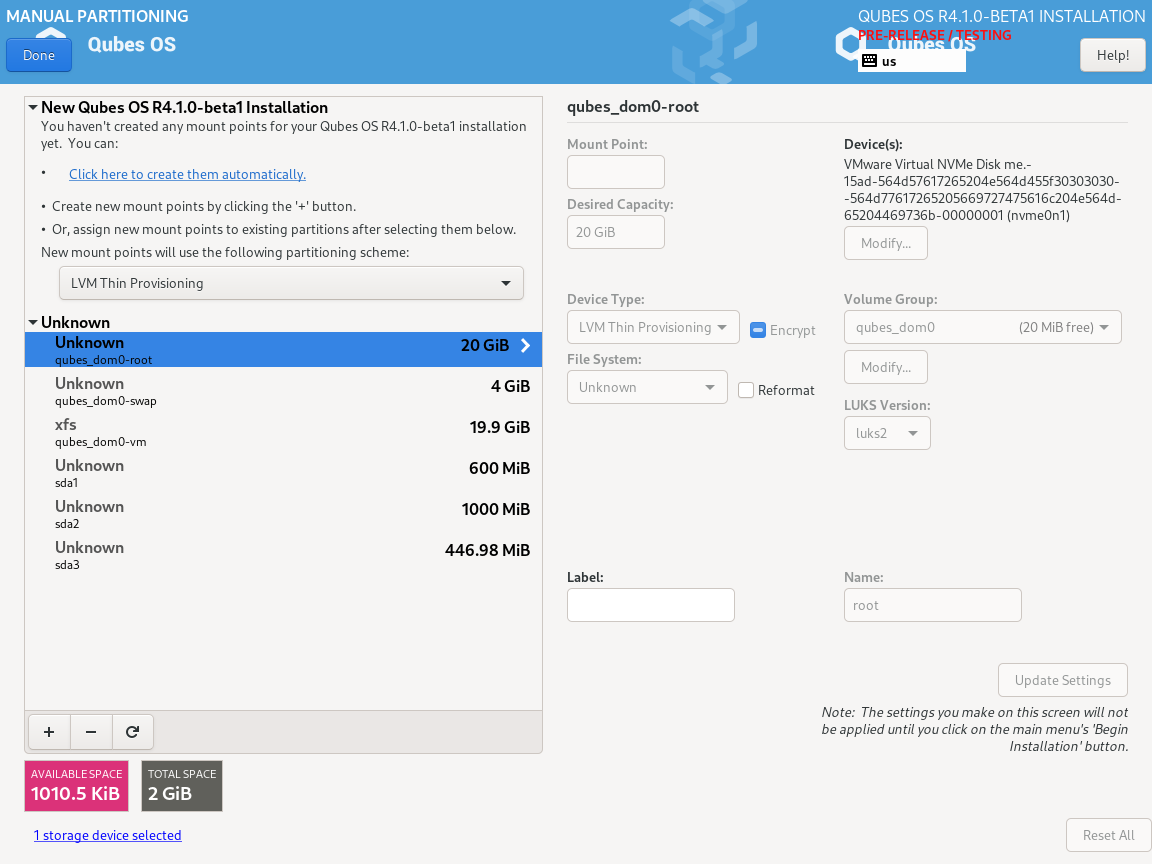
—# reformat disk
qubes_dom0-root, reformat, ext4, /, update settings.
qubes-dom0-swap, reformat, swap, update settings.
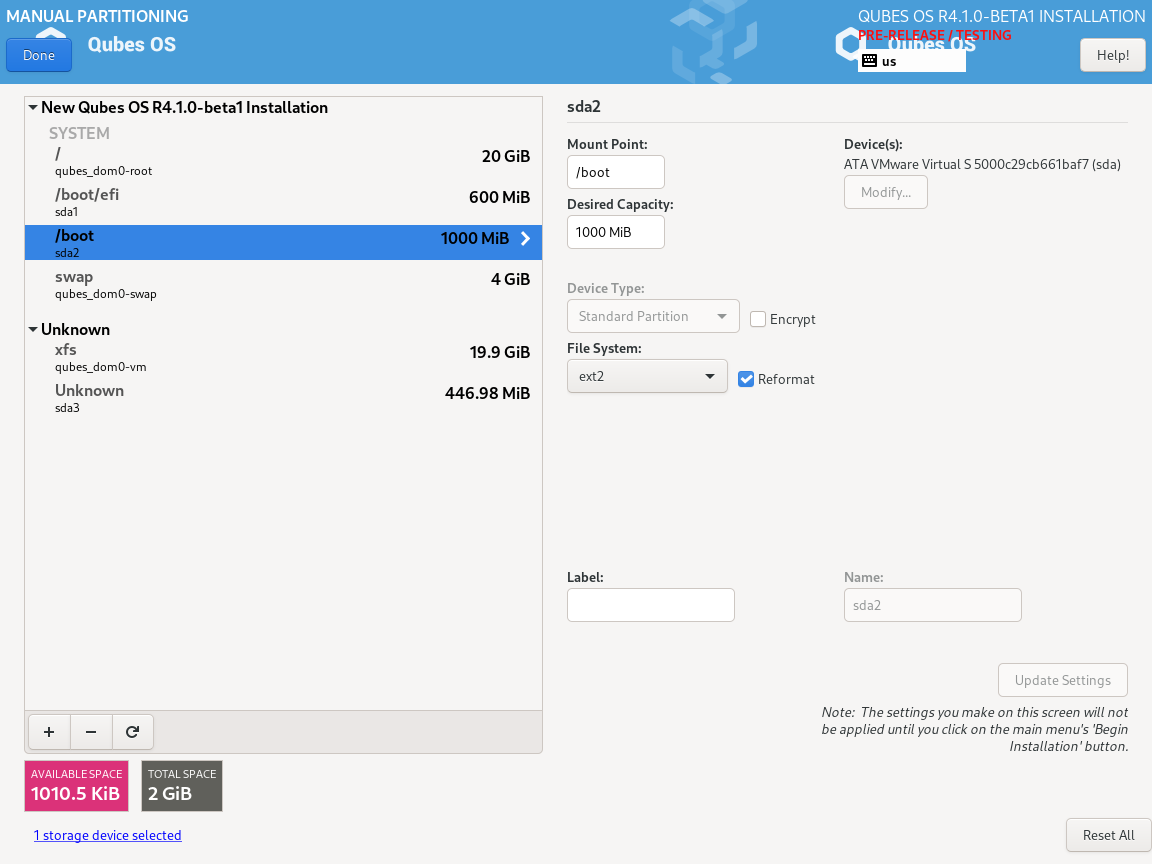
sda1, reformat, Efi System Partition, /boot/efi, update settings.
sda2, reformat, ext2, /boot, update settings.
—# leave qubes_dom0-vm and sda3 untouched.

  • Click done and begin installation.
  • After completion, switch back to shell with ctrl + alt + f2

[anaconda /] cp -r /usr/lib/grub/x86_64-efi /mnt/sysroot/boot/efi/EFI/qubes/
[anaconda /] chroot /mnt/sysroot/
[anaconda /] mount -oremount,ro /boot
[anaconda /] install -m0600 /dev/null /tmp/boot.tar
[anaconda /] tar -C /boot --acls --xattrs --one-file-system -cf /tmp/boot.tar .
[anaconda /] umount /boot/efi
[anaconda /] umount /boot
[anaconda /] exit

—# WARNING CONFIRM YOUR DISK FIRST BEFORE EXECUTING COMMAND

[anaconda /] dd if=/dev/urandom of=/dev/sda2 bs=1M status=progress
[anaconda /] cryptsetup -c twofish-xts-plain64 -h sha512 -s 512 -y -i 1 --use-random --type luks1 luksFormat /dev/sda2
[luks prompt  /] YES
[luks prompt /] (enter password)
[luks prompt /] (verify password)

—#

[anaconda /] uuidR="$(blkid -o value -s UUID /dev/nvme0n1)"
[anaconda /] uuidB="$(blkid -o value -s UUID /dev/sda2)"
[anaconda /] cryptsetup luksOpen /dev/sda2 luks-$uuidB
[anaconda /] mkfs.ext2 -m0 -U $uuidB /dev/mapper/luks-$uuidB

—#

[anaconda /] vi /mnt/sysroot/etc/fstab

—# Change UUID=…on boot line to /dev/mapper/luks-(your $uuidB) and leave the rest to default value


[anaconda /] chroot /mnt/sysroot
[anaconda /] mount -v /boot
[anaconda /] tar -C /boot --acls --xattrs -xf /tmp/boot.tar
[anaconda /] mount /dev/sda1 /boot/efi
[anaconda /] echo "GRUB_ENABLE_CRYPTODISK=y" >> /etc/default/grub
---# create luks keys so we dont have to enter any password after grub
[anaconda /] mkdir /etc/keys
[anaconda /] dd if=/dev/urandom bs=1 count=64 of=/etc/keys/root.key conv=excl,fsync 
[anaconda /] dd if=/dev/urandom bs=1 count=64 of=/etc/keys/boot.key conv=excl,fsync
[anaconda /] cryptsetup luksAddKey /dev/nvme0n1 /etc/keys/root.key
[luks prompt /] (system password) 
[anaconda /] cryptsetup luksAddKey /dev/sda2 /etc/keys/boot.key
[luks prompt /] (boot password)
[anaconda /] cryptsetup luksHeaderBackup /dev/nvme0n1 --header-backup-file header
---# WARNING CONFIRM YOUR DISK FIRST BEFORE EXECUTING COMMAND
[anaconda /] dd if=/header of=/dev/sda3 bs=16M count=1 status=progress
[anaconda /] exit
[anaconda /] echo "luks-$uuidB UUID=$uuidB /etc/keys/boot.key luks,key-slot=1" | tee -a /mnt/sysroot/etc/crypttab
[anaconda /] mount --bind /dev /mnt/sysroot/dev
[anaconda /] mount --bind /dev/pts /mnt/sysroot/dev/pts
[anaconda /] mount --bind /sys /mnt/sysroot/sys
[anaconda /] mount --bind /proc /mnt/sysroot/proc

---

[anaconda /] chroot /mnt/sysroot
[anaconda /] vi /etc/crypttab 
---# Change root device value so it look like this 

![Qubes OS-2021-09-09-05-41-16|690x100](upload://wq7nqayfAzpGbeT5p8gfLqB1XMc.png)

---

[anaconda /] vi /etc/dracut.conf.d/misc.conf

add_dracutmodules+=" crypt "
install_items+=" /etc/keys/root.key /etc/keys/boot.key /sbin/cryptsetup "

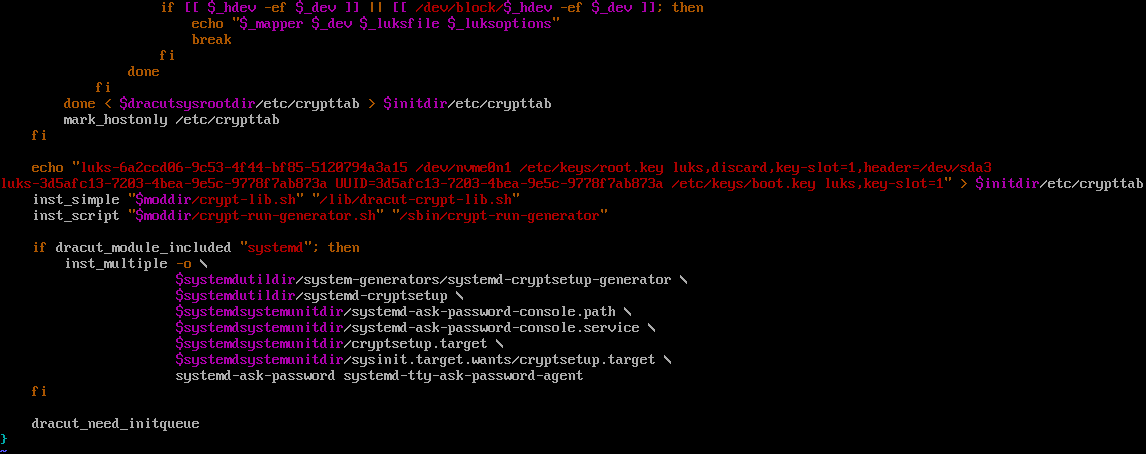
[anaconda /] vi /usr/lib/dracut/modules.d/90crypt/module-setup.sh

—# write a persistence device at /etc/block_uuid.map in generated initramfs

echo "/dev/nvme0n1 $uuidR
/dev/disk/by-uuid/$uuidB $uuidB" > "{initdir}/etc/block_uuid.map"

—# write a persistence device at /etc/crypttab in generated initramfs (we can’t inject /etc/crypttab files in dracut.conf)

echo "luks-$uuidR /dev/nvme0n1 /etc/keys/root.key luks,discard,key-slot=1,header=/dev/sda3
luks-$uuidB UUID=$uuidB /etc/keys/boot.key luks,key-slot=1" > $initdir/etc/crypttab


[anaconda /] grub2-mkconfig -o /boot/efi/EFI/qubes/grub.cfg
[anaconda /] dracut -v -f /boot/initramfs-*
[anaconda /] exit
[anaconda /] umount /mnt/sysroot/boot/efi
[anaconda /] umount /mnt/sysroot/boot
[anaconda /] umount -l /mnt/sysroot
[anaconda /] umount -l /mnt/sysimage
[anaconda /] swapoff /dev/qubes_dom0/swap
[anaconda /] vgchange -a n qubes_dom0
[anaconda /] cryptsetup luksClose /dev/mapper/luks
[anaconda /] cryptsetup luksClose /dev/mapper/luks-$uuidB
[anaconda /] cryptsetup luksErase /dev/nvme0n1
[luks prompt /] YES
[anaconda /] wipefs -a /dev/nvme0n1
[anaconda /] reboot

—# Screenshoot

24 Likes

wow. This looks like something id love to try at some point. Thank you for the research into this @51lieal and taking the time to publish this literal step by step, keystroke by keystroke howto.

5 Likes

Much appreciated for putting in time and efforts into this, Tried and tested it works. Thank you

2 Likes

Update: I have made big changes, please re read if you already read my frist post because I’ve found that after upgrading kernel, system will stuck and after debugging i’ve found that newer initramfs has wrong block mapping and empty crypttab. Further using is fine as long dev aren’t playing with dracut things.

3 Likes

Hi 51lieal thank you first and foremost for your contribution and taking the time to publish this guide.

I just want to make sure I understand the benefit of this setup correctly. It means that even if an attacker has the hdd + password – they still can not unlock the data?

Luks password is not master key, it’s just a key. Imagine your disk is a solid home and password is a key then header is a door, how would you go inside without the door? but still we don’t know what method will come in the future.

As far as i know there’s not known case someone has able to unlock data without master key until now.

Additional note from cryptsetup

2.4 What is the difference between “plain” and LUKS format?

First, unless you happen to understand the cryptographic background well, you should use LUKS. It does protect the user from a lot of common mistakes. Plain dm-crypt is for experts.

Plain format is just that: It has no metadata on disk, reads all parameters from the commandline (or the defaults), derives a master-key from the passphrase and then uses that to de-/encrypt the sectors of the device, with a direct 1:1 mapping between encrypted and decrypted sectors.

Primary advantage is high resilience to damage, as one damaged encrypted sector results in exactly one damaged decrypted sector. Also, it is not readily apparent that there even is encrypted data on the device, as an overwrite with crypto-grade randomness (e.g. from /dev/urandom) looks exactly the same on disk.

Side-note: That has limited value against the authorities. In civilized countries, they cannot force you to give up a crypto-key anyways. In quite a few countries around the world, they can force you to give up the keys (using imprisonment or worse to pressure you, sometimes without due process), and in the worst case, they only need a nebulous “suspicion” about the presence of encrypted data. Sometimes this applies to everybody, sometimes only when you are suspected of having “illicit data” (definition subject to change) and sometimes specifically when crossing a border. Note that this is going on in countries like the US and the UK to different degrees and sometimes with courts restricting what the authorities can actually demand.

My advice is to either be ready to give up the keys or to not have encrypted data when traveling to those countries, especially when crossing the borders. The latter also means not having any high-entropy (random) data areas on your disk, unless you can explain them and demonstrate that explanation. Hence doing a zero-wipe of all free space, including unused space, may be a good idea.
Disadvantages are that you do not have all the nice features that the LUKS metadata offers, like multiple passphrases that can be changed, the cipher being stored in the metadata, anti-forensic properties like key-slot diffusion and salts, etc…

LUKS format uses a metadata header and 8 key-slot areas that are being placed at the beginning of the disk, see below under “What does the LUKS on-disk format looks like?”. The passphrases are used to decrypt a single master key that is stored in the anti-forensic stripes. LUKS2 adds some more flexibility.

Advantages are a higher usability, automatic configuration of non-default crypto parameters, defenses against low-entropy passphrases like salting and iterated PBKDF2 or ARGON 2 passphrase hashing, the ability to change passphrases, and others.

Disadvantages are that it is readily obvious there is encrypted data on disk (but see side note above) and that damage to the header or key-slots usually results in permanent data-loss. See below under “6. Backup and Data Recovery” on how to reduce that risk. Also the sector numbers get shifted by the length of the header and key-slots and there is a loss of that size in capacity. Unless you have a specific need, use LUKS2.

From the statement, i can say that headerless luks has same method like dm-crypt.

I would love buy you an coffee or pizza. PM me your xmr address, I’m also donating some to qubes project. Thank you very much happy to be part of qubes community :wink:

1 Like

I’m trying to figure out how to accomplish this legacy bios instead of UEFI.

Few things I noted:

  • I was unable to give $uuidR a value since my luks partition where Qubes was installed didn’t seem to have a UUID.
  • I did not add the luks partition to boot_uuid since I could not find $uuidR. So for that part I only added boot ($uuidB).
  • I ignored all steps related to /boot/efi since I’m not using UEFI
  • Qubes installation required biosboot partition
  • Use MBR instead of GPT type drive.
  • I tried installing it with an existing HDD drive for system and an sdcard for detached parts, and so my partitions were instead sdd8 for system partition; and sdc was for biosboot, /boot and header partitions.
  • I exported grub to to /boot/grub2/grub.cfg instead

Other than that I think everything else was the same.
I guess I’ve not set it up correctly, as grub is unable to recognise luks system drive; it says “unknown filesystem” and goes into recovery mode.

Any ideas on what changes in particular would be needed to get it to work with legacy bios?
Also, I noticed $uuidR isn’t really used apart from naming. I’m just a bit confused about it in general so maybe I’m misunderstanding something.

I think I understand the gist of how everything is supposed to work and piece together but still don’t understand enough to know what’s causing the problem.

I will try figuring it out some more. Thank you so much for such an informative guide it is so helpful to learn from.

I think maybe it’s because the luks and header partitions are different depending on connected drives.

e.g. If it’s looking for sdd8 and sdc3, but they are actually now sdc8 and sdb3 after I boot without the installer usb plugged in, so it doesn’t find them.

Not sure if that’s how it works or makes sense. Definitely will try learning more :slight_smile: .

No it should give you a generated uuid, after installing go back to shell then run lsblk -f

run lsblk -f in shell or run cat /etc/default/grub check how grub was try to access disk.

you still need to copy /usr/lib/grub/i386-pc to where your boot config is located.
In 4.1 and uefi, boot config is located in /mnt/sysroot/boot/efi/EFI/qubes/ so you need to find it yourself, and for the reason i copying entire modules (i386-pc / x86_64-efi) because i need twofish modules and others (i forget which modules i need, so i just copy the entire folder)

just ignore efi step, then make 2 partition only.

it’s okay.

No this is important, from dracut :

  • The traditional root=/dev/sda1 style device specification is
    allowed, but not encouraged. The root device should better be
    identified by LABEL or UUID. If a label is used, as in
    root=LABEL=<label_of_root> the initramfs will search all
    available devices for a filesystem with the appropriate label,
    and mount that device as the root filesystem.
    root=UUID= will mount the partition with that UUID as
    the root filesystem.

with detached header, our filesystem doesn’t have uuid or label, that’s why I copy the luks header into a partition, so that i don’t lose root uuid and for why i not using /dev/sda1 is at some point i got stuck.

one of problem not using a uuid.

1 Like

Thank you for the information and help!

I forgot another thing I did differently which was I detaching the header right at the beginning during luksFormat. I guess that would explain why the UUID is missing (it exists on the header partition instead).

Few more things I’ve left to figure out:

  • What is block_uuid.map (cannot find any info about it for some reason)?
  • In the case where header is detached during the initial luksFormat, should I make $uuidR be the UUID of the header partition? Is it possible to make it work this way, or must the header be detached only near the end after most of the configuration steps have been completed?
  • /usr/lib/grub only contains i386-efi and x86_64-efi, cannot find i386-pc. Would it be okay to use one of these for legacy bios 64 bit system?
  • /etc/default/grub doesnt exist

Please correct if wrong – following all the information and steps you’ve outlined, a summary of my understanding is that:

  1. Grub needs additional configuration to decrypt/read luks partitions.
  2. It needs to be configured to search for the encrypted /boot partition (ideally via UUID so it can always find it).
  3. /boot needs a few modifications so that it can map the detatched header and luks system partitions together, decrypt and boot the os (and also key files are added so we aren’t inconveniently prompted for password many times).

Based of that I will try troubleshooting or trying to understand things a bit more. :slight_smile:

In the step # Change root device value so it look like this

Should the label be luks-( my $uuidR)?

Great, great tutorial. Thanks for taking the time to write it.

Looking forward to testing this on a second system. Soon.

i really don’t know what it is, i just do a diff when comparing generated initramfs when installing and initramfs in first test i made then i found about that. As you can see i made edit post, you can check the history that i dont write block_uuid.map there.

I dont detach header, I write out the header from /dev/nvme0n1 then i did a copy into my flashdrive partition (/dev/sda3) then i erase all keyslots and make the LUKS container permanently inaccessible, as well erase filesystem or raid signatures (magic strings) from the device to make the filesystem invisible for libblkid using wipefs


oh then you need to copy i386-efi.

Ok so this is problem, as you can see in my code i did echo “GRUB_ENABLE_CRYPTODISK=y” >> /etc/default/grub

that means i tell grub2 to decypt /boot in boot section, you need to find equivalent command to do it in bios + mbr then update to your

or you can just write GRUB_ENABLE_CRYPTODISK=y into /boot/grub2/grub.cfg and you should rewrite again every kernel update.

A good catch, I believe that you only need to tweak it little, here’s the hint.

  • You need to find how to decrypt /boot in boot section.
  • You need to tell dracut to generate correct block_uuid.map as well as the crypttab.
    You can just follow from

to


it isn’t neccessary because we don’t use this crypttab file, instead we use the crypttab that generated by dracut.

Reviewing on my above guide :

  1. luks-$uuidR luks.data=/dev/nvme0n1 option{key, luks, discard, key-slot, header}
  2. luks-$uuidB luks.data=$uuidB (you can use /dev/sda /dev/sdb where your flashdrive device is founded, but as you can see what happen if you remove the disk, sdd into sdc and sdc into sdb, luckily i use nvme so i know that my flashdrive is /dev/sda)

an additional note when you write your own confiiguration in here

You must not use uuid in header option, if you use header=/dev/disk/by-uuid/$uuidB initramfs would confuse and you’ll not be able to decrypt and you’ll get dracut shell after waiting.

1 Like

Thanks for clarifying all of this.

I haven’t been able to test by here’s my thoughts:

So one concern: I thought that maybe due to anti-forensic strips, this wouldn’t be a problem even with an ssd, but as mentioned here for example, a minor concern is that the header may not get erased (I think due to things like ssd wear leveling). So I think ideally the header would never be written to /dev/nvme0n1, so i.e. its only ever existince would be on detached device(s). I assume using luksFormat with --header option would do the trick, but not sure. Do you have any thoughts about this? Is it neglible problem to be concerned about? Or if not, should it be possible to install Qubes in similar fashion in your guide, but with an already detached luks?

Hmm I don’t think so, I think this doesn’t work for legacy bios and only for EFI unfortunately.

So just curious, this means we overwrite the file, so that step can be skipped/ignored then?

Any info why this happens?

No we can’t fight anaconda whatever we do, we’ll always lose.

Law is not like that, as long as they can’t find the header, my disk is safe from inspection. Even they found it, they should catch me while in action.

As long as i know we can’t fight anaconda gui, it must be done via gui.

:thinking:

I haven’t try but it’s best to have it same.

I don’t have idea you may look in crypttab for the reason.

1 Like

Wasn’t expecting such a quick response!

I guess what you are hinting that I shouldn’t try troubleshooting this further because the qubes installer might just to weird things hard to understand. And yup, if legal requirements (or worse) get involved, I agree that the “totally separate header” probably wouldn’t serve much help (i.e. make no difference) for those people. Maybe in few cases it would be useful though.

My curiosity is going to make me try just a little bit more. I guess my best bet at this point is to work backwards from a working setup and see what breaks it.

I hope legacy bios will work (last time I couldn’t get UEFI to work on a normal install).

Thanks again for the help!

If you want step by step here’s the hint :

  1. Make sure grub cryptodisk is work, have a prompt like in the screenshoot.
  2. Some modules are required as example twofish modules (if you encrypted boot partition with twofish chiper), in uefi it’s inside x86_64-efi folder.
  3. To generate initramfs, from [anaconda /] vi /etc/dracut.conf.d/misc.conf to [anaconda /] dracut -v -f /boot/initramfs-* it should same configuration except those drive and uuid.

I’ve planning to make next guide custom btrfs install, using bios+mbr let’s see if it would work.

1 Like

Quick update on doing this with legacy-bios:

  1. I realized that since I don’t create /boot/efi partition, and install grub to /boot/grub2/grub.cfg that my grub located inside the encrypted partition, so it seems obvious why that wouldn’t work. Oddly enough, it seems to recognise it since it enters grub rescue mode. I’m sure I encrypted the partition. If I understand correctly, the stage 1 of grub2 is written to the first sector (of the device the /boot partition is on I guess?), i.e. the MBR. And/or grub is installed in the first part of the disk, between MBR and the first partition. If true, then that would explain why, as those places shouldn’t have been overwritten when encrypting the /boot partition. But back to the problem: I’m not sure how I’d configure it so grub.cfg is in a different location off the encrypted /boot partition. Maybe someone smarter can point out a solution.

  2. I mentioned before Qubes install requiring a biosboot partition. I understand now that this was because the install target partition was on a gpt disk. (Actually the installer is very helpful, and literally states that reason, but I misinterperetted it and thought it was referring to the /boot partition instead, which I had as MBR. Just my mistake.) If the root / partition is on a MBR configured disk, it is not needed (because it uses the storage location techniques mentioned above in 1.)

  3. After installation was complete, instead of ctrl + alt + f2 I just rebooted to see if the system was working at all. It was, and I was able to find i386-pc, /etc/default/grub, and pretty much all the necessary files and complete the rest of the steps. I think that should be a viable way to accomplish this then, unless there are reasons for not. Do you know of any reasons why it might not work doing it that way? I plan on trying it that way if I try again.

  4. After learning more about this, I am wondering more about what is the main/common reasons for encrypting /boot?

Initially I thought maybe:

  • Better security because /boot cannot have been modified without being decrypted. But of course there are the same problems lower down (grub, firmware, etc…) so the benefit of this is likely not very much without also securing those.
  • Prevent leakage of encrypted data to plain-text. This is not really a problem with Qubes AFAICT unless dom0 is compromised or user manually does it.
  • Whoever finds it while it’s encrypted won’t see that it’s for Qubes boot.

Is there something I’m missing? I can’t think of any downsides, so even if these benefits are relatively small (unless there are some I missed) it’s still a better setup then not, right?


It will be really interesting to see your new guide. I’m sure there is lots to learn. I suppose I’ll try troubleshooting and getting my UEFI install to work in the meantime. Thank you again for this guide and all the help, it has been so interesting and I’ve learned a lot from trying it out. :slight_smile: