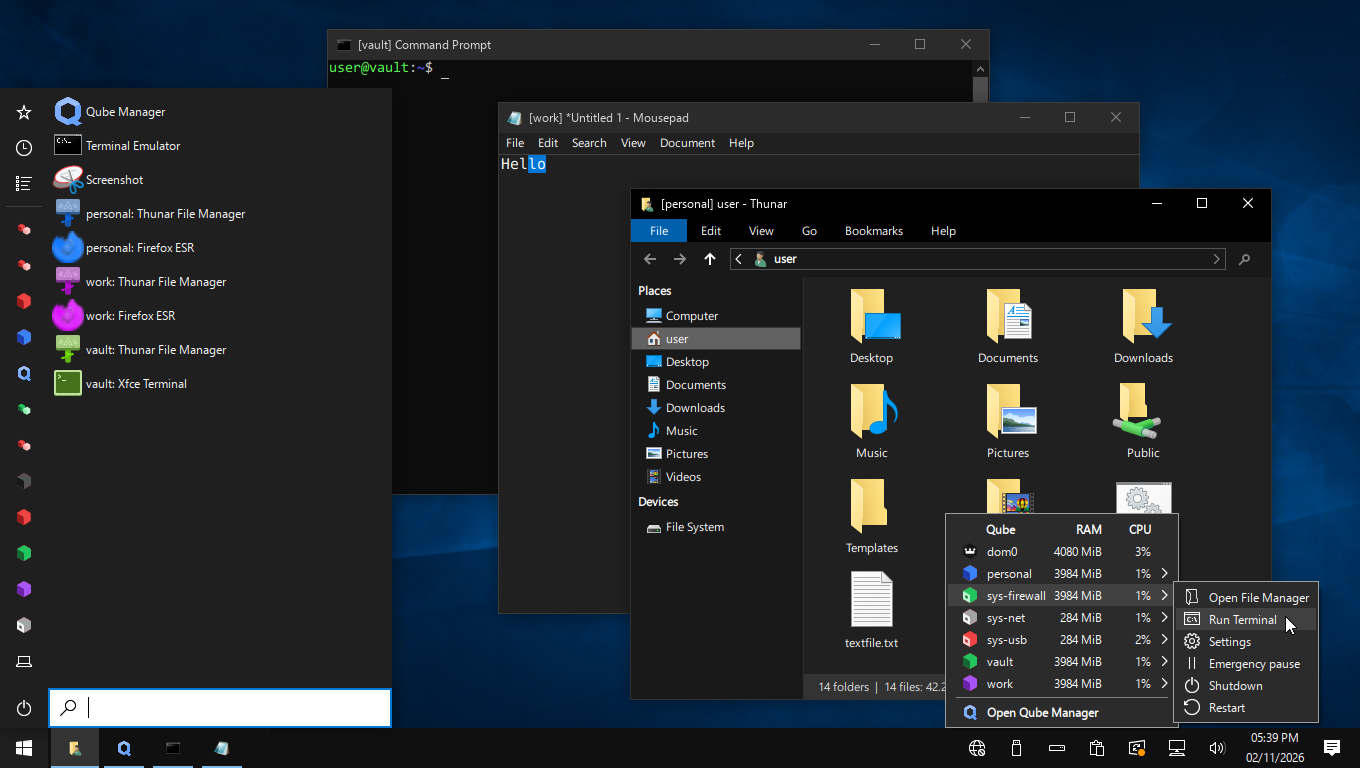
Hello Qubes forum! I released a XFCE Win10 look-alike theme a few months ago and I’m pleased to announce that I’ve added dedicated Qubes OS support for it! Example screenshots below:

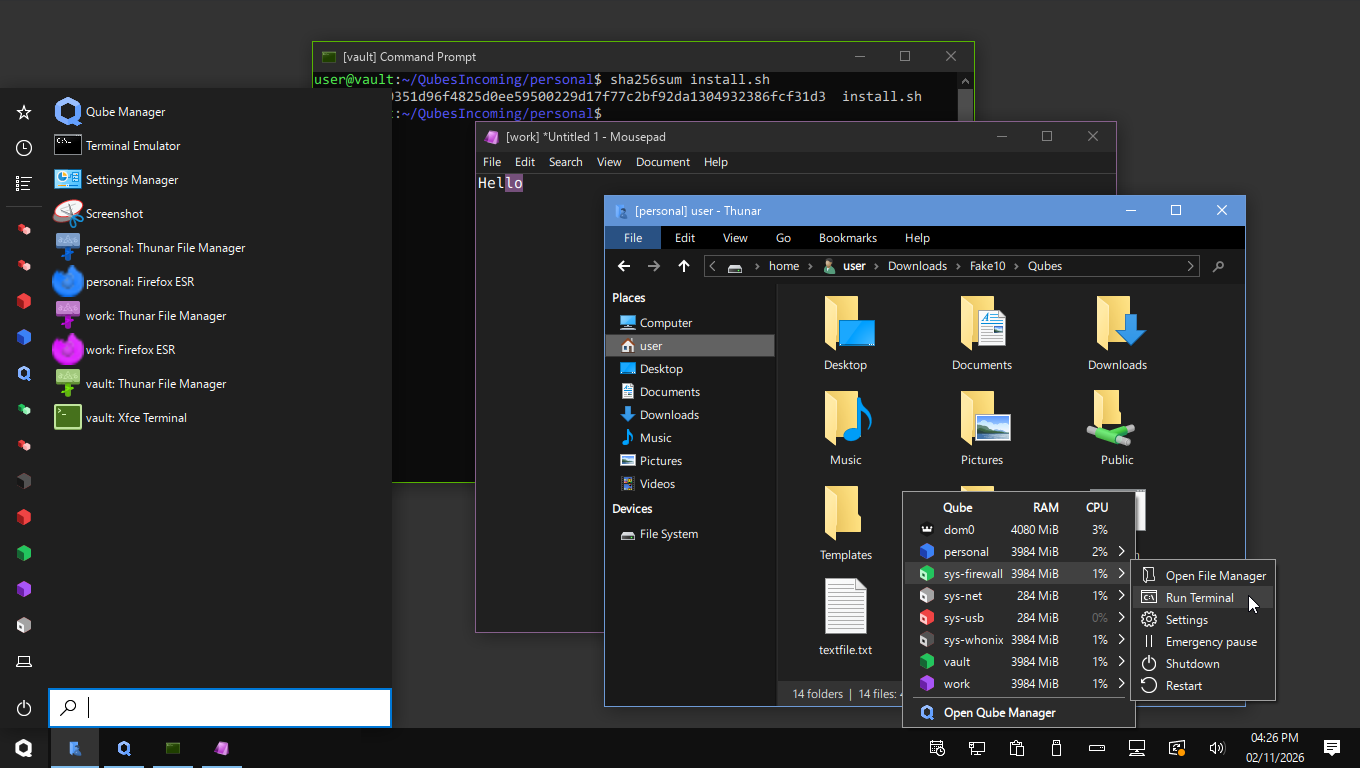
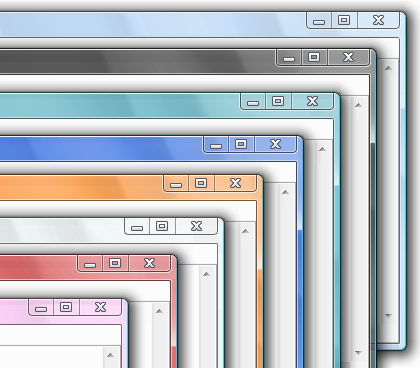
You can choose between eleven different window border options for Qubes:
- Standard (no coloring) + light theme variant
- Colored 1 (tints borders on focus) + light theme variant
- Colored 2 (tints borders always) + light theme variant
- Colored 3 (tint titlebars+borders on focus) + light theme variant
- Colored 4 (tints titlebar on focus, borders always) + light theme variant
- Colorful (tints titlebars and borders always)
The theme also contains a unique “accent color” feature, which works like Windows 10. This lets you set a single main color which gets mixed and reused in lots of places (such as the taskbar, Start menu, text highlight colors, sliders, menu items, etc). As you can probably imagine, this feature can also be put to use for differentiating VMs and complementing the window border colors.
You can find the theme and more example screenshots here. The instructions to set it up (which are mostly pasted from the included guide) are below.
QUBES OS 4.3 GUIDED SETUP (~10-15 minutes depending on VM count)
Populate and run the following command in Dom0 to copy the theme to Dom0 [DISCOURAGED BY QUBES DEVS]
qvm-run --pass-io SOURCEVMNAME “cat ~/Downloads/Fake10-v6.tar.gz” > ~/Desktop/Fake10.tar.gz
Extract the theme by running “tar -xvzf ~/Desktop/Fake10.tar.gz”
Review the two shell scripts in ./Scripts/ to ensure there is nothing malicious inside
Review the entire install.sh file to ensure there is nothing malicious inside
Compare the installer SHA256 hash to the one the download page (check in changelogs)
Run install.sh
Answer the prompts, read, and follow instructions
If the sys-net and sys-whonix VMs load before the reload-theme script refreshes the taskbar (which causes the VM system tray icons to be hidden/broken), decrease the delay between actions inside the reload-theme script [TROUBLESHOOTING]
On the unlikely chance your XFCE panel breaks, run “xfconf-query -c xfce4-panel -p / -R -r” and reboot to restore the panel [TROUBLESHOOTING]
QUBES OS 4.3 MANUAL SETUP (~40-70 minutes depending on VM count)
— In Dom0 —
Populate and run the following command in Dom0 to copy the theme to Dom0 [DISCOURAGED BY QUBES DEVS]
qvm-run --pass-io SOURCEVMNAME “cat ~/Downloads/Fake10-v6.tar.gz” > ~/Desktop/Fake10.tar.gz
Extract the theme by running “tar -xvzf ~/Desktop/Fake10.tar.gz”
Modify the CSS file in your desired theme (./Themes/Fake10/gtk-3.0/gtk.css or ./Themes/Fake10 Light/gtk-3.0/gtk.css) by running “nano gtk.css” in the directory
.xfce4-panel .tasklist button box image {
	background-color: transparent;
	margin-left: 5px; <----- [CHANGE TO 9PX]
}
.xfce4-panel .tasklist button:checked box image,
.xfce4-panel .tasklist button:hover box image {
	margin-left: 9px; <----- [CHANGE TO 13PX]
}
#whiskermenu-window .category-button {
	border: none;
	background-color: transparent;
	min-width: 30px; <----- [CHANGE TO 36PX]
	min-height: 36px;
	-gtk-icon-style: symbolic;
}
#genmon-8 .genmon_imagebutton {
	margin-right: -5px; <----- [CHANGE TO -11PX]
}
These modifications properly align taskbar program button icons, Start menu categories with persistent scroll bars, and the “Show Desktop” button in Qubes.
↓ Install Fake10 like normal (standard setup guide below) ↓
Copy the window borders from ~/Desktop/Fake10/Qubes/Themes/ to ~/.themes/ and apply one in Window Manager
Back up and overwrite the Adwaita cursors in /usr/share/icons/Adwaita/cursors/ with your desired cursor theme
Modify the following Python line by running “sudo nano /usr/lib/qubes/icon-receiver” to prevent program icon tinting [OPTIONAL]
icon_tinted = icon.tint(color) <----- [CHANGE TO "icon_tinted = icon"]
Change some VM colors to gray to make their system tray icons monochrome and fit better with the theme [OPTIONAL]
Reboot system to fix icons, cursors, fonts, scrollbars, and alignment
If the sys-net and sys-whonix VMs load before the reload-theme script refreshes the taskbar (which causes the VM system tray icons to be hidden/broken), decrease the delay between actions inside the reload-theme script [TROUBLESHOOTING]
— In VMs —
Get a fresh copy of Fake10 (without the Dom0 CSS modifications)
Modify the following line of CSS in your desired theme (./Themes/Fake10/gtk-3.0/gtk.css or ./Themes/Fake10 Light/gtk-3.0/gtk.css)
tooltip {
	background-color: transparent; <----- [CHANGE TO WHAT THE COMMENT NEXT TO THIS LINE SAYS]
}
↓ Install this theme in your VMs (setting accent colors is recommended, skip the taskbar section) ↓
For sys-net, change the VM color to gray and overwrite icons in ~/.icons/Fake10/16/ with icons from ./Qubes/Light or Dark Icons/Network Manager/
For whonix-gateway, run " qvm-run -u root whonix-gateway-18 ‘pcmanfm-qt’ " to open a file explorer in root
Copy the sdwdate icons from ./Qubes/Dark Icons/ or ./Qubes/Light Icons/ to the Whonix Gateway VM and overwrite the icons in /usr/share/sdwdate-gui/icons/
STANDARD (MANUAL) SETUP GUIDE
— Main —
Move the font folders from ./Fonts/ to ~/.local/share/fonts/
Move everything inside ./Mimes/ to ~/.local/share/mime/packages/
Move shell scripts inside ./Scripts/ to ~/.local/bin/
Move everything inside ./Icons/ to ~/.icons/
Move the images in ./Wallpaper/ to your wallpaper folder [OPTIONAL]
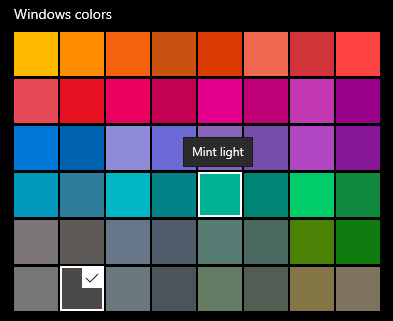
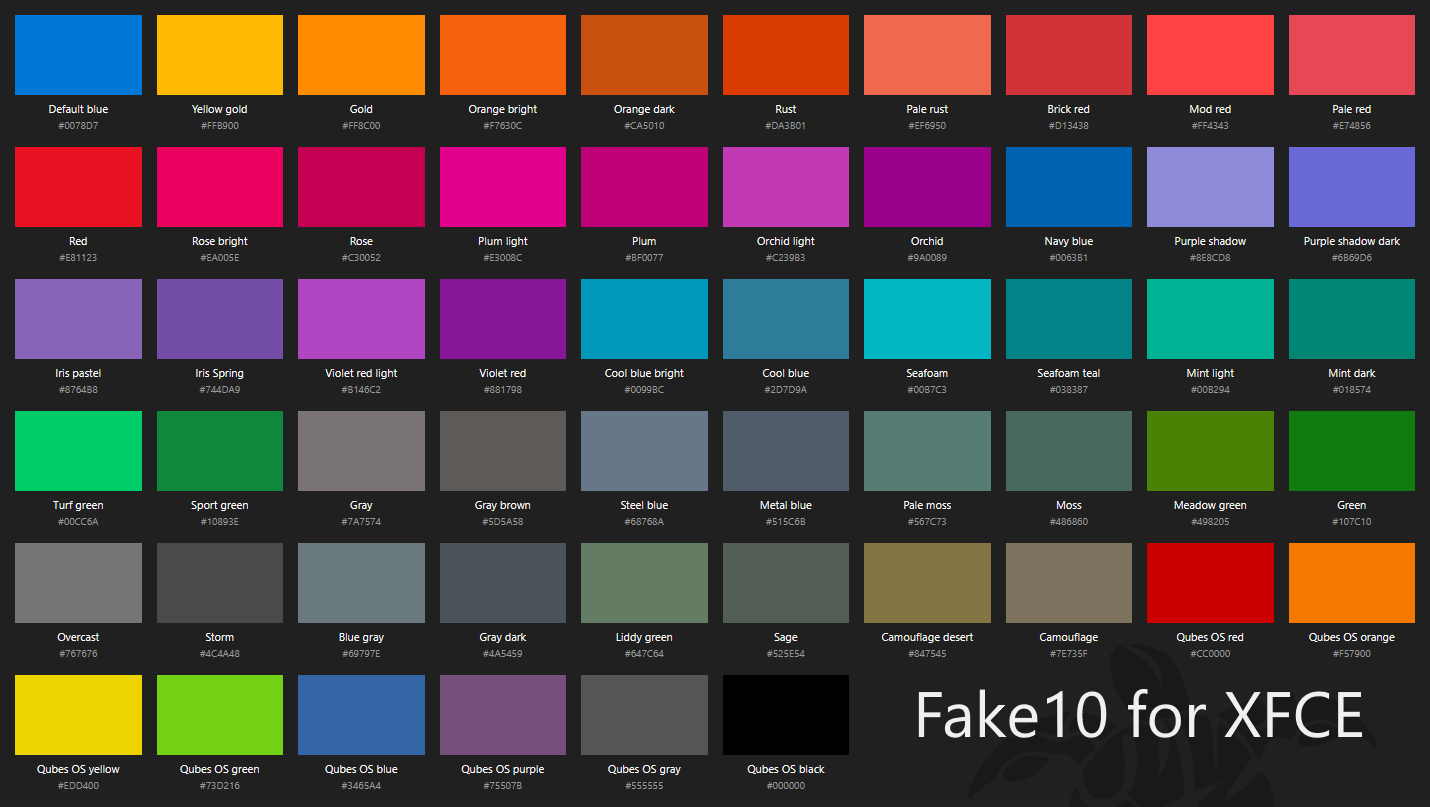
Set your desired accent color hex code inside ./Themes/Fake10/gtk-3.0/gtk.css (Refer to colors.png for default Windows accent colors) [OPTIONAL]
Set your accent color hex code inside ./Themes/Fake10 Light/gtk-3.0/gtk.css [OPTIONAL]
Set your accent color hex code at the bottom of ./Themes/Fake10 Accent Color/xfwm4/themerc [OPTIONAL]
Set your accent color hex code at the bottom of ./Themes/Fake10 Light Accent Color/xfwm4/themerc [OPTIONAL]
Move the folders inside ./Themes/ to ~/.themes/
Create or add the following text to the last line of ~/.bash_profile, ~/.profile, and ~/.xsessionrc: "export GTK_OVERLAY_SCROLLING=0"
Run "chmod +x ~/.local/bin/show-desktop.sh && chmod +x ~/.local/bin/reload-theme.sh"
Run "rm -rf ~/.cache/fontconfig && rm -rf ~/.fontconfig && fc-cache -rv"
Run "update-mime-database ~/.local/share/mime/"
Run "gtk-update-icon-cache -f -t ~/.icons/Fake10/ && gtk-update-icon-cache -f -t "$HOME/.icons/Fake10 Light/" "
Run "xfce4-panel -r"
Appearance > Style > Fake10 or Fake10 Light
> Icons > Fake10 or Fake10 Light
> Fonts > Default Font = Segoe UI Regular 9px
> Default Monospace Font = Consolas Regular 12px
> Hinting = Full
> Sub-pixel order = RGB (unless you aren't on a RGB monitor)
> Custom DPI setting = Disabled
> Settings > Show images on buttons = Disabled
> Enable header bars in dialogs = Disabled
Window Manager > Style > Theme = Fake10 (you change this later for Qubes OS)
> Title Font = Segoe UI Regular 9px
> Title Alignment = Left
> Shade Button = Hidden [OPTIONAL]
Mouse and Touchpad > Theme > Fake10, Fake10 Light, or the Fake10 Evil counterparts
— Taskbar and Start Menu —
Panel Preferences > Delete Panel 2
                  > Panel 1 > Display > Unlock the panel, drag it to the bottom, re-lock
                                      > Row size (pixels) = 40px
                            > Appearance > Style = Solid color (required to remove 1px border)
                                         > Color = #101010 (or #EEEEEE for light mode)
                                         > Fixed icon size (pixels) = 24px
                            > Items > Delete all items first (required for Show Desktop button to work properly)
                                    > Set in order: Whisker Menu, Window Buttons, Separator, Status Tray, PulseAudio, Clock, Notification Plugin, Generic Monitor
                                    > Use Show Desktop instead of Generic Monitor if you want a much larger Show Desktop button [OPTIONAL]
                                    > Separator > Style = Transparent
                                                > Expand = Enabled
                                    > Window Buttons > Show handle = Disabled
                                                     > Show button labels = Enabled
                                                     > Sorting order = None, allow drag-and-drop
                                                     > Group windows by application = Enabled
                                    > Generic Monitor > Command = echo "<img></img><click>/home/USER/.local/bin/show-desktop.sh</click><tool>Show Desktop</tool>"
                                                      > Replace USER with your user name
                                                      > Label = Disabled
                                                      > Period = 86400
                                    > Status Tray Plugin > Fixed icon size (pixels) = 16px
                                                         > Square items = Enabled
                                    > Clock > Date Font > Segoe UI Regular 9px
                                            > Time Font > Segoe UI Regular 9px
                                            > Set layout and format to your country standard
                                    > Whisker Menu > General > Show category names = Disabled
                                                             > Show application descriptions = Disabled
                                                             > Category icon size = Very small
                                                             > Menu width = 392 [OPTIONAL]
                                                             > Menu height = 640 [OPTIONAL]
                                                   > Appearance > Position categories on left = Enabled
                                                                > Position search entry on bottom = Enabled
                                                                > Position commands next to search entry = Enabled
                                                                > Profile = Hidden [OPTIONAL]
                                                                > Set the icon to your preferred start menu icon
                                                   > Behavior > Show confirmation dialog = Disabled
                                                   > Commands > Enable Shut Down, disable the other buttons
Session and Startup > Application Autostart > Add ~/.local/bin/reload-theme.sh to trigger on login
Power Manager > System > Critical Battery Power Level = 20 (to match theme icons, if you have a battery)
                       > System tray icon = Enabled (if you have a battery)
Notification Settings > General > Fade out = Disabled [OPTIONAL]
                                > Slide out = Enabled [OPTIONAL]
                      > Appearance > Theme = Fake10 or Fake10 Light
                                   > Opacity = 100%
                                   > Default position = Bottom right [OPTIONAL]
                      > Log > Log notifications = Enabled, Always
Keyboard > Application Shortcuts > Add "xfce4-popup-whiskermenu" and bind it to your start keys [OPTIONAL]
Window Manager Tweaks > Compositor > Show shadows under dock windows = Disabled
— Terminal —
Move fake-ten.theme from ./Terminal/ to ~/.local/share/xfce4/terminal/colorschemes/
Terminal > General > Initial title = "Command Prompt"
                   > Dynamically-set title = Isn't displayed [OPTIONAL]
                   > Cursor Shape = Underline
                   > Cursor blinks = Enabled
         > Appearance > Font = Consolas Regular 11px
                      > Allow bold text = Disabled
                      > Display menubar in new windows = Disabled
         > Colors > Presets = Fake10
— Thunar File Explorer —
Thunar > Preferences > Side Pane > Shortcuts Pane Icon Size = 16px
       > Toolbar > Disable Home
       > View > Location Selector = Buttons Style [OPTIONAL]
Run "xdg-user-dirs-update" to create user directories which use theme icons [OPTIONAL]
Bookmark the user directories (in order: Desktop, Documents, Downloads, Music, Pictures, Videos) [OPTIONAL]
— Firefox —
Firefox > Settings > Extensions & Themes > Dark or Light = Enabled (change it off System Theme)
        > Customize Toolbar > Title Bar = Enabled (for Qubes)
        > about:config > toolkit.legacyUserProfileCustomizations.stylesheets = true
                       > widget.gtk.overlay-scrollbars.enabled = false
                       > widget.non-native-theme.gtk.scrollbar.allow-buttons = true
                       > widget.non-native-theme.gtk.scrollbar.round-thumb = false
                       > widget.non-native-theme.scrollbar.style = 4
                       > widget.non-native-theme.scrollbar.size.override = 17
                       > layout.css.scrollbar-width-thin.disabled = true
Find your Firefox profile directory path in about:support and create subdirectory "chrome" inside it
Move userChrome.css from ./Firefox/<Light or Dark> Theme to the chrome directory you just made
— Final Touches —
Ristretto > View > Show Toolbar = Disabled
                 > Show Status Bar = Disabled
Desktop > Desktop Icons > Icon Size = 48px [OPTIONAL]
        > File/Launcher Icons > Disable Home, File System, and Devices [OPTIONAL]
Workspaces > Number of workspaces = 1 [OPTIONAL]
XFCE Screensaver > Lock Screen > User Switching = Disabled [OPTIONAL]
Customize desktop icon label colors and shadows based on your wallpaper near the bottom of Fake10/gtk-3.0/gtk.css [OPTIONAL]
Reboot system to fix fonts, scrollbars, and alignment
↑ Don’t forget to return back to the Qubes guide if you’ve made it this far! ↑
WINDOWS 10 ACCENT COLOR CODES (& QUBE COLORS)
If you really like this theme and/or are using it, please leave a comment or rate it on the download page. I worked hard on it and would love to hear your feedback!
If you have any questions you can ask them here. Have a nice day!