Hi,
I am posting instructions for installing Mullvad VPN as a wireguaofficial instructions
The following tutorial is tested and is mainly an update to the official instructions for creating a VPN.
The instructions have been revised and the whole thing has been successfully tested.
- Create a new qube:*
Click on the Qubes app menu and then Create Qubes VM.
- Name and label: MullvadVPN.
- Type: Qube based on a template (AppVM).
- Template: fedora-38 (or later).
- Networking: default (sys-firewall).
- Advanced: Check (enable) provides network.
- Click on OK.
- (example: in personal qube) Visit www Log in | Mullvad VPN
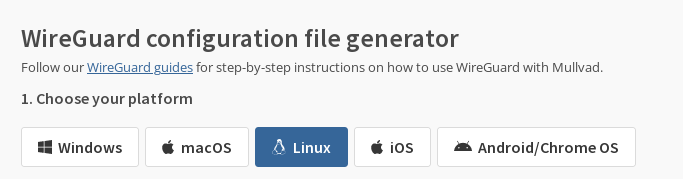
- check the option “Linux”:
- The server that our computer connects to (this is the server that the local ISP sees). This means that in this example, my computer will only connect to the Honk Kong server, while traffic from the Honk Kong server will be redirected to the Israeli server.
4.That is, I am connecting to Hong Kong, while the outgoing IP address is Israeli.*
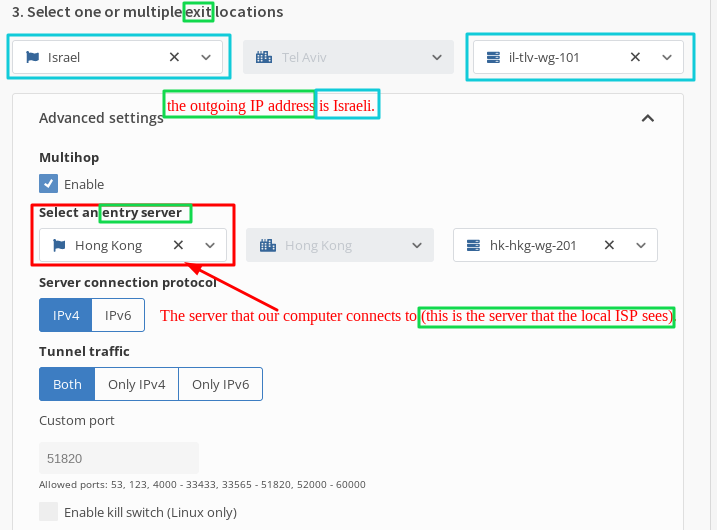
4.Check the “kill switch” option
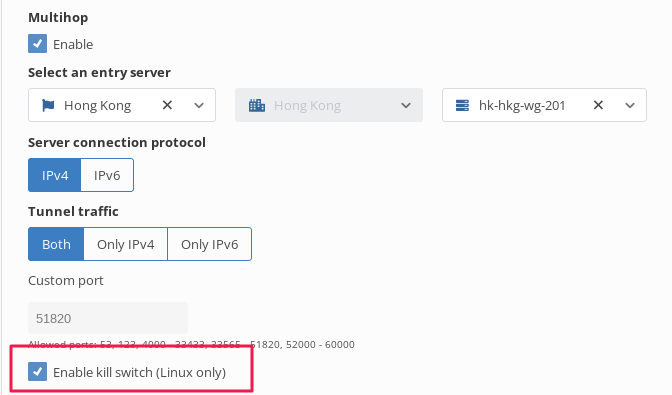
- (Optional) select the content to which mullvad should block access:
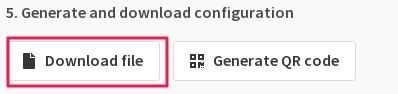
- Generate and download configuration.

Note: In the Qubes app menu, the newly created MullvadVPN AppVM qube will show up as “Service: MullvadVPN” and not “Qube: MullvadVPN” due to its “provides network” setting.
- Click on the Qubes app menu and go to your current AppVM and open Files.
- Open the Downloads folder and right click on the downloaded WireGuard file.
- Select Copy To Other AppVM… and then enter MullvadVPN as the Target and click on OK.
8. Install WireGuard
We will install WireGuard in the Fedora-38 template so your MullvadVPN ProxyVM can use that.
- Click on the Qubes app menu and go to Template: fedora-38 and open the Terminal.
- In the Terminal run the command
sudo dnf install wireguard-tools -y- Shut down the VM with the command
sudo shutdown -h now- Shutdown and Start the MullvadVPN so that wireguard-tools are added to it.
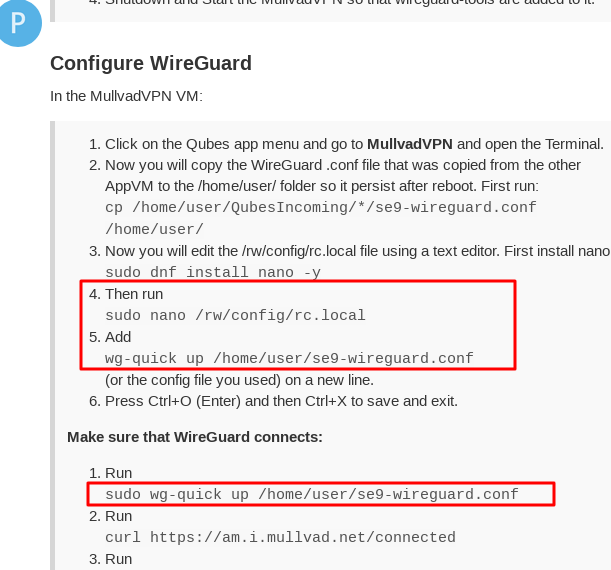
Configure WireGuard
In the MullvadVPN VM:
- Click on the Qubes app menu and go to MullvadVPN and open the Terminal.
- Now you will copy the WireGuard .conf file that was copied from the other AppVM to the /home/user/ folder so it persist after reboot. First run:
cp /home/user/QubesIncoming/*/se9-wireguard.conf /home/user/- Now you will edit the /rw/config/rc.local file using a text editor. First install nano:
sudo dnf install nano -y- Then run
sudo nano /rw/config/rc.local- Add
wg-quick up /home/user/se9-wireguard.conf
(or the config file you used) on a new line.- Press Ctrl+O (Enter) and then Ctrl+X to save and exit.
Make sure that WireGuard connects:
- Run
sudo wg-quick up /home/user/se9-wireguard.conf- Run
curl https://am.i.mullvad.net/connected- Run
sudo wg
and check for a WireGuard network interface and a peer handshake.
Add DNS hijacking rules
Now we will add firewall rules to redirect DNS requests to 10.64.0.1 (the DNS on the VPN server) for all AppVMs that use the MullvadVPN ProxyVM.
Make sure that you have started an AppVM that has the Networking set to MullvadVPN, otherwise the “vif” IP address will not be visible.
Still in the MullvadVPN Terminal:
- To find out your MullvadVPN_local_IP address, run
ip a | grep eth0 - Edit the firewall user file with nano:
sudo nano /rw/config/qubes-firewall-user-script - Copy and paste the following in the bottom.
4.Only Replace*10.137.0.47
with your own MullvadVPN_local_IP IP address:
**# replace 10.137.0.47 with the IP address of your vif* interface**
virtualif=10.137.0.47
vpndns1=10.64.0.1
iptables -F OUTPUT
iptables -I FORWARD -o eth0 -j DROP
iptables -I FORWARD -i eth0 -j DROP
iptables -A FORWARD -p tcp --tcp-flags SYN,RST SYN -j TCPMSS  --clamp-mss-to-pmtu
iptables -F PR-QBS -t nat
iptables -A PR-QBS -t nat -d $virtualif -p udp --dport 53 -j DNAT --to $vpndns1
iptables -A PR-QBS -t nat -d $virtualif -p tcp --dport 53 -j DNAT --to $vpndns1
- Press Ctrl+O (Enter) and then Ctrl+X to save and exit.
Set the Networking
- Click on the Qubes app menu and go to System Tools > Qube Manager.
- Select the AppVM that you want to use with the MullvadVPN ProxyVM and click on the Stop button in the toolbar to shut it down.
- Right click on the same AppVM and then select Qube settings.
- On the Basic tab, click on the Networking drop-down list and select MullvadVPN.
- Click on OK.
- Click on the Start button in the toolbar to start the AppVM again.
Warning
Kill-switch works only when a Wireguard connection is established.
When VM:Mullvad VPN is started before Wifi traffic is established, wireguard will not be automatically set up.
The solution is to create a VPN setup button in the Dom0 panel.
- Point the mouse cursor at the Dom0 panel, then press the right mouse button and select the option
panel → panel preferences - in the “Items” tab, press the plus icon, and then press twice on the “launcher” item
- in the launcher settings, place the pointer in the “Command” field and enter the following command:
qvm-run --pass-io MullvadVPN 'sudo wg-quick up /home/user/config.conf'
Remember to replace the name of the “config.conf” file with the name of the wireguard configuration file downloaded from the mullvad website.
Check the option “Run in terminal” and press “save”. From now on, every time you press the icon, it will trigger an attempt to connect to the tunnel.
Preventing leaks in the browser
- Run the firefox browser on the AppVM connected to the MullvadVPN network
- Go to the website Download Extension |Mullvad VPN
- press the “Install” button, and then accept the request to install the browser add-on.
- when you see the mullvad icon on the firefox icon bar, then press on it and select “Connect Proxy” option.
- the Proxy will only work if the Mullvad tunnel is running. When the VPN connection is not established for some reason, the browser will stop allowing traffic to pass through to the Internet (that’s because the proxy is only reachable on the MullvadVPN network by the local mullvad server address)