Run VMs in Proxmox in QubesOS (Crashes)

Context

I need to learn some stuff about Proxmox, as I like to do everything with QubesOS, the purpose of this post, is to try to make it work to run VMs in Proxmox in QubesOS.

As I couldn’t find much information on internet about virtualization in a VM of QubesOS, as some are outdated and does not work anymore. And as Information about Proxmox in QubesOS is almost nonexistent. In this post, you will see every step I did and try so you can do it too. What worked so far for me and what didn’t as of now to be able to run VMs in Proxmox in QubesOS.

(Yes doing that is not stable, and crompromise security)

ProxmoxQubesOS.drawio

This post is about :

  • Create a new Qubes/VM for Proxmox
  • Enable virtualization for Proxmox Qubes/VM in QubesOS/Xen
  • Install Proxmox on that Qubes/VM
  • Access the Web Interface of Proxmox from another VM/Qubes with a Browser.

Can’t make it work for now

  • Run a VM in proxmox that will not crash

Versions as of now (25-03-2022)

Qubes release 4.1.2 (R4.1)
Xen: 4.14.5
Kernel: 5.15.94-1
Proxmox: 7.4-1

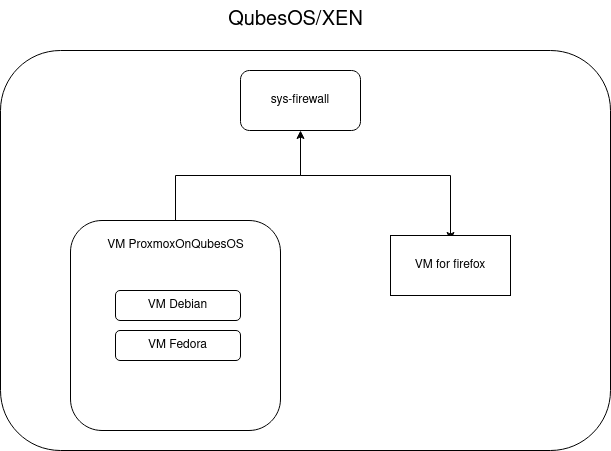
How everything works ?

QubesOS is based on Xen
Xen allow to enable virtualization inside a VM/Qubes.
To be able to use virtualization on a VM/Qubes, everything is about libvirt and his config file

In order of increasing precedence: the main template, from which the config is generated is /usr/share/qubes/templates/libvirt/xen.xml). The distributor may put a file at /usr/share/qubes/templates/libvirt/xen-dist.xml) to override this file. User may put a file at either /etc/qubes/templates/libvirt/xen-user.xml or /etc/qubes/templates/libvirt/xen/by-name/<name>.xml, where <name> is full name of the domain. Wildcards are not supported but symlinks are.

Jinja has a concept of template names, which basically is the path below some load point, which in Qubes’ case is /etc/qubes/templates and /usr/share/qubes/templates. Thus names of those templates are respectively 'libvirt/xen.xml', 'libvirt/xen-dist.xml', 'libvirt/xen-user.xml' and 'libvirt/xen/by-name/<name>.xml'. This will be important later.

From here

From here

Create a new Qubes/VM for Proxmox

To install Proxmox, you need to create a new template.
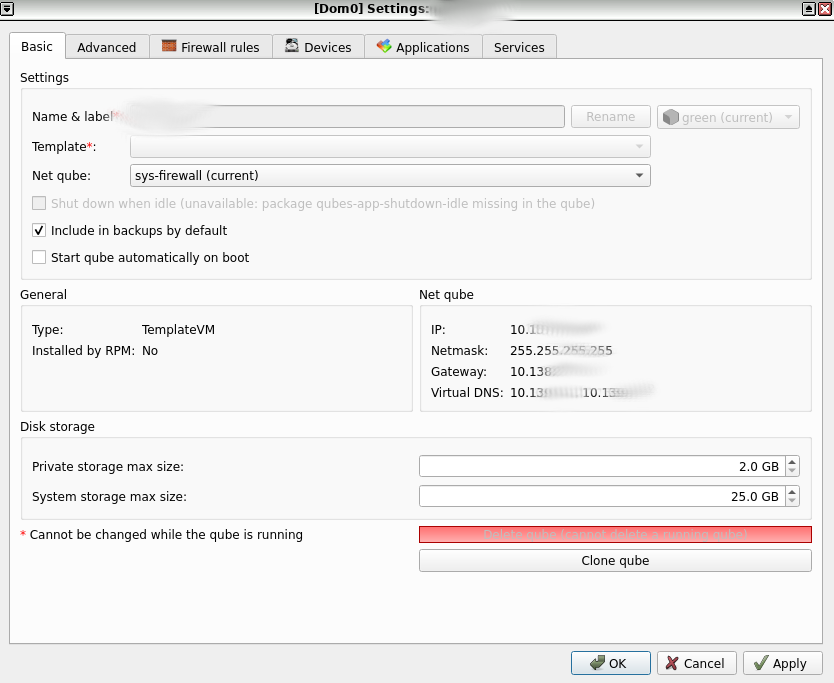
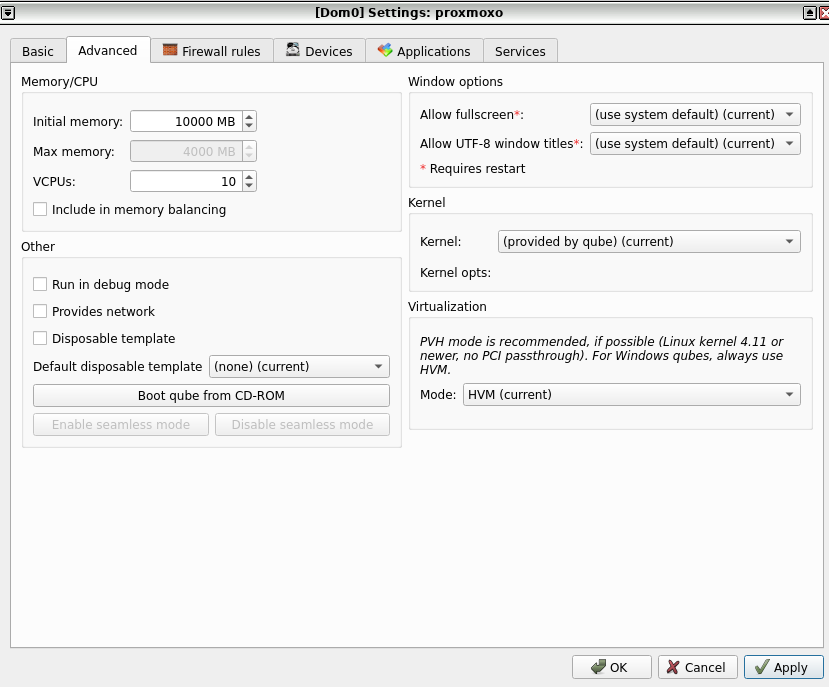
The settings of the template should be the following :

Kernel : (Provived by qube)
Mode : HVM
Disable ‘Include in memory balancing’

And add more Storage, RAM and VCPUs as Proxmox will not work otherwise

And let’s name this template/VM/Qubes with ProxmoxOnQubesOS


Enable virtualization for Proxmox Qubes/VM in QubesOS/Xen

The config file about libvirt are in Dom0, so open the Dom0 terminal.

First, do a backup of /usr/share/qubes/templates/libvirt/xen.xml with

cp /usr/share/qubes/templates/libvirt/xen.xml /usr/share/qubes/templates/libvirt/xen.xml.save

By default, the file /usr/share/qubes/templates/libvirt/xen.xml will be the following

...
<cpu mode='host-passthrough'>
            <!-- disable nested HVM -->
            <feature name='vmx' policy='disable'/>
            <feature name='svm' policy='disable'/>
            {% if vm.app.host.cpu_family_model in [(6, 58), (6, 62)] -%}
                <feature name='rdrand' policy='disable'/>
            {% endif -%}
            <!-- let the guest know the TSC is safe to use (no migration) -->
            <feature name='invtsc' policy='require'/>
</cpu>
...

You need to comment out vmx and svm line, it will be like that after

...
<cpu mode='host-passthrough'>
            <!-- disable nested HVM -->
            <!-- <feature name='vmx' policy='disable'/>
            <feature name='svm' policy='disable'/>-->
            {% if vm.app.host.cpu_family_model in [(6, 58), (6, 62)] -%}
                <feature name='rdrand' policy='disable'/>
            {% endif -%}
            <!-- let the guest know the TSC is safe to use (no migration) -->
            <feature name='invtsc' policy='require'/>
</cpu>
...

By default, the directory are not created (‘by-name’ is NOT a variable, do NOT change it) :

mkdir -p /etc/qubes/templates/libvirt/xen/by-name/

Create the following file :

touch /etc/qubes/templates/libvirt/xen/by-name/NameVM.xml

If the name of your template/VM/Qubes on QubeOS that will run Proxmox is ProxmoxOnQubesOS then :

touch /etc/qubes/templates/libvirt/xen/by-name/ProxmoxOnQubesOS.xml

Edit the file with :

nano /etc/qubes/templates/libvirt/xen/by-name/ProxmoxOnQubesOS.xml

{% extends 'libvirt/xen.xml' %}
{% block cpu %}
    <cpu mode='host-passthrough'>
        <feature name='vmx' policy='require'/>
        <feature name='svm' policy='require'/>
        <!-- disable SMAP inside VM, because of Linux bug -->
        <feature name='smap' policy='disable'/>
    </cpu>
{% endblock %}
{% block features %}
    <pae/>
    <acpi/>
    <apic/>
    <viridian/>
    <hap/> <!-- enable Hardware Assisted Paging -->
    <!-- <nestedvm/> -->
{% endblock %}

How to check if it worked ? you can see it with :

wirsh dumpxml ProxmoxOnQubesOS

For reference you can see mine if necessary

<domain type='xen' id='39'>
  <name>ProxmoxOnQubesOS</name>
  <uuid>.........</uuid>
  <memory unit='KiB'>10240000</memory>
  <currentMemory unit='KiB'>10240000</currentMemory>
  <vcpu placement='static'>10</vcpu>
  <os>
    <type arch='x86_64' machine='xenfv'>hvm</type>
    <loader type='rom'>hvmloader</loader>
    <boot dev='cdrom'/>
    <boot dev='hd'/>
  </os>
  <features>
    <acpi/>
    <apic/>
    <pae/>
    <hap state='on'/>
    <viridian/>
  </features>
  <cpu mode='host-passthrough'>
    <feature policy='require' name='vmx'/>
    <feature policy='require' name='svm'/>
    <feature policy='disable' name='smap'/>
  </cpu>
  <clock offset='variable' adjustment='0' basis='utc'/>
  <on_poweroff>destroy</on_poweroff>
  <on_reboot>destroy</on_reboot>
  <on_crash>destroy</on_crash>
  <devices>
    <emulator type='stubdom-linux' cmdline='-qubes-net:client_ip=10.XXX.XX.XX,dns_0=10.XXX.XX.XX,dns_1=10.XXX.XX.XX,gw=10.XXX.XX.XX,netmask=255.255.255.255'/>
    <disk type='block' device='disk'>
      <driver name='phy' type='raw'/>
      <source dev='/dev/qubes_dom0/vm-proxmoxo-root-snap'/>
      <target dev='xvda' bus='xen'/>
    </disk>
    <disk type='block' device='disk'>
      <driver name='phy' type='raw'/>
      <source dev='/dev/qubes_dom0/vm-proxmoxo-private-snap'/>
      <target dev='xvdb' bus='xen'/>
    </disk>
    <disk type='block' device='disk'>
      <driver name='phy' type='raw'/>
      <source dev='/dev/qubes_dom0/vm-proxmoxo-volatile'/>
      <target dev='xvdc' bus='xen'/>
    </disk>
    <controller type='xenbus' index='0'/>
    <interface type='ethernet'>
      <mac address='00:16:3e:5e:6c:00'/>
      <ip address='10.XXX.XX.XX' family='ipv4'/>
      <script path='vif-route-qubes'/>
      <backenddomain name='sys-firewall'/>
      <target dev='vif39.0-emu'/>
    </interface>
    <console type='pty' tty='/dev/pts/13'>
      <source path='/dev/pts/13'/>
      <target type='xen' port='0'/>
    </console>
    <input type='tablet' bus='usb'/>
    <input type='mouse' bus='ps2'/>
    <input type='keyboard' bus='ps2'/>
    <graphics type='qubes' log_level='0'/>
    <video>
      <model type='vga' vram='16384' heads='1' primary='yes'/>
    </video>
    <memballoon model='xen'/>
  </devices>
</domain>

What is vmx and svm ?

Svm: AVM-V support information

Vmx: Intel-VT technology support information


Enable or require ?

I saw in some post that they used enable instead of require but that didn’t worked for me using enable

<feature policy='enable' name='vmx'/>
<feature policy='enable' name='svm'/>


To Copie Paste this file to dom0, in the Dom0 terminal do : (More here)

qvm-run --pass-io VMwithInternet ‘cat /home/user/ProxmoxOnQubesOS.xml’ > /etc/qubes/templates/libvirt/xen/by-name/ProxmoxOnQubesOS.xml

What I saw on Internet but didn't work for me with libvirt

I saw different way to do it on Internet, one is to edit this file directly to change the value.

nano /etc/libvirt/libxl/ProxmoxOnQubesOS.xml

But you may see the following message on top of the file

<!--
WARNING: THIS IS AN AUTO-GENERATED FILE. CHANGES TO IT ARE LIKELY TO BE
OVERWRITTEN AND LOST. Changes to this xml configuration should be made using:
  virsh edit ProxmoxOnQubesOS
or other application using the libvirt API.
-->

So it’s better to use the following command :

virsh edit ProxmoxOnQubesOS

But using this method will either :

  • show this error
error: XML document failed to validate against schema: Unable to validate doc against /usr/share/libvirt/schemas/domain.rng
Error validating value 
Extra element os in interleave
Element domain failed to validate content

Failed. Try again? [y,n,i,f,?]:
  • Or doesnt show any arror, will apply the modification in the file, but as soon as I start the ProxmoxOnQubesOS, the modification are not there anymore.
    As I can see it with wirsh dumpxml ProxmoxOnQubesOS or virsh edit ProxmoxOnQubesOS

Installing Proxmox

Download lastest ISO of Proxmox.
In the settings of your ProxmoxOnQubesOs VM, click on “boot from CD-ROM” and choose the ISO.
When the ProxmoxOnQubesOS start, you shouldn’t see that

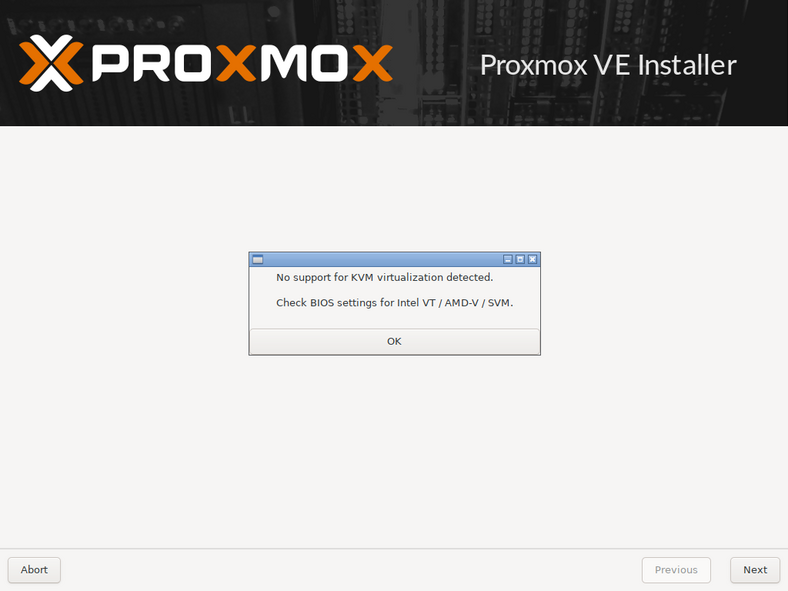
No Support for KVM virtualization detected.
Check BIOS settings for intel VT / AMD-V / SVM.

If it’s the case then something is wrong with libvirt and his config file.

If you don’t then you can keep going the installation, It will ask several things, including some network information (IP address, netmask …)
You have to put the one that was generated by QubesOS. To know that you just can see in the settings of your Qubes.

Once it’s installed, you can start it.

Network configuration

You should have another Qubes in which you will with a browser access to the Proxmox web interface. That other Qubes should be connected to the same net Qubes that the Proxmox one, for exemple here sys-firewall.

if it’s sys-firewall, then in sys-firewall, terminal :

sudo iptables -I FORWARD 2 -s <IP address of A> -d <IP address of B> -j ACCEPT

sudo iptables -I FORWARD 2 -s IP_VM_browser -d IP_of_ProxmoxOnQubesOS -j ACCEPT

More here

Once it’s done, go in the browser and your Proxmox web acces

https://ipOfYourProxmoxOnQubesOS:8006/

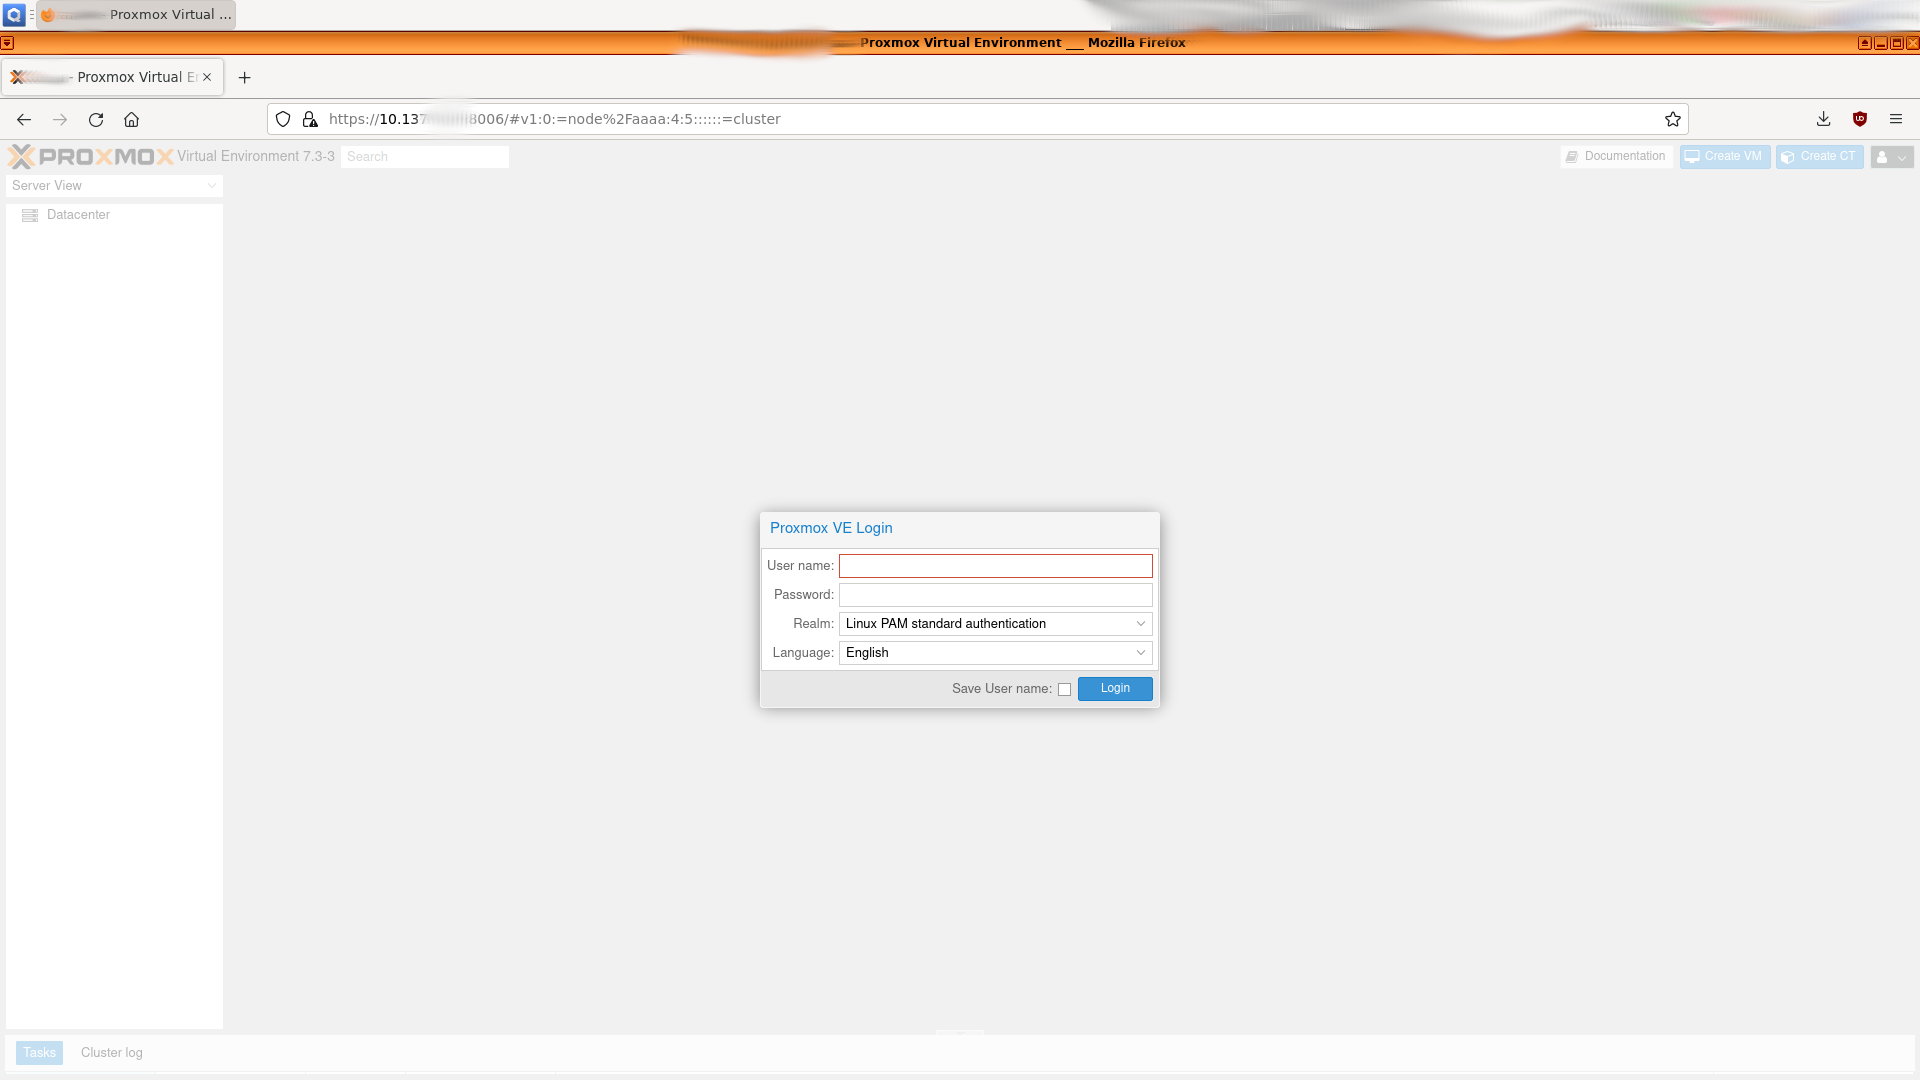
Check if virtualization if enable in Proxmox

Method 1 : In ProxmoxOnQubesOS terminal you can do (more here) :

lscpu|grep Virtualization

egrep “svm|vmx” /proc/cpuinfo

Method 2 : orr you can do this (more here)

- -for Intel --
$ cat /proc/cpuinfo | grep -c vmx
64

-- or for AMD --

$ cat /proc/cpuinfo | grep -c svm
16

Method 3 : Or you can do that (from here) :

sudo apt update
sudo apt-get install cpu-checker
sudo kvm-ok

You should have that :

INFO: /dev/kvm exists
KVM acceleration can be used

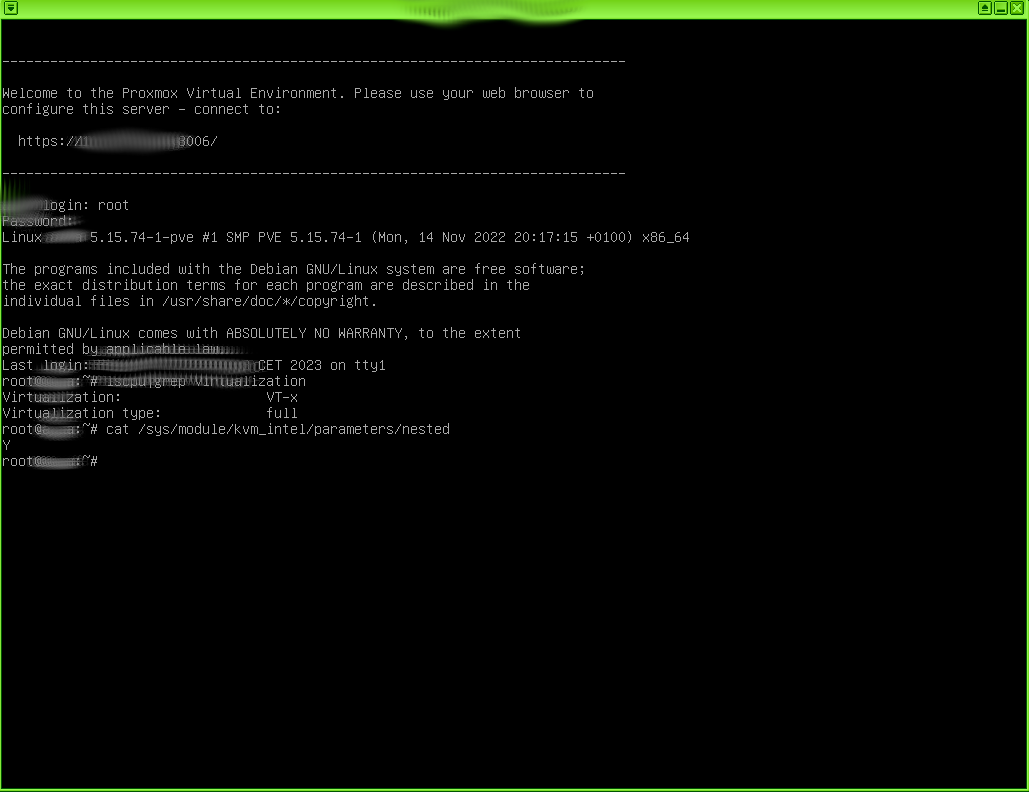
Method 4 : Saw it from this post

In Proxmox terminal I checked and it was already on by for me

cat /sys/module/kvm_intel/parameters/nested   
Y

Method 5 : Or you can do that (from here)

sudo apt update
sudo apt install libvirt-clients
virt-host-validate

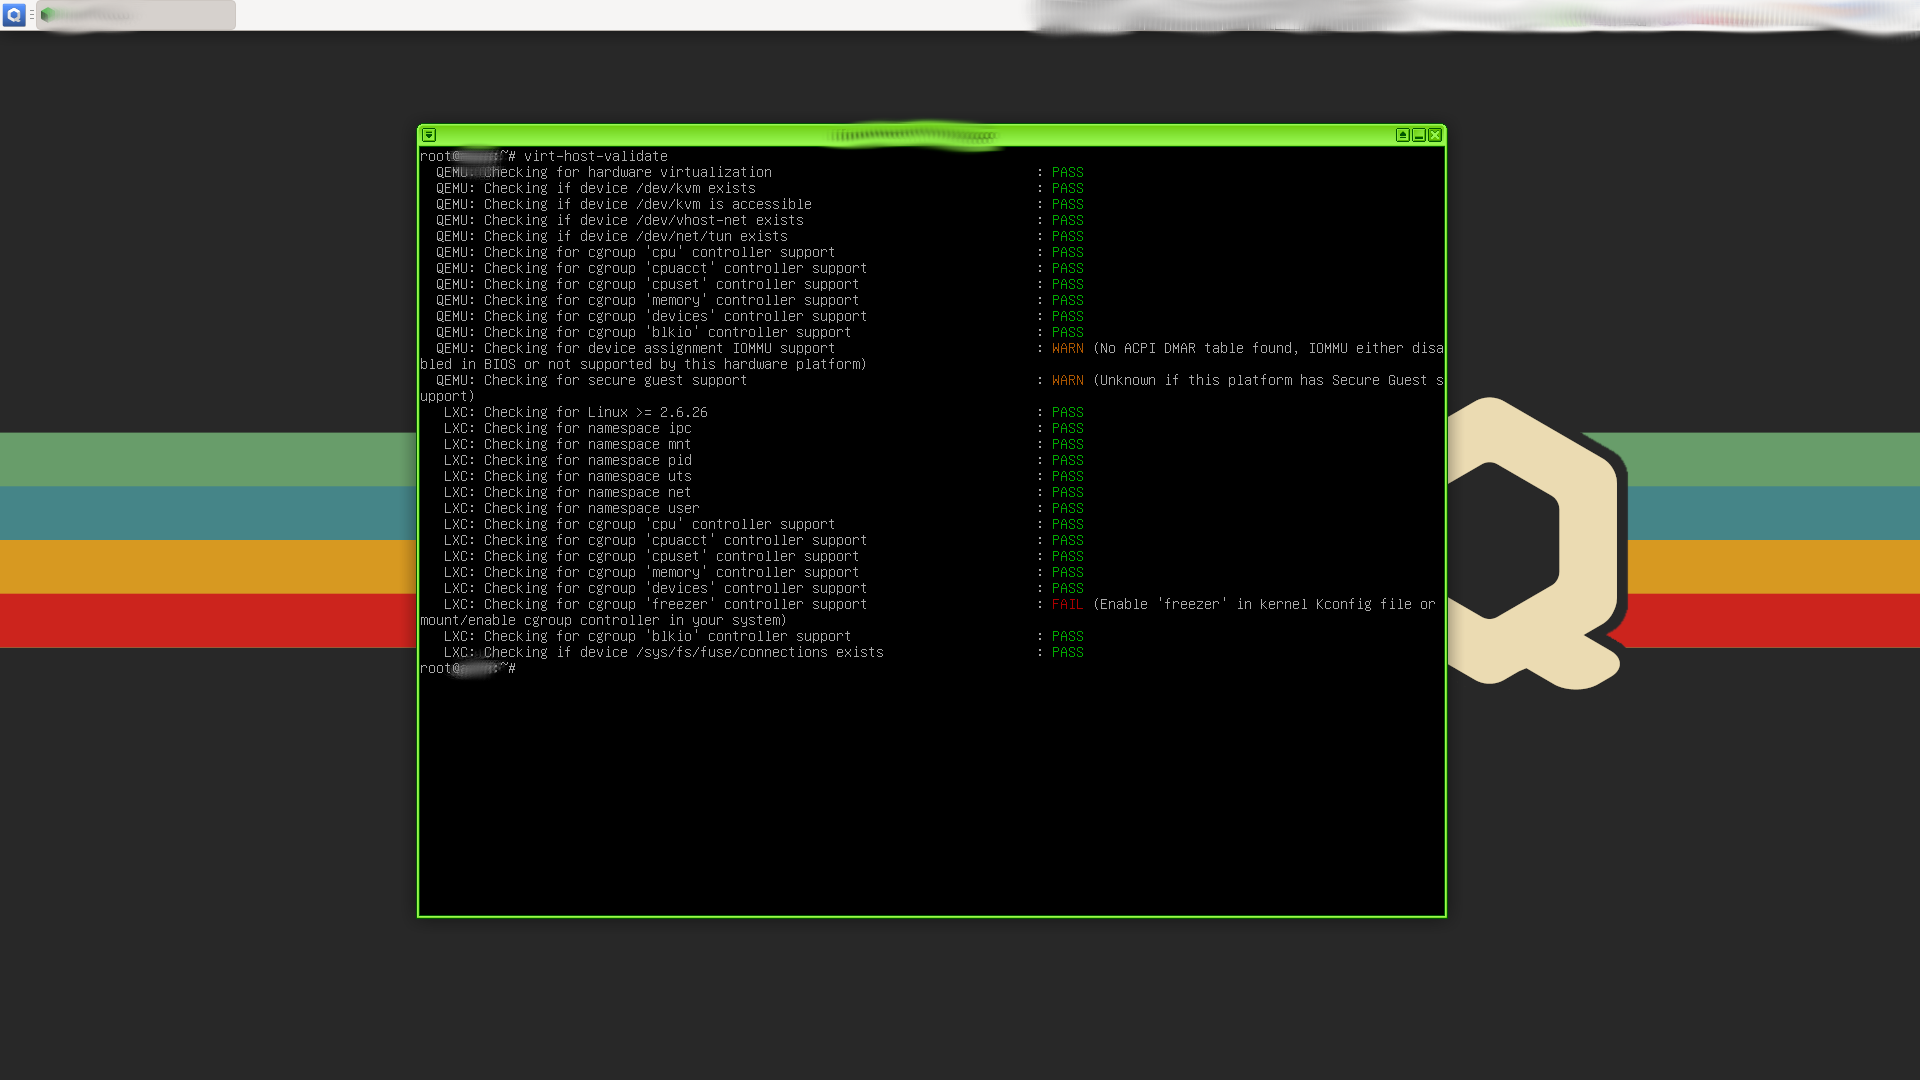
But I have the following error :


 QEMU: Checking for device assignment IOMMU : WARN (No ACPI DMAR table found, IOMMU either disabled in BIOS or not supported by this hardware platform)

 QEMU: Checking for secure guest : WARN (Unknown if this platform has Secure Guest support)

 LXC: Checking for cgroup 'freezer' controller : FAIL (Enable 'freezer' in kernel Kconfig file or mount/enable cgroup controller in your system)
Full output

root@ProxmoxOnQubesOS:~# virt-host-validate
QEMU: Checking for hardware virtualization : PASS
QEMU: Checking if device /dev/kvm exists : PASS
QEMU: Checking if device /dev/kvm is accessible : PASS
QEMU: Checking if device /dev/vhost-net exists : PASS
QEMU: Checking if device /dev/net/tun exists : PASS
QEMU: Checking for cgroup ‘cpu’ controller support : PASS
QEMU: Checking for cgroup ‘cpuacct’ controller support : PASS
QEMU: Checking for cgroup ‘cpuset’ controller support : PASS
QEMU: Checking for cgroup ‘memory’ controller support : PASS
QEMU: Checking for cgroup ‘devices’ controller support : PASS
QEMU: Checking for cgroup ‘blkio’ controller support : PASS
QEMU: Checking for device assignment IOMMU support : WARN (No ACPI DMAR table found, IOMMU either disabled in BIOS or not supported by this hardware platform)
QEMU: Checking for secure guest support : WARN (Unknown if this platform has Secure Guest support)
LXC: Checking for Linux >= 2.6.26 : PASS
LXC: Checking for namespace ipc : PASS
LXC: Checking for namespace mnt : PASS
LXC: Checking for namespace pid : PASS
LXC: Checking for namespace uts : PASS
LXC: Checking for namespace net : PASS
LXC: Checking for namespace user : PASS
LXC: Checking for cgroup ‘cpu’ controller support : PASS
LXC: Checking for cgroup ‘cpuacct’ controller support : PASS
LXC: Checking for cgroup ‘cpuset’ controller support : PASS
LXC: Checking for cgroup ‘memory’ controller support : PASS
LXC: Checking for cgroup ‘devices’ controller support : PASS
LXC: Checking for cgroup ‘freezer’ controller support : FAIL (Enable ‘freezer’ in kernel Kconfig file or mount/enable cgroup controller in your system)
LXC: Checking for cgroup ‘blkio’ controller support : PASS
LXC: Checking if device /sys/fs/fuse/connections exists : PASS

Method 6 (from here) :

modinfo kvm_intel | grep -i nested

you should have :


parm:           nested_early_check:bool
parm:           nested:bool

Link that can help ?

Proxmox VE inside VirtualBox - Proxmox VE
Proxmox Nested Virtualization Tutorial- Harvester/ESXI · GitHub

Create and use a VM in Proxmox (CAN’T MAKE IT WORK FOR NOW, NEED YOUR HELP)

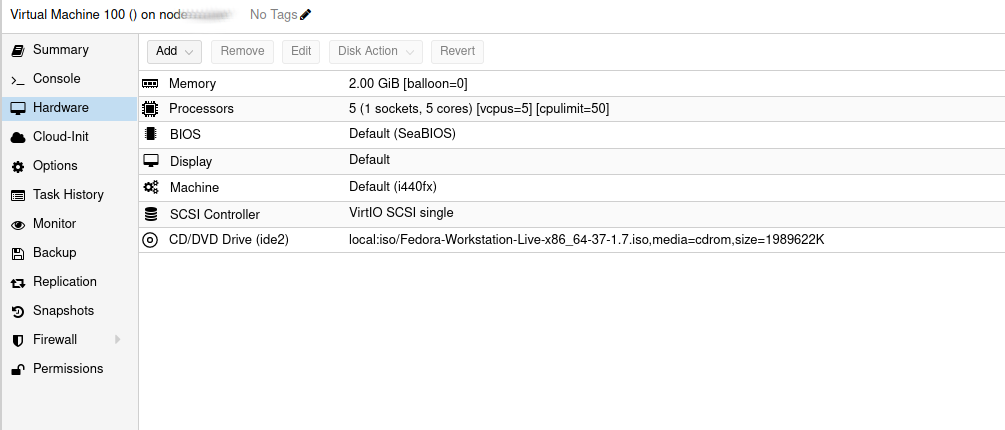
As you can see, I created two VM in proxmox. One for Debian 11 and another one for Fedora 37.
For both of them, I can start them, have the install screen of Debian 11 ISO and Fedora 37 ISO.

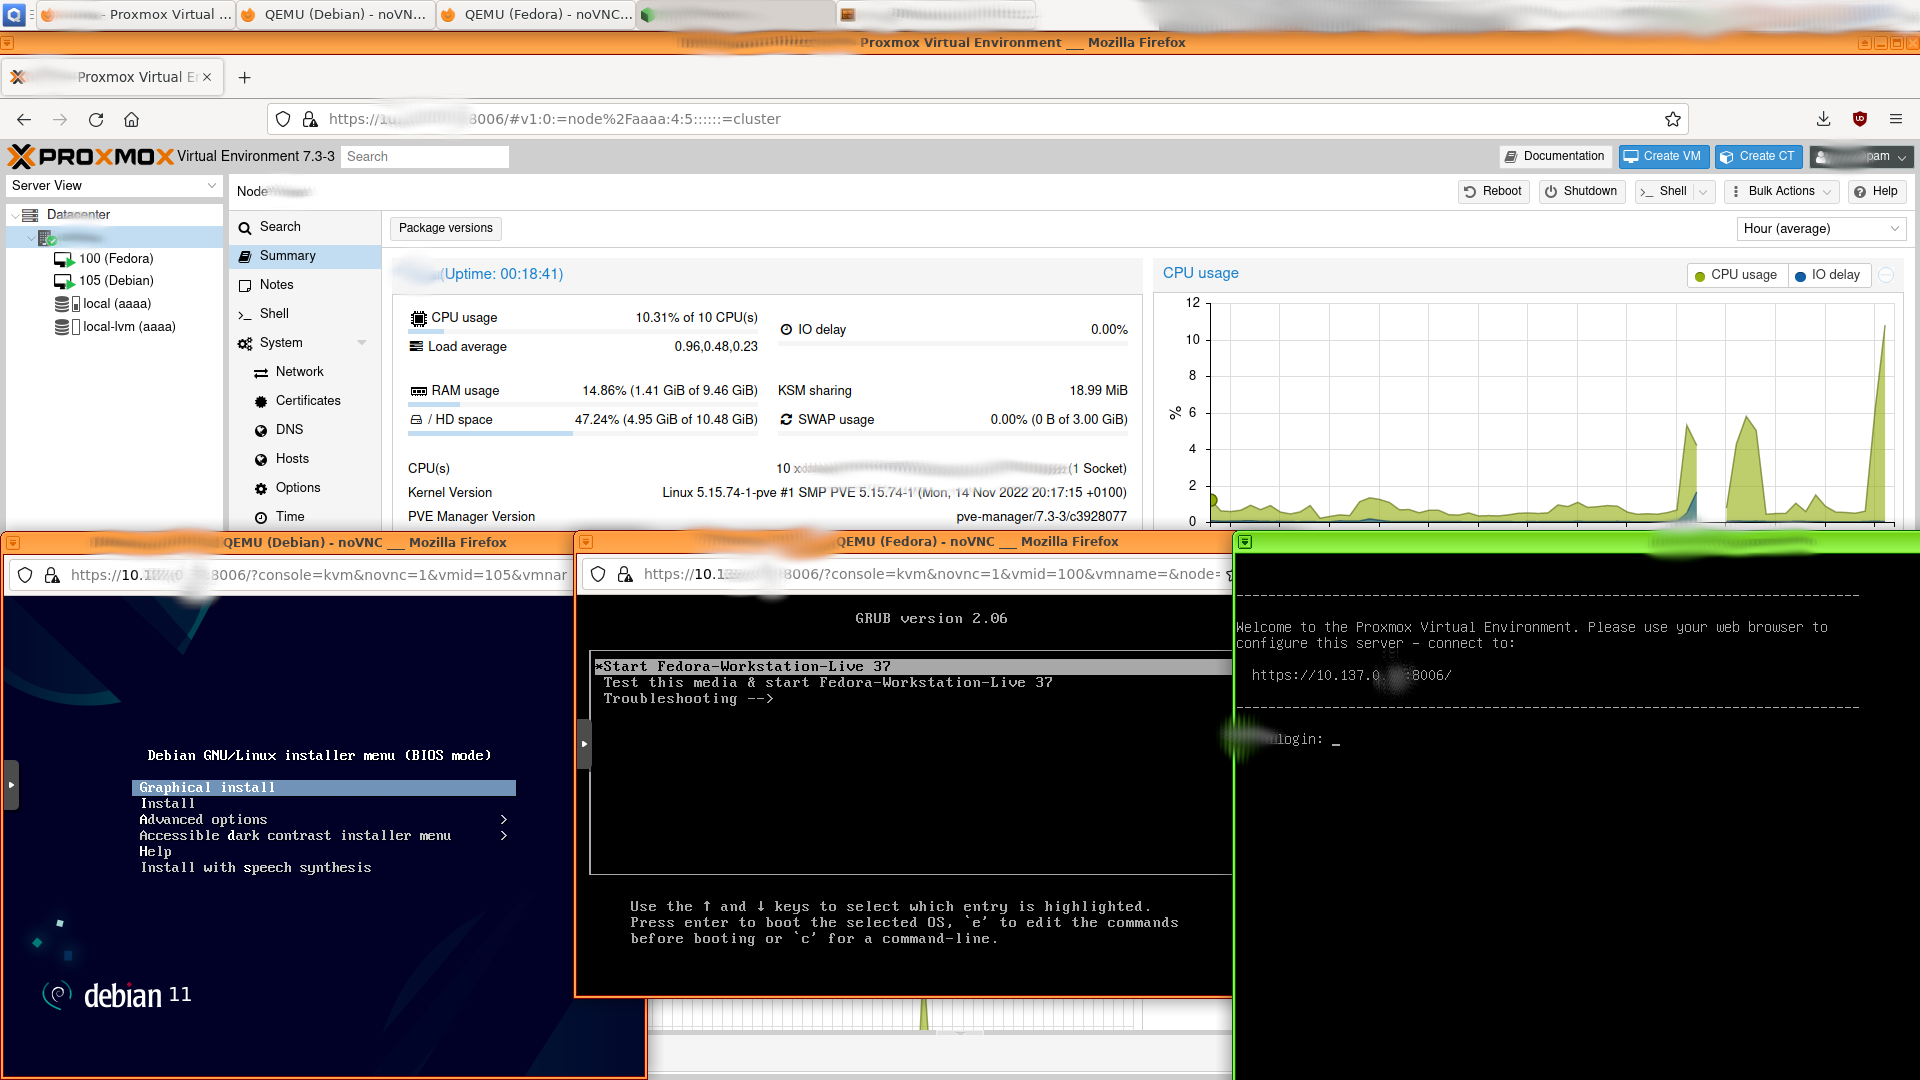
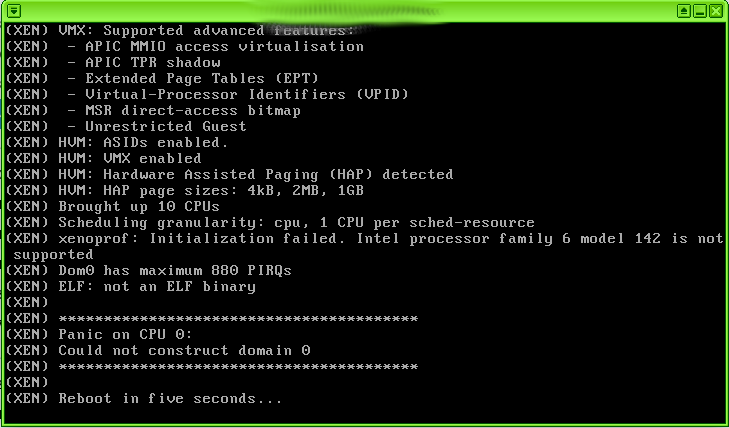
But if press enter in the grub to install Debian 11 pr Fedora 37, the Qubes ProxmoxOnQubesOS itself, not just VM of Debian or fedora, stop suddenly several seconds after.

I even try to run Proxmox 7.4.1 inside ProxmoxOnQubesOS, but same crash.

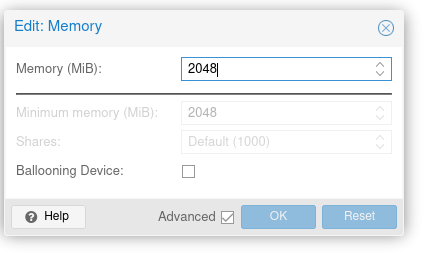
I create Debian and Fedora with the following settings, and tried different one but nothing worked so far
For Memory settings you need to click on advanced and disable ‘Ballooning Device’

Memory_Ballooning_Device_Disable

ISOs I tried for far :
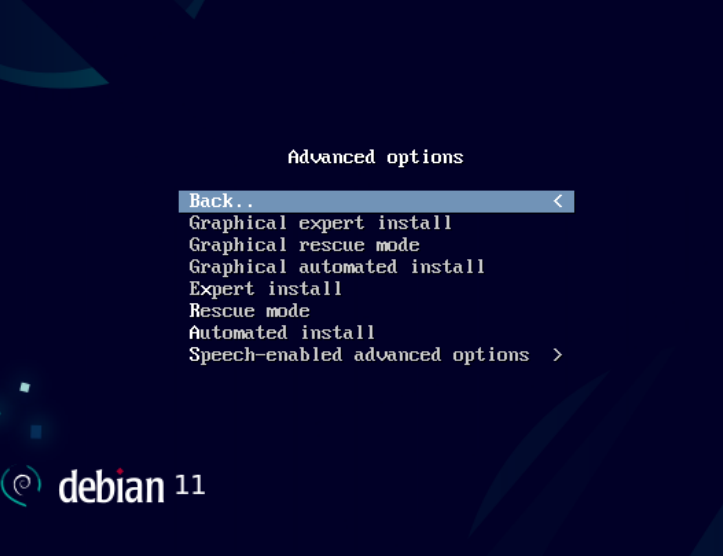
Debian 11 :x:
Debian 11 minimal :x:
Fedora 34 :x:
Proxmox 7.4-1 :x:
Ubuntu 22.10 (desktop-amd64) :x:
Ubuntu 22.10 (core-amd64) will try
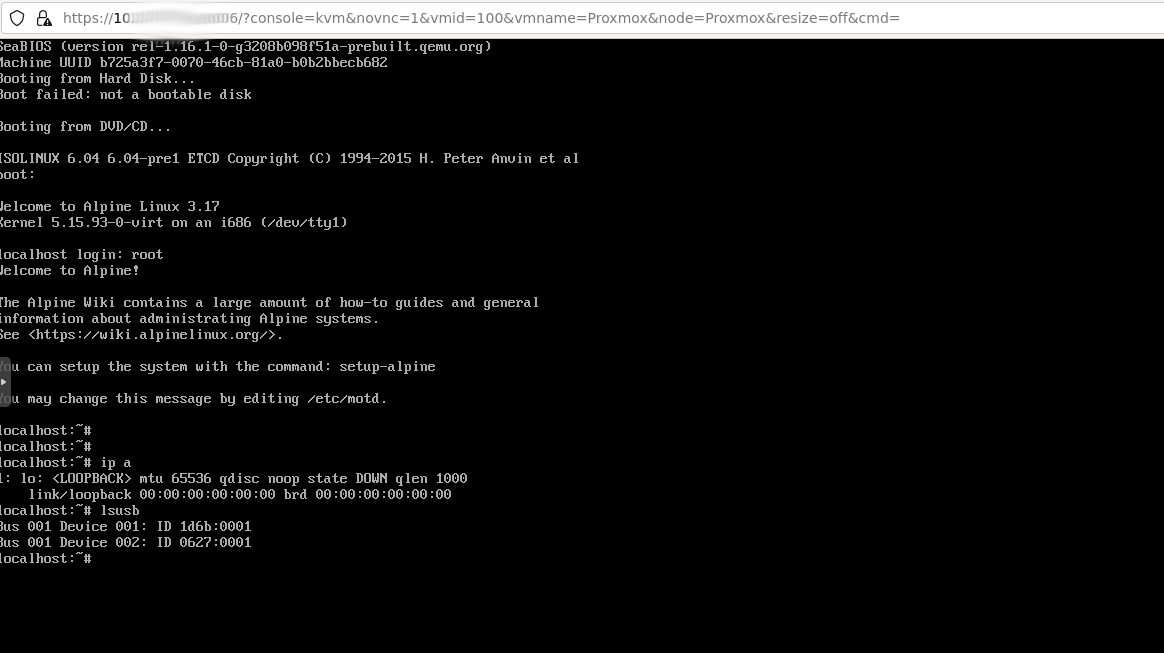
Alpine (virt-3.17.2-x86) :white_check_mark:
Alpine (standard-3.17.2-x86) :white_check_mark:
(Tried and worked with CPU type host and kvm64 for Alpine)

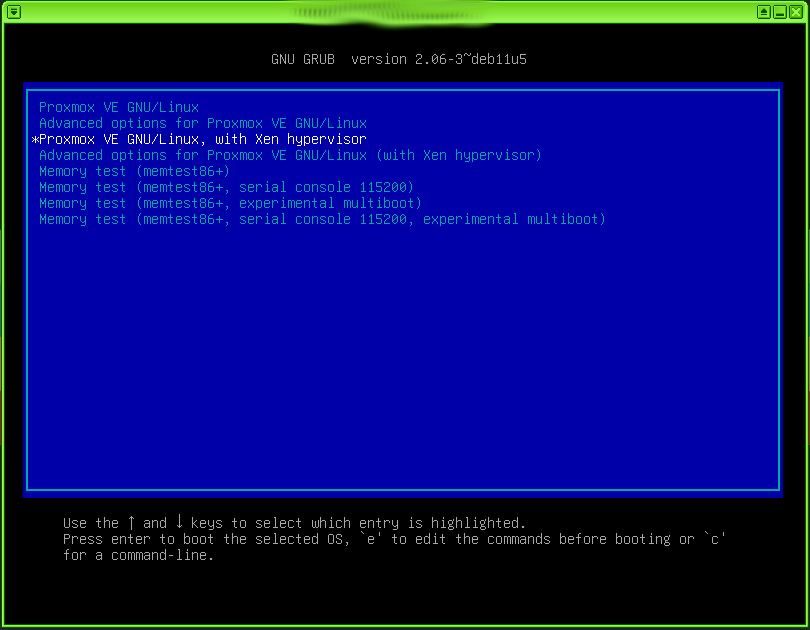
Could it be because of the grub settings of Debian 11 and Fedora 34 ?
Could it be because of the VM hardware configuration in Proxmox of Debian 11 and Fedora 34 ?

If you have ideas to share or information, please do :slight_smile:

Logs and information about the crash so far

(But the logs doesnt help at all on what happen)

The CPU doesnt go up it stays around 0 and 5%

On dom0, in the folder

cat /var/log/xen/console/guest-proxmox-dm.log nothing appear

/var/log/qubes/qrexec.proxmox.log

domain dead
2023-03-17 11:43:02.855 qrexec-daemon[57789]: qrexec-daemon.c:340:init: cannot connect to qrexec agent: No such file or directory

/var/log/qubes/guid.proxmox.log

Icon size: 128x128
domain dead
Failed to connect to gui-agent

On ProxmoxOnQubesOs


Mar 17 11:42:02 ProxmoxOnQubesOS pmxcfs[838]: [status] notice: RRD update error /var/lib/rrdcached/db/pve2-vm/102: mmaping file '/var/lib/rrdcached/db/pve2-vm/102': Invalid argument
Mar 17 11:42:12 ProxmoxOnQubesOS rrdcached[819]: handle_request_update: Could not read RRD file.
Mar 17 11:42:12 ProxmoxOnQubesOS pmxcfs[838]: [status] notice: RRDC update error /var/lib/rrdcached/db/pve2-vm/102: -1
Mar 17 11:42:12 ProxmoxOnQubesOS pmxcfs[838]: [status] notice: RRD update error /var/lib/rrdcached/db/pve2-vm/102: mmaping file '/var/lib/rrdcached/db/pve2-vm/102': Invalid argument
Mar 17 11:42:22 ProxmoxOnQubesOS rrdcached[819]: handle_request_update: Could not read RRD file.
Mar 17 11:42:22 ProxmoxOnQubesOS pmxcfs[838]: [status] notice: RRDC update error /var/lib/rrdcached/db/pve2-vm/102: -1
Mar 17 11:42:22 ProxmoxOnQubesOS pmxcfs[838]: [status] notice: RRD update error /var/lib/rrdcached/db/pve2-vm/102: mmaping file '/var/lib/rrdcached/db/pve2-vm/102': Invalid argument
Mar 17 11:42:32 ProxmoxOnQubesOS rrdcached[819]: handle_request_update: Could not read RRD file.
Mar 17 11:42:32 ProxmoxOnQubesOS pmxcfs[838]: [status] notice: RRDC update error /var/lib/rrdcached/db/pve2-vm/102: -1
Mar 17 11:42:32 ProxmoxOnQubesOS pmxcfs[838]: [status] notice: RRD update error /var/lib/rrdcached/db/pve2-vm/102: mmaping file '/var/lib/rrdcached/db/pve2-vm/102': Invalid argument
Mar 17 11:42:42 ProxmoxOnQubesOS rrdcached[819]: handle_request_update: Could not read RRD file.
Mar 17 11:42:42 ProxmoxOnQubesOS pmxcfs[838]: [status] notice: RRDC update error /var/lib/rrdcached/db/pve2-vm/102: -1
Mar 17 11:42:42 ProxmoxOnQubesOS pmxcfs[838]: [status] notice: RRD update error /var/lib/rrdcached/db/pve2-vm/102: mmaping file '/var/lib/rrdcached/db/pve2-vm/102': Invalid argument
Mar 17 11:42:52 ProxmoxOnQubesOS rrdcached[819]: handle_request_update: Could not read RRD file.
-- Reboot --
2 Likes

Hey, good to read another nested virt post !
I’ve done it successfully-ish, but the other way around : Qubes as a domU on a vanilla Xen dom0 (Debian).
So I managed Xen-on-Xen, whereas you do KVM-on-Xen, so my advice may not apply to you.
I’ve seen you’ve liked/read my posts about nested virtualization, did it help ?

I remember “hap=1” and “nestedhvm=1” are REQUIRED in the L1-dom0 (your proxmoxonqubes) config file (this is Xen syntax, adapt).
In your quoted text you did not enable nestedhvm in the xen-by name xml.
The way to go is with “xen/by-name” like you did, but check how KVM/libvirt do it, I’m not using them.
Btw, VMX/SVM are processor features related to virtualization, but not specific about nested virt. Although I guess they’re required to be ebabled in L0-dom0 AND L1-dom0.

Dunno why you used RDRAND and SMAP, what are those ? I don’t have those settings on Xen, last I checked.

Also, I only managed to run PV L2-domUs (Debian/Fedora in your case).
You can check “xl dmesg” from L0-dom0 (Qubes) to see what’s happening, but better use “loglvl=all guest_loglvl=all” in Qubes Xen command line to get more info.
IIRC, “xl dmesg” is permanently logged to “hypervisor.log” on Qubes.
If you have LOTS OF “vmexit” lines (xl dmesg cant even stop), try changing the L2-domU type.

One last thing I think about : the last Debian-based ISOs won’t work correctly on Xen, ie they wont boot and hang exactly where you spot it. But you’re on KVM so I dunno if it applies.
If you manage to read/log why the installers fail, maybe I can tell you if that applies to you. Try panic=0 or something in the GRUB kernel command lines for the installers.

2 Likes

Post to delete

There is no parameter I think I can include in /etc/qubes/templates/libvirt/xen/by-name/ProxmoxOnQubesOS.xml with hap=1 and nestedhvm=1

What I did is then : (More info here):

touch /etc/xen/ProxmoxOnQubesOS.hvm

nano /etc/xen/ProxmoxOnQubesOS.hvm

builder = "hvm"
name = "proxmoxonqubes"
hap=1
nestedhvm=1

Do you think it’s how you do it @zithro ?
How do I check if it’s working ?
Nothing changed so far

Thank so much for your time

I guess that’s how you would do it, as the blog tells us “we’re using the xenlight (xl) toolkit, as of yet I have not found how to enable the relevant parameters in libvirt to make nesting work” (but it’s from 2017, so check the libvirt manual).

You forgot the cpuid thing, but I don’t know if it’s useful or not.
In my tests, I didn’t use it, as per Xen wiki it’s used only for L1-dom0 using “VMware-ESX, VMware-Workstation, Win8-hyperv”. But the page is old.
Maybe try it to see if something changes.

Try to remove ballooning, by setting both “memory=” and “maxmem=” to the same values. Do this for L1-dom0 AND the L2-domUs config files. The info is also on the Xen wiki, you could even crash L0-dom0.

BUT I’m wondering, how do you start L1-dom0 ? I don’t know if the Qubes manager can read normal Xen config files (ie. non-libvirt). Are you sure it’s booting proxmox from THIS config file ?
You may have to launch proxmox with xl create.
(PS: “builder=” is deprecated, use “type=” instead).

What about the config from L2-domUs ? Need more info.
Also, you need to check and provide logs, otherwise we dunno what’s wrong :wink:
What is the error reported when booting L2-domUs ? Need both L1-dom0 and L2-domU logs.
Usually there are 2 logs to check: the logs from the hypervisor, and the logs from inside the domUs. They report different stuff.

Another stuff to test : are the ISOs booting on normal proxmox (as a L0-dom0) ? As I told you, stock Debian ISOs won’t work directly on Xen (read this: Re: Debian 11 installer crashed and reboot).
If you get this on L2-domUs logs :

[    1.785474] synth uevent: /devices/virtual/input/input1: failed to send uevent
[    1.785503] input input1: uevent: failed to send synthetic uevent
input1: Failed to write 'add' to '/sys/devices/virtual/input/input1/uevent': Cannot allocate memory
[    1.786590] Kernel panic - not syncing: Attempted to kill init! exitcode=0x00000100

it means your ISOs are not compatible. Note that it happens on Debian-based distros too (had the problem with Kali for example). I don’t know about fedora.
I just dropped the info for reference, as I don’t know if KVM has the same problems.

Last thought, I repeat, you’re doing KVM-on-Xen, whereas the blog author and me we do Xen-on-Xen !
Maybe try running Qubes-on-Qubes first, or vanilla Xen on top of Qubes to see if it’s working ?

2 Likes

I tried and yes both ISOs Fedora 37 and Debian 11 work on L0-dom0.


So discovered the following command, and there some issues, could it be the reason it doesn’t work ?


I was disable for L1 already but didn’t L2-domUs.
Just did it on L2-domUs with :

Memory_Ballooning_Device_Disable

But still crashing :smiling_face_with_tear:


Thanks


Yes looks like you are right


Omg so complicated with the command xl haha I will look more in detail later and try it again with that.
If you have article/post about it, I would gladly accept it


Thank you again, with your help we are getting little by little closer to make it work :slight_smile:

Concerning “virt-host-validate”, I imagine you ran this in proxmox ? I’ll have to boot my L1-dom0 Qubes to see what I get there, to compare.
Can you post the text (not the image) of the result ?

On a fully functional L0-dom0 (vanilla Xen), this is what I get :

QEMU: Checking for hardware virtualization                                 : FAIL (Only emulated CPUs are available, performance will be significantly limited)
WARN (Unknown if this platform has IOMMU support)
QEMU: Checking for secure guest support                                    : WARN (Unknown if this platform has Secure Guest support)

Note, I removed the PASS lines (and the LXC lines, useless in our case).
But I don’t know how to debug KVM …

Ok for ballooning, leave it disabled everywhere.
What about the type of guests ? I imagine you also have HVM/PV/PVH types in KVM, right ?

xl create is as easy as :

xl create /path/of/the/config/file
or with verbosity
xl create -v /path/of/the/config/file
(you can add more v’s to get more output, aka “-vvv”)

You can “xl help” to see all possibilities :wink: For instance there’s “xl dmesg”.
This is the full man page: xl - Xen management tool, based on libxenlight

To shutdown the domU, it depends on if the domain is crashed or running, and if xen-tools are loaded.
Oh, sorry I write as I think, do you have xen packages installed in proxmox ? You would need xen-utils for guests.
Anyway, to shutdown a domain :

xl shutdown DOMAIN_NAME

If it’s not working, you can destroy it (it’s eq to pulling the plug ^^) :

xl destroy DOMAIN_NAME

PS: DOMAIN_NAME is the name of the domU

Lastly, I know you’re doing this because you wanna test proxmox, but I ask again, can you test Qubes and/or vanilla Xen too as a L1-dom0 ?

I hope it will work for you, and better than it works here ^^
Because there’s one big drawback : I cannot passthrough either real or virtual devices from L0-dom0 to a L2-domU.

1 Like

Yes exactly in Proxmox.


Yes of course :slight_smile:


Good call, I did not, it’s done now on Proxmox with

sudo apt install xen-utils -y

So after a reboot, now it says that I can start Proxmox with Xen hypervisor

But if I do, I get that :

Panic on CPU 0
Could not construct domain 0

If start like before so without Xen Hypervisor, everything looks fine like before.


What can you do and can’t you can’t for exemple if you can’t passthrough either real or virtual devices from L0-dom0 to a L2-domU ?

Yes good point, will take a look later, I will do a feedback


thank for the info, will take a look later, I will do a feedback


Good idea, will take a look later, I will do a feedback

Funny to read “Proxmox with Xen” :wink:
Seriously, so sorry for that, I messed up, you have nothing to install in proxmox, it’s a KVM hypervisor …
It installed the Xen hypervisor on your proxmox install, which ofc won’t work … Remove xen-utils.

Concerning virt-host-validate output, I think it’s good.
The IOMMU warning I think is normal : since we’re running nested, it’s L0-dom0 who’s in charge of the IOMMU, and proxmox cannot see/use it (read below about passingthrough devices).
The secure guest support is a feature of some CPUs only, ignore it too.

I don’t know if you can/cannot, I can only tell you what worked on my setup :wink:
In Qubes (my L1-dom0), dom0 is locked down, so I had a hard time making networking work.
I don’t think that’s the case on proxmox, so you will have network working, which is almost the essential part !
Also it depends on what you plan to do ^^
For servers and lightweight desktops (ie. no heavy GPU tasks), everything should work.
I was able to launch L2-domUs and use them w/o much problems.

Concerning passthrough …
You can PT a real device from L0-dom0 to L1-dom0, but I don’t think you can pass it to a L2-domU (IOMMU not avail to L1-dom0).
I also tried to PT emulated and PV network cards from L1-dom0 to L2-domU to no avail …
e1000, realtek, all sorts of PV ones provided by QEMU, none would work in L2-domUs.
But you don’t need passthrough to make a fully virtual environment.

Try PV first ! From my other posts you should know I cannot run HVM or PVH guests. YMMV !

1 Like

So I did the following command to clean all the logs with

xl dmesg -c

Then started L1 ProxmoxOnQubesOS and then started a VM inside which crashed of course, I have the following messages :

xl dmesg


[root@dom0 xen]# xl dmesg 
(XEN) CPU0: Temperature above threshold
(XEN) CPU0: Running in modulated clock mode
(XEN) CPU0: Temperature above threshold
(XEN) CPU0: Running in modulated clock mode
(XEN) CPU0: Temperature above threshold
(XEN) CPU0: Running in modulated clock mode
(XEN) CPU0: Temperature above threshold
(XEN) CPU0: Running in modulated clock mode
(XEN) CPU0: Temperature above threshold
(XEN) CPU0: Running in modulated clock mode
(XEN) CPU0: Temperature above threshold
(XEN) CPU0: Running in modulated clock mode
(XEN) domain_crash called from vmx.c:1386
(XEN) Domain 101 (vcpu#8) crashed on cpu#0:
(XEN) ----[ Xen-4.14.5  x86_64  debug=n   Tainted: M    ]----
(XEN) CPU:    0
(XEN) RIP:    0008:[<ffffffffc0a67176>]
(XEN) RFLAGS: 0000000000000002   CONTEXT: hvm guest (d101v8)
(XEN) rax: 0000000000000020   rbx: 0000000004710000   rcx: 0000000080202001
(XEN) rdx: 0000000006000000   rsi: 000000000008b000   rdi: 0000000000000000
(XEN) rbp: 0000000001000000   rsp: ffffbe62852efcb0   r8:  0000000000000000
(XEN) r9:  0000000000000000   r10: 0000000000000000   r11: 0000000000000000
(XEN) r12: 0000000000000000   r13: 0000000000000000   r14: 0000000000000000
(XEN) r15: 0000000000000000   cr0: 0000000080050033   cr4: 0000000000002060
(XEN) cr3: 00000001062e2002   cr2: 0000000000000000
(XEN) fsb: 0000000000000000   gsb: 0000000000000000   gss: 0000000000000000
(XEN) ds: 0018   es: 0018   fs: 0018   gs: 0018   ss: 0018   cs: 0008

I added loglvl=all guest_loglvl=all in the grub of L0 QubesOS and restart it after.

When I did xl dmesg -c then started L1 ProxmoxOnQubesOS and then did xl dmesg i have the following logs :

(XEN) HVM d6v0 save: CPU
(XEN) HVM d6v1 save: CPU
(XEN) HVM d6v2 save: CPU
(XEN) HVM d6v3 save: CPU
(XEN) HVM d6v4 save: CPU
(XEN) HVM d6v5 save: CPU
(XEN) HVM d6v6 save: CPU
(XEN) HVM d6v7 save: CPU
(XEN) HVM d6v8 save: CPU
(XEN) HVM d6v9 save: CPU
(XEN) HVM d6 save: PIC
(XEN) HVM d6 save: IOAPIC
(XEN) HVM d6v0 save: LAPIC
(XEN) HVM d6v1 save: LAPIC
(XEN) HVM d6v2 save: LAPIC
(XEN) HVM d6v3 save: LAPIC
(XEN) HVM d6v4 save: LAPIC
(XEN) HVM d6v5 save: LAPIC
(XEN) HVM d6v6 save: LAPIC
(XEN) HVM d6v7 save: LAPIC
(XEN) HVM d6v8 save: LAPIC
(XEN) HVM d6v9 save: LAPIC
(XEN) HVM d6v0 save: LAPIC_REGS
(XEN) HVM d6v1 save: LAPIC_REGS
(XEN) HVM d6v2 save: LAPIC_REGS
(XEN) HVM d6v3 save: LAPIC_REGS
(XEN) HVM d6v4 save: LAPIC_REGS
(XEN) HVM d6v5 save: LAPIC_REGS
(XEN) HVM d6v6 save: LAPIC_REGS
(XEN) HVM d6v7 save: LAPIC_REGS
(XEN) HVM d6v8 save: LAPIC_REGS
(XEN) HVM d6v9 save: LAPIC_REGS
(XEN) HVM d6 save: PCI_IRQ
(XEN) HVM d6 save: ISA_IRQ
(XEN) HVM d6 save: PCI_LINK
(XEN) HVM d6 save: PIT
(XEN) HVM d6 save: RTC
(XEN) HVM d6 save: HPET
(XEN) HVM d6 save: PMTIMER
(XEN) HVM d6v0 save: MTRR
(XEN) HVM d6v1 save: MTRR
(XEN) HVM d6v2 save: MTRR
(XEN) HVM d6v3 save: MTRR
(XEN) HVM d6v4 save: MTRR
(XEN) HVM d6v5 save: MTRR
(XEN) HVM d6v6 save: MTRR
(XEN) HVM d6v7 save: MTRR
(XEN) HVM d6v8 save: MTRR
(XEN) HVM d6v9 save: MTRR
(XEN) HVM d6 save: VIRIDIAN_DOMAIN
(XEN) HVM d6v0 save: CPU_XSAVE
(XEN) HVM d6v1 save: CPU_XSAVE
(XEN) HVM d6v2 save: CPU_XSAVE
(XEN) HVM d6v3 save: CPU_XSAVE
(XEN) HVM d6v4 save: CPU_XSAVE
(XEN) HVM d6v5 save: CPU_XSAVE
(XEN) HVM d6v6 save: CPU_XSAVE
(XEN) HVM d6v7 save: CPU_XSAVE
(XEN) HVM d6v8 save: CPU_XSAVE
(XEN) HVM d6v9 save: CPU_XSAVE
(XEN) HVM d6v0 save: VIRIDIAN_VCPU
(XEN) HVM d6v1 save: VIRIDIAN_VCPU
(XEN) HVM d6v2 save: VIRIDIAN_VCPU
(XEN) HVM d6v3 save: VIRIDIAN_VCPU
(XEN) HVM d6v4 save: VIRIDIAN_VCPU
(XEN) HVM d6v5 save: VIRIDIAN_VCPU
(XEN) HVM d6v6 save: VIRIDIAN_VCPU
(XEN) HVM d6v7 save: VIRIDIAN_VCPU
(XEN) HVM d6v8 save: VIRIDIAN_VCPU
(XEN) HVM d6v9 save: VIRIDIAN_VCPU
(XEN) HVM d6v0 save: VMCE_VCPU
(XEN) HVM d6v1 save: VMCE_VCPU
(XEN) HVM d6v2 save: VMCE_VCPU
(XEN) HVM d6v3 save: VMCE_VCPU
(XEN) HVM d6v4 save: VMCE_VCPU
(XEN) HVM d6v5 save: VMCE_VCPU
(XEN) HVM d6v6 save: VMCE_VCPU
(XEN) HVM d6v7 save: VMCE_VCPU
(XEN) HVM d6v8 save: VMCE_VCPU
(XEN) HVM d6v9 save: VMCE_VCPU
(XEN) HVM d6v0 save: TSC_ADJUST
(XEN) HVM d6v1 save: TSC_ADJUST
(XEN) HVM d6v2 save: TSC_ADJUST
(XEN) HVM d6v3 save: TSC_ADJUST
(XEN) HVM d6v4 save: TSC_ADJUST
(XEN) HVM d6v5 save: TSC_ADJUST
(XEN) HVM d6v6 save: TSC_ADJUST
(XEN) HVM d6v7 save: TSC_ADJUST
(XEN) HVM d6v8 save: TSC_ADJUST
(XEN) HVM d6v9 save: TSC_ADJUST
(XEN) HVM d6v0 save: CPU_MSR
(XEN) HVM d6v1 save: CPU_MSR
(XEN) HVM d6v2 save: CPU_MSR
(XEN) HVM d6v3 save: CPU_MSR
(XEN) HVM d6v4 save: CPU_MSR
(XEN) HVM d6v5 save: CPU_MSR
(XEN) HVM d6v6 save: CPU_MSR
(XEN) HVM d6v7 save: CPU_MSR
(XEN) HVM d6v8 save: CPU_MSR
(XEN) HVM d6v9 save: CPU_MSR
(XEN) HVM6 restore: CPU 0
(d6) HVM Loader
(d6) Detected Xen v4.14.5
(d6) Xenbus rings @0xfeffc000, event channel 1
(d6) System requested SeaBIOS
(d6) CPU speed is 1992 MHz
(d6) Relocating guest memory for lowmem MMIO space enabled
(d6) PCI-ISA link 0 routed to IRQ5
(d6) PCI-ISA link 1 routed to IRQ10
(d6) PCI-ISA link 2 routed to IRQ11
(d6) PCI-ISA link 3 routed to IRQ5
(d6) pci dev 01:3 INTA->IRQ10
(d6) pci dev 02:0 INTA->IRQ11
(d6) pci dev 04:0 INTD->IRQ5
(d6) pci dev 05:0 INTA->IRQ10
(d6) RAM in high memory; setting high_mem resource base to 280000000
(d6) pci dev 02:0 bar 14 size 001000000: 0f0000008
(d6) pci dev 03:0 bar 10 size 001000000: 0f1000008
(d6) pci dev 03:0 bar 30 size 000010000: 0f2000000
(d6) pci dev 03:0 bar 18 size 000001000: 0f2010000
(d6) pci dev 04:0 bar 10 size 000001000: 0f2011000
(d6) pci dev 02:0 bar 10 size 000000100: 00000c001
(d6) pci dev 05:0 bar 10 size 000000100: 00000c101
(d6) pci dev 05:0 bar 14 size 000000100: 0f2012000
(d6) pci dev 01:1 bar 20 size 000000010: 00000c201
(d6) Multiprocessor initialisation:
(d6)  - CPU0 ... 39-bit phys ... fixed MTRRs ... var MTRRs [2/8] ... done.
(d6)  - CPU1 ... 39-bit phys ... fixed MTRRs ... var MTRRs [2/8] ... done.
(d6)  - CPU2 ... 39-bit phys ... fixed MTRRs ... var MTRRs [2/8] ... done.
(d6)  - CPU3 ... 39-bit phys ... fixed MTRRs ... var MTRRs [2/8] ... done.
(d6)  - CPU4 ... 39-bit phys ... fixed MTRRs ... var MTRRs [2/8] ... done.
(d6)  - CPU5 ... 39-bit phys ... fixed MTRRs ... var MTRRs [2/8] ... done.
(d6)  - CPU6 ... 39-bit phys ... fixed MTRRs ... var MTRRs [2/8] ... done.
(d6)  - CPU7 ... 39-bit phys ... fixed MTRRs ... var MTRRs [2/8] ... done.
(d6)  - CPU8 ... 39-bit phys ... fixed MTRRs ... var MTRRs [2/8] ... done.
(d6)  - CPU9 ... 39-bit phys ... fixed MTRRs ... var MTRRs [2/8] ... done.
(d6) Writing SMBIOS tables ...
(d6) Loading SeaBIOS ...
(d6) Creating MP tables ...
(d6) Loading ACPI ...
(d6) vm86 TSS at fc100500
(d6) BIOS map:
(d6)  10000-100e3: Scratch space
(d6)  c0000-fffff: Main BIOS
(d6) E820 table:
(d6)  [00]: 00000000:00000000 - 00000000:000a0000: RAM
(d6)  HOLE: 00000000:000a0000 - 00000000:000c0000
(d6)  [01]: 00000000:000c0000 - 00000000:00100000: RESERVED
(d6)  [02]: 00000000:00100000 - 00000000:f0000000: RAM
(d6)  HOLE: 00000000:f0000000 - 00000000:fc000000
(d6)  [03]: 00000000:fc000000 - 00000000:fc00b000: NVS
(d6)  [04]: 00000000:fc00b000 - 00000001:00000000: RESERVED
(d6)  [05]: 00000001:00000000 - 00000002:80000000: RAM
(d6) Invoking SeaBIOS ...
(d6) SeaBIOS (version 1.13.0-3.fc32)
(d6) BUILD: gcc: (GCC) 9.2.1 20190827 (Red Hat Cross 9.2.1-3) binutils: version 2.34-2.fc32
(d6) 
(d6) Found Xen hypervisor signature at 40000000


(with the new grub settings) → starting an L2 VM I still have the same messages as without the new grub settings :

[user@dom0 ~]$ xl dmesg 
(XEN) domain_crash called from vmx.c:1386
(XEN) Domain 6 (vcpu#9) crashed on cpu#2:
(XEN) ----[ Xen-4.14.5  x86_64  debug=n   Not tainted ]----
(XEN) CPU:    2
(XEN) RIP:    0008:[<ffffffffc0af0176>]
(XEN) RFLAGS: 0000000000000002   CONTEXT: hvm guest (d6v9)
(XEN) rax: 0000000000000020   rbx: 0000000004710000   rcx: 0000000080202001
(XEN) rdx: 0000000006000000   rsi: 000000000008b000   rdi: 0000000000000000
(XEN) rbp: 0000000001000000   rsp: ffffbd6743b47c00   r8:  0000000000000000
(XEN) r9:  0000000000000000   r10: 0000000000000000   r11: 0000000000000000
(XEN) r12: 0000000000000000   r13: 0000000000000000   r14: 0000000000000000
(XEN) r15: 0000000000000000   cr0: 0000000080050033   cr4: 0000000000002060
(XEN) cr3: 000000010254c006   cr2: 0000000000000000
(XEN) fsb: 0000000000000000   gsb: 0000000000000000   gss: 0000000000000000
(XEN) ds: 0018   es: 0018   fs: 0018   gs: 0018   ss: 0018   cs: 0008


I also updated Proxmox 7.3 to Proxmox 7.4 in ProxmoxOnQubesOSbut the behavior are the same so far, L2 vm are still crashing

1 Like

Probably nothing, but viridian extensions are only used by Windows OSes.
It -should- be harmless on other OSes, but who knows ? Not me ^^ Better safe than sorry.
Remove it from proxmox config file, or force it like “viridian = 0”.

Yes, and L0-dom0 sees it, but does not provide much information …
Is the CPU crashing before or after you get to the installers ?
What do the logs of proxmox say ? And the L2-domUs say what, kernel panic ?
Another question remain, did you try the CPUID thing mentionned in the blog ?

I found this in a RedHat FAQ (https://www.linux-kvm.org/page/FAQ#General_KVM_information) :

KVM only run on processors that supports x86 hvm (vt/svm instructions set) whereas Xen also allows running modified operating systems on non-hvm x86 processors using a technique called paravirtualization. KVM does not support paravirtualization for CPU but may support paravirtualization for device drivers to improve I/O performance

I can only launch PV domUs from a nested hypervisor. It’s just my experience with my hardware, as it seems the author of the blog post you linked succeeded in launching HVM L2-domUs …
My L1-domU is Xen so I can launch PV L2-domUs, whereas with kvm you simply can’t launch PV domains.

Found this about KVM-on-KVM (search terms: “nest kvm on xen” …) : https://www.howtogeek.com/devops/how-to-enable-nested-kvm-virtualization
Found 2 things to try :

  • activate nesting on proxmox. It can ensure CPU features get properly passed to L2-domUs, and maybe they’ll be happy.
  • In the paragraph “Activating Nested Virtualization For a Guest” (at the bottom), there are settings for the L2-domUs concerning host-passthrough, try both lines.

The Arch KVM FAQ has also the same kind of advice for nesting : https://wiki.archlinux.org/title/KVM#Nested_virtualization

This is really trials-and-errors ^^
But it’s really odd that the L2-domUs installers start. It means the domU starts ok, and a few drivers work.
Maybe I’m totally overlooking something. Provide proxmox and L2-domUs panic logs ^^
Can you try other distros ? Like very small Linuxes, or NetBSD, openBSD, even Windows.

1 Like

Thanks for all the info, I will take a look at everything later :slight_smile:


Good point !
Finally some good news, I tried with alpine and it’s working :

Alpine (virt-3.17.2-x86) :white_check_mark:
Alpine (standard-3.17.2-x86) :white_check_mark:

Alpine [virt-3.17.2-x86]

Alpine (Standard-3.17.2-x86)

I will try more ISOs later

1 Like

That’s good to read, so the problem is neither from Qubes or Proxmox, nor from nesting !

For Debian, try the text installer, and not the expert option.
If that does not work, maybe you will have to do what I suggested earlier, preparing ISOs for hypervisor use.
If you want I can write my notes here, it’s quick to test.

2 Likes

Many thanks :handshake:, much appreciation :bowing_woman:, :womans_hat:s off & bravo :clap: to you both @quququbebebe & @zithro for such an enjoyable thread!

2 Likes

One of the reason why I try to make Proxmox works on QubesOS, is so I can create a cluster of Proxmox and can use different functionality that a cluster provide such as HA, migration, ceph, replication …

So more good new as :

I created a second Proxmox called ProxmoxOnQubesOS-2

I can simultaneously run ProxmoxOnQubesOS and ProxmoxOnQubesOS-2 on QubeOS.

I was also able to make both on same communicate to each other so I could in Proxmox create a cluster

On sys-firewall :

sudo iptables -I FORWARD 4 -s 10.137.0.30 -d 10.137.0.29 -j ACCEPT
sudo iptables -I FORWARD 5 -s 10.137.0.29 -d 10.137.0.30 -j ACCEPT

In the screenshoot :

Proxmox = ProxmoxOnQubesOS
Proxmox-2 = ProxmoxOnQubesOS-2

As of now, only Alpine is working for me in proxmox, running alpine in both ProxmoxOnQubesOS and ProxmoxOnQubesOS-2 does work !


Both Proxmox with virtualization on can run simultaneously on QubesOS :white_check_mark:
Both Proxmox can run a VM (Alpine) simultaneously on QubesOS :white_check_mark:
Both Proxmox can both communicate between each other :white_check_mark:
Both Proxmox are in the same cluster :white_check_mark:

Need to try next :

Cepth
Migration
Replication
HA

1 Like

How you do that ?

Can’t find the text installer.
I tried Rescue mode, but still crashing.

Yes please :slight_smile:

The text mode install is simply named “Install”. Don’t use “graphical” or “expert” mode. You’ll have to spot the right one if you follow my instructions.

Usually, you don’t have to prepare them, ISOs should work out of the box.
By the way, you can also try “Live CDs” to install from, maybe they’ll work better ?
Anyways, there has been a bug in Debian-based ISO which prevented the installer to boot.
Note: I don’t know if it applies to KVM/proxmox !
To spot the error, you’ll have to attach to the serial console of the domU from proxmox.

[    1.749429] Run /init as init process
[    1.785474] synth uevent: /devices/virtual/input/input1: failed to send uevent
[    1.785503] input input1: uevent: failed to send synthetic uevent
input1: Failed to write 'add' to '/sys/devices/virtual/input/input1/uevent': Cannot allocate memory
[    1.786590] Kernel panic - not syncing: Attempted to kill init! exitcode=0x00000100

Chuck Zmudzinski posted a workaround on the Debian BTS: Re: Debian 11 installer crashed and reboot
The method should work on all Debian-based installs. Tested working on debian-11.2.0-amd64-netinst.iso and Kali 2022.1
Prerequisites: xorriso and initramfs-tools packages installed (packages names for Debians)
You may also have to change “Xen HVM domU” to what proxmox/kvm tells you.
Quick steps :

(Put the ISO in a temporary folder, then `cd` to this folder)
mkdir CD
mount -o ro -t iso9660 debian-11.2.0-amd64-netinst.iso CD
cp -p CD/install.amd/initrd.gz .
umount CD
unmkinitramfs initrd.gz initramfs
vi initramfs/lib/debian-installer/start-udev
	CHANGE
	udevadm trigger --action=add
	TO
	dmesg | grep DMI: | grep 'Xen HVM domU' || udevadm trigger --action=add
cd initramfs
find . | sort | sudo cpio --reproducible --quiet -o -H newc > ../newinitrd
cd ..
gzip -v9f newinitrd
xorriso -dev debian-11.2.0-amd64-xenhvm-netinst.iso -boot_image any keep -map newinitrd.gz /install.amd/initrd.gz
rm -rf CD initramfs newinitrd.gz initrd.gz

On the main menu, choose the Install option, not the graphical or expert options, in order to boot using the modified initrd.gz ramdisk.

Long version with explanation

This fix might also work on the live ISO images that are also reported
to crash and reboot in Xen HVM domUs.

Prerequisites: xorriso and initramfs-tools packages installed

Step 0:
	Download/copy debian-11.0.0-amd64-netinst.iso into current working directory

Step 1: Mount the original iso:

	mkdir CD
	sudo mount -o ro -t iso9660 debian-11.0.0-amd64-netinst.iso CD

Step 2: Copy the initrd.gz file we need to modify:

	cp -p CD/install.amd/initrd.gz .

Step 4: Unmount the original iso:

	sudo umount CD

Step 5: As root, extract the initramfs into a working directory:

	sudo unmkinitramfs initrd.gz initramfs

Step 6: As root, edit the start-udev script that causes the crash and reboot:

	sudo vi initramfs/lib/debian-installer/start-udev

In the start-udev script change this line:

	udevadm trigger --action=add
	TO
	dmesg | grep DMI: | grep 'Xen HVM domU' || udevadm trigger --action=add

and save the file
This change should only disable the udevadm trigger in Xen HVM DomUs.

Step 7: Re-pack the initrd into a new initrd file:

	cd initramfs
	find . | sort | sudo cpio --reproducible --quiet -o -H newc > ../newinitrd
	cd ..
	gzip -v9f newinitrd

Step 8: Create the new installation ISO:

	cp -p debian-11.0.0-amd64-netinst.iso debian-11.0.0-amd64-xenhvm-netinst.iso
	xorriso -dev debian-11.0.0-amd64-xenhvm-netinst.iso -boot_image any keep -map newinitrd.gz /install.amd/initrd.gz

Step 9 [Optional] : Clean up

	sudo rm -r initramfs newinitrd.gz initrd.gz
1 Like

Any news ? I’m curious !

2 Likes

If you’re running Proxmox in a VM, I would think the Qubes sandbox would contain compromise to the VM? Why would this compromise security?

Before going thru the hassle to set this up, was it worth it? Was it viable for your workflow? Or just an academic exercise?

1 Like