The guide is based on debian13-minimal, but it should work on debian-13-xfce or debian-13.
Prepare the template
Start “Terminal Xfce” in dom0
Run qvm-template install debian-13-minimal
Run qvm-clone debian-13-minimal debian-13-minimal-openvpn
The following steps are required to install packages in the new template, as it’s a minimal template, you can’t use sudo from a regular terminal.
Run “Terminal Xfce” in dom0
Run qvm-run -u root debian-13-minimal-openvpn xterm
Run this command in the terminal that opened: apt install -y qubes-core-agent-networking qubes-core-agent-network-manager network-manager-openvpn-gnome
Run this command in the terminal that opened: adduser user netdev
Shutdown debian-13-minimal-openvpn qube
The following steps will create an AppVM qube that will connect to the OpenVPN server and be used as a NetVM for other qubes.
Start “Terminal Xfce” in dom0
Run qvm-create --property provides_network=true --template debian-13-minimal-openvpn --label red --property maxmem=512 sys-vpn-openvpn
Run qvm-service --enable sys-vpn-openvpn network-manager true
Copy the OpenVPN configuration file to sys-vpn-openvpn
Move the OpenVPN configuration (unzip the file before if needed, the appvm does not have the tools to unzip) to the qube sys-vpn-openvpn you just created.
This can be done by right-clicking on the downloaded file in the file explorer of the Qube that downloaded the configuration file, and choose “Move to other qube…” menu entry in the contextual menu.
Import the configuration file in sys-vpn-openvpn
Start “Terminal Xfce” in dom0
Run qvm-run -u root sys-vpn-openvpn xterm
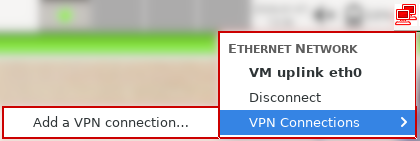
On the network systray icon, left click, then hover on “VPN Connections” then click on “Add a VPN connection…”
On the shown menu, click on “OpenVPN” and select “Imported a saved VPN configuration…” instead
Click on “Create…”
Select the configuration file you sent to the qube, it’s under /home/user/QubesIncoming/...
When prompted with “Choose new password for keyring” click on “Continue”, you can fill the password fields if you want to add a password to unlock the VPN password but this is useless for most users as the qube is dedicated for the VPN task. You will be asked if you really don’t want to use a password, click “Continue”
Fill the values for the fields User name and Password
Click on “Save”
Autoconnect
Autoconnect on boot can’t work if you store the passwords as the user, which is the case in this guide.
This creates a service running as user on boot that selects a random VPN connection and connect to it.
Block non-VPN network using Qubes OS Firewall (aka “killswitch”)
This method uses the command line version of the firewall as it allows to block both ICMP (ping) and DNS packets, whereas the firewall tab in the qube settings does not block ICMP and DNS.
Start “Terminal Xfce” in dom0
Type the following commands:
Remove all existing rules for the qube, this is the default qube settings: qvm-firewall sys-vpn-openvpn reset
Only accept outgoing traffic toward destination, the example is using destination 1.2.3.4 with proto udp and port 1194 (adapt to your configuration!): qvm-firewall sys-vpn-openvpn add accept dsthost=1.2.3.4 dstports=1194 proto=udp
Remove the default rule that allows everything since we added a more restrictive one: qvm-firewall sys-vpn-openvpn del --rule-no 0
Literally opened the forum looking for exactly this - openvpn and last qubes os release. Ill come back in a few days hopefully the draft will be finished
I guess it’s because you aimed for the minimal template solution… What I do not recommend in a VPN guide intended for ‘beginners’ - who actually need such guide…
In a normal Fedora template, the NM should write it’s configurations to the /rw folder:
[user@Customer-VPN ~]$ ls -lha /rw/config/NM-system-connections/
total 20K
drwxr-xr-x. 2 root root 4.0K Jan  7 07:36 .
drwxr-xr-x. 3 root root 4.0K Feb 20  2019 ..
-rw-------. 1 root root  769 Jan  7 07:36 IIC-Lab.nmconnection
-rw-------. 1 root root  773 Apr 12  2025 Lab-121.nmconnection
-rw-------. 1 root root  288 Jan  5 13:36 qubes-uplink-eth0
These configs are created by the nm-applet, using the GUI. No magic was involved - just changed the ‘where to save the password’, as the default is to the current user only.
It’s on a Fedora 42 template. Derivating from this might makes some differences - and that’s should not be the case in a beginner guide - if you ask me.
(you will use a different version of Network Managger as a starter)
So my suggestion wold be to stick to the default Fedora (full, not the minimal) template. That’s what the ‘official guide’ should cover.
Any other customisation like using other distro, using minimal templates are for advanced users - for a very good reason. pushing the users to the deep waters will just make confusion.
suggestion for you - if you want to go to the debian-minial template:
include proper screenshots for all the actions you do.
explain the network topology you suggest - then we (as Qubes users) can argue why it is not the best one
explain the use case you trying to cover
I guess this is like a single VPN tunnel, providing ‘default route’, hosted on a public hosting provider - which is a very specific scenario. And it might be the one that most user trying to achieve. Still worth defining, as any other scenario (like connection to a company network) might need very different settings.
Then… the ‘leak proof’ setup is the most wanted as I see, hence it is the most challenging, requires solid understanding how firewalls are working, plus it is very much Qubes specific → therefore most of the beginners will not able to achieve such without extensive learning by ‘trial and error’ - so promising such in a beginner guide will bring false hopes and unrealistic expectations.
Same in my case, but credentials can’t be stored there.
From my various experiments, the minimal template does not make it more complicated than a regular template, but will reduce storage, networking for updates and runtime memory footprint. As written on the top of the guide, I say people can easily replace the minimal by another Debian flavour.
I don’t really see what to explain? It’s yet another netvm that can be used as a netvm for a Qube to use the VPN. I can explain that of course, maybe it’s not obvious for users, hence I’m always happy to read about proper feedback.
AFAIK VPN tunnels can only establish a connection to a single endpoint at a time, and that doesn’t change anything in the setup if you self host the VPN or use a paid one.
And yes, it is a lot of work. I know.
(I created and published the very first version of the Qubes VPN guide… 10+ years ago)
Yes, it is outdated. Yes it is merged and extended with many different scenario. Yes it has been migrated several times to multiple different format and platform. And yes the current state is ‘unacceptable’ as an official guide for sure. No doubt about this.
However, what you (anybody who ‘demands’ a better one) should keep in mind: Qubes OS - and especially it’s documentation - is a community effort. Which means you are free to write and publish any better:
So full respect for the ones are actually trying to create and share something!
And when I commenting/suggesting things it is not to poke and/or criticise them, but trying to help to guide them to the ‘right direction’ - that’s what I can ‘offer’ from my ‘free’ time.
I’m sure it can.
I using this method for 10+ years. Starting with the earliest release, upgraded trough all of the future versions of Qubes, and now I’m on 4.3. So that ‘can’t be stored there’ is surely not the case.
I can share a sanitised config sample if that helps…
Espacially this part:
Qubes does not support running any networking services (e.g. VPN, local DNS server, IPS, …) directly in a qube that is used to run the Qubes firewall service (usually sys-firewall) for good reasons. In particular, if you want to ensure proper functioning of the Qubes firewall, you should not tinker with nftables rules in such qubes.
Instead, you should deploy a network infrastructure such as
Which might be overcomplicated for most of the cases.
‘Qubes does not supports’, not means you can’t do that
In contrast, I’m usually using a much more simple network topology, like:
sys-net ← sys-VPN ← AppVM
and even if the docs say it’s ‘not supported’, it is still works in practice: sys-VPN can act as a qubes firewall at the same time doing the VPN - IF you are sure the vpn is not messing up the firewall rules.
(but it’s surely not ‘leak proof’)
So my point is: the virtual network topology do matters and can make a huge difference. in the end results.
you can have multiple tunnels at the same time, ofc to different servers, and in such case not using the ‘default route’ method.
you can have fail-over tunnels from the same service.
you can also have tunnel in another tunnel
Moreover, if you want to keep it running ‘all time’ that’s very likely needs custom configs on client side, what ‘they’ might not provide you by default.
And the difference is huge if you self hosting: as you can control the server side as well.
In case of a VPN provider, you must adopt to their settings - even if it’s not what you really wanted.
@Zrubi did you get OpenVPN vpns to automatically connect from network manager? I tried with debian 13, fedora 42 and fedora 43 and I never get the “automatically connect to VPN” checkbox in its settings.
I also tried to set it manually using nmcli or even setting the VPN as a secondaries connection of eth0, nothing happens.
I use kicksecure-18 for wireguard (proton) and another with openvpn (rise up). I just checked and, effectively, for openvpn i don’t have it but i have with wireguard.
As I wrote in another thread, the “Autoconnect” NetworkManager setting is not available for the “vpn”-type connections. However “wireguard” is it’s own “type”, distinct from “vpn”, and has this option.
This is the post, and it includes the workaround (by nmcli or GUI) of “connection.secondaries”.
This is still surprising as from screenshot I found of network manager, I saw people with that checkbox?
Did you get auto connect to work with secondaries? Now I’m writing this, I guess it didn’t work for me due to the credential storage not available to root…
@solene I wanted to ask if you needed any help in writing the guide for 4.3 openvpn.
Can i know why you chose to put the vpn in between sys-net and sys-firewall?
Previous official guides used to put it after sys-firewall. I remember i read once in original docs that nothing should be put before sys-firewall. my best guess is that this way you can have the the little selectable thing when clicking the sys-net icon in the task panel?
The following steps are required to install packages in the new template, as it’s a minimal template, you can’t use sudo from a regular terminal.