This guide only suitable for the deprecated Qubes OS version 4.1. For supported versions 4.2 and 4.3 consult the new guide How To make an OpenVPN Gateway in Qubes (4.2, 4.3).
Although setting up a VPN connection is not by itself Qubes specific, Qubes includes a number of tools that can make the client-side setup of your VPN more versatile and secure. This document is a Qubes-specific outline for choosing the type of VM to use, and shows how to prepare a ProxyVM for either NetworkManager or a set of fail-safe VPN scripts.
Please refer to your guest OS and VPN service documentation when considering the specific steps and parameters for your connection(s); The relevant documentation for the Qubes default guest OS (Fedora) is Establishing a VPN Connection.
NetVM
The simplest case is to set up a VPN connection using the NetworkManager service inside your NetVM. Because the NetworkManager service is already started, you are ready to set up your VPN connection. However this has some disadvantages:
- You have to place (and probably save) your VPN credentials inside the NetVM, which is directly connected to the outside world
- All your AppVMs which are connected to the NetVM will be connected to the VPN (by default)
AppVM
While the NetworkManager service is not started here (for a good reason), you can configure any kind of VPN client in your AppVM as well. However this is only suggested if your VPN client has special requirements.
ProxyVM
One of the best unique features of Qubes OS is its special type of VM called a ProxyVM. The special thing is that your AppVMs see this as a NetVM (or uplink), and your NetVMs see it as a downstream AppVM. Because of this, you can place a ProxyVM between your AppVMs and your NetVM. This is how the default sys-firewall VM functions.
Using a ProxyVM to set up a VPN client gives you the ability to:
- Separate your VPN credentials from your NetVM.
- Separate your VPN credentials from your AppVM data.
- Easily control which of your AppVMs are connected to your VPN by simply setting it as a NetVM of the desired AppVM.
Set up a ProxyVM as a VPN gateway using NetworkManager
-
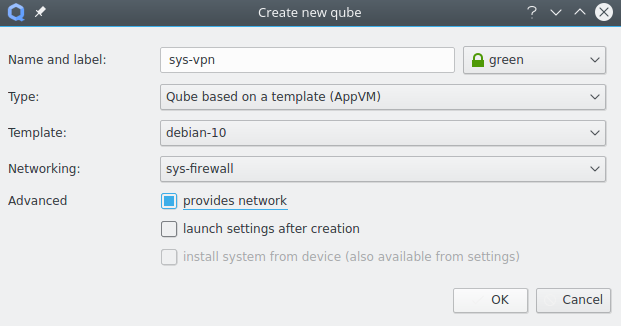
Create a new VM, name it, click the ProxyVM radio button, and choose a color and template.
-
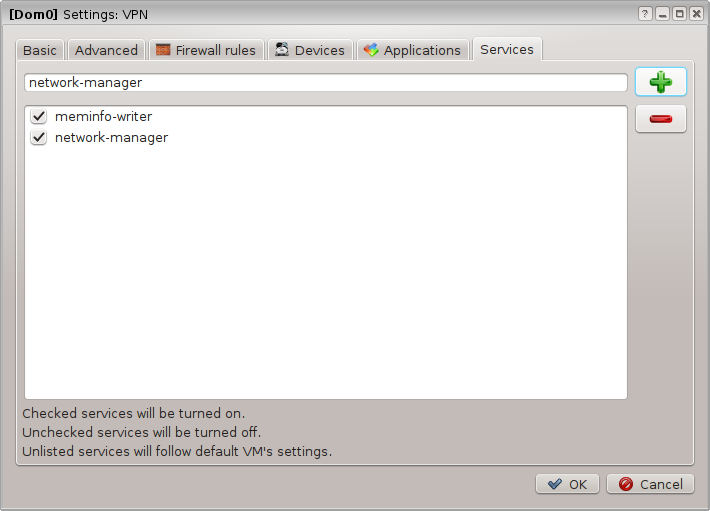
Add the
network-managerservice to this new VM. -
Set up your VPN as described in the NetworkManager documentation linked above.
-
(Optional) Make your VPN start automatically.
Edit
/rw/config/rc.localand add these lines:# Automatically connect to the VPN once Internet is up while ! ping -c 1 -W 1 1.1.1.1; do sleep 1 done PWDFILE="/rw/config/NM-system-connections/secrets/passwd-file.txt" nmcli connection up file-vpn-conn passwd-file $PWDFILEYou can find the actual “file-vpn-conn” in
/rw/config/NM-system-connections/.Create directory
/rw/config/NM-system-connections/secrets/(You can put your*.crtand*.pemfiles here too). Create a new file/rw/config/NM-system-connections/secrets/passwd-file.txt:vpn.secrets.password:XXXXXXXXXXXXXXAnd substitute “XXXXXXXXXXXXXX” for the actual password. The contents of
passwd-file.txtmay differ depending on your VPN settings. See the documentation fornmcli up. -
(Optional) Make the network fail-close for the AppVMs if the connection to the VPN breaks.
Edit
/rw/config/qubes-firewall-user-scriptand add these lines:# Block forwarding of connections through upstream network device # (in case the vpn tunnel breaks) iptables -I FORWARD -o eth0 -j DROP iptables -I FORWARD -i eth0 -j DROP ip6tables -I FORWARD -o eth0 -j DROP ip6tables -I FORWARD -i eth0 -j DROP -
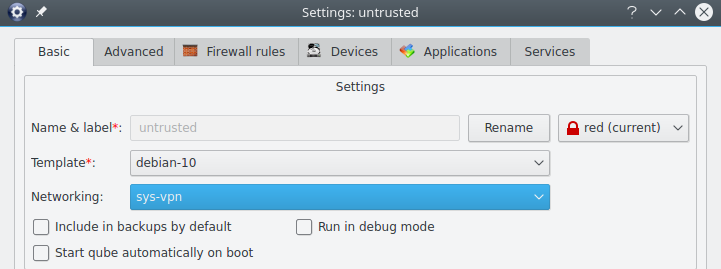
Configure your AppVMs to use the new VM as a NetVM.
-
Optionally, you can install some custom icons for your VPN
Set up a ProxyVM as a VPN gateway using iptables and CLI scripts
This method is more involved than the one above, but has anti-leak features that also make the connection fail closed should it be interrupted. It has been tested with Fedora 30 and Debian 10 templates.
Before proceeding, you will need to download a copy of your VPN provider’s configuration file(s) and have your VPN login information handy.
-
Create a new VM, name it, choose “provides network”, and choose a color and template.
Note: Do not enable NetworkManager in the ProxyVM, as it can interfere with the scripts’ DNS features. If you enabled NetworkManager or used other methods in a previous attempt, do not re-use the old ProxyVM… Create a new one according to this step.
If your choice of TemplateVM doesn’t already have the VPN client software, you’ll need to install the software in the template before proceeding. The ‘openvpn’ package comes installed in the Fedora template, and in Debian it can be installed with the following command:
sudo apt-get install openvpnDisable any auto-starting service that comes with the software package. For example for OpenVPN.
sudo systemctl disable openvpn-server@.service sudo systemctl disable openvpn-client@.service -
Set up and test the VPN client. Make sure the VPN VM and its TemplateVM is not running. Run a terminal (CLI) in the VPN VM – this will start the VM. Then create a new
/rw/config/vpnfolder with:sudo mkdir /rw/config/vpnCopy your VPN configuration files to
/rw/config/vpn. Your VPN config file should be namedopenvpn-client.ovpnso you can use the scripts below as is without modification. Otherwise you would have to replace the file name. Files accompanying the main config such as*.crtand*.pemshould also be placed in the/rw/config/vpnfolder.Check or modify configuration file contents using a text editor:
sudo gedit /rw/config/vpn/openvpn-client.ovpnFiles referenced in
openvpn-client.ovpnshould not use absolute paths such as/etc/....The config should route all traffic through your VPN’s interface after a connection is created; For OpenVPN the directive for this is
redirect-gateway def1.Make sure it already includes or add:
redirect-gateway def1The VPN client may not be able to prompt you for credentials when connecting to the server, so we’ll add a reference to a file containing the VPN username and password. For example for OpenVPN, add or modify
auth-user-passlike so:auth-user-pass pass.txtSave the
/rw/config/vpn/openvpn-client.ovpnfile.Now make sure a
/rw/config/vpn/pass.txtfile actually exists.sudo gedit /rw/config/vpn/pass.txtAdd:
username
password
Replace
usernameandpasswordwith your actual username and password.Test your client configuration: Run the client from a CLI prompt in the ‘vpn’ folder, preferably as root. For example:
sudo openvpn --cd /rw/config/vpn --config openvpn-client.ovpnWatch for status messages that indicate whether the connection is successful and test from another VPN VM terminal window with
ping.ping 1.1.1.1pingcan be aborted by pressing the two keysctrl+cat the same time. DNS may be tested at this point by replacing addresses in/etc/resolv.confwith ones appropriate for your VPN (although this file will not be used when setup is complete). Diagnose any connection problems using resources such as client documentation and help from your VPN service provider. Proceed to the next step when you’re sure the basic VPN connection is working. -
Create the DNS-handling script.
sudo gedit /rw/config/vpn/qubes-vpn-handler.shAdd the following:
#!/bin/bash
set -e
export PATH="$PATH:/usr/sbin:/sbin"

case "$1" in

up)
# To override DHCP DNS, assign DNS addresses to 'vpn_dns' env variable before calling this script;
# Format is 'X.X.X.X  Y.Y.Y.Y [...]'
if [[ -z "$vpn_dns" ]] ; then
    # Parses DHCP foreign_option_* vars to automatically set DNS address translation:
    for optionname in ${!foreign_option_*} ; do
        option="${!optionname}"
        unset fops; fops=($option)
        if [ ${fops[1]} == "DNS" ] ; then vpn_dns="$vpn_dns ${fops[2]}" ; fi
    done
fi

iptables -t nat -F PR-QBS
if [[ -n "$vpn_dns" ]] ; then
    # Set DNS address translation in firewall:
    for addr in $vpn_dns; do
        iptables -t nat -A PR-QBS -i vif+ -p udp --dport 53 -j DNAT --to $addr
        iptables -t nat -A PR-QBS -i vif+ -p tcp --dport 53 -j DNAT --to $addr
    done
    su - -c 'notify-send "$(hostname): LINK IS UP." --icon=network-idle' user
else
    su - -c 'notify-send "$(hostname): LINK UP, NO DNS!" --icon=dialog-error' user
fi

;;
down)
su - -c 'notify-send "$(hostname): LINK IS DOWN !" --icon=dialog-error' user

# Restart the VPN automatically
sleep 5s
sudo /rw/config/rc.local
;;
esac
Save the script. Make it executable.
sudo chmod +x /rw/config/vpn/qubes-vpn-handler.sh -
Configure client to use the DNS handling script. Using openvpn as an example, edit the config.
sudo gedit /rw/config/vpn/openvpn-client.ovpnAdd the following.
script-security 2
up 'qubes-vpn-handler.sh up'
down 'qubes-vpn-handler.sh down'
Remove other instances of lines starting with
script-security,upordownshould there be any others. Save the script. Restart the client and test the connection again …this time from an AppVM! -
Set up iptables anti-leak rules. Edit the firewall script.
sudo gedit /rw/config/qubes-firewall-user-scriptClear out the existing lines and add:
#!/bin/bash
#    Block forwarding of connections through upstream network device
#    (in case the vpn tunnel breaks):
iptables -I FORWARD -o eth0 -j DROP
iptables -I FORWARD -i eth0 -j DROP
ip6tables -I FORWARD -o eth0 -j DROP
ip6tables -I FORWARD -i eth0 -j DROP

#    Accept traffic to VPN
iptables -P OUTPUT ACCEPT
iptables -F OUTPUT

#    Add the `qvpn` group to system, if it doesn't already exist
if ! grep -q "^qvpn:" /etc/group ; then
     groupadd -rf qvpn
     sync
fi
sleep 2s

#    Block non-VPN traffic to clearnet
iptables -I OUTPUT -o eth0 -j DROP
#    Allow traffic from the `qvpn` group to the uplink interface (eth0);
#    Our VPN client will run with group `qvpn`.
iptables -I OUTPUT -p all -o eth0 -m owner --gid-owner qvpn -j ACCEPT
Save the script. Make it executable.
sudo chmod +x /rw/config/qubes-firewall-user-script -
Set up the VPN’s autostart.
sudo gedit /rw/config/rc.localClear out the existing lines and add:
#!/bin/bash
VPN_CLIENT='openvpn'
VPN_OPTIONS='--cd /rw/config/vpn/ --config openvpn-client.ovpn --daemon'

groupadd -rf qvpn ; sleep 2s
sg qvpn -c "$VPN_CLIENT $VPN_OPTIONS"
su - -c 'notify-send "$(hostname): Starting $VPN_CLIENT..." --icon=network-idle' user
If you are using anything other than OpenVPN, change the
VPN_CLIENTandVPN_OPTIONSvariables to match your VPN software. Save the script. Make it executable.sudo chmod +x /rw/config/rc.local -
Restart the new VM! The link should then be established automatically with a popup notification to that effect.
Usage
Configure your AppVMs to use the VPN VM as a NetVM…
If you want to update your TemplateVMs through the VPN, you can enable the qubes-updates-proxy service for your new VPN VM and configure the qubes-rpc policy.
Troubleshooting
See the VPN Troubleshooting guide for tips on how to fix common VPN issues.
This document was migrated from the qubes-community project
- Page archive
- First commit: 08 Dec 2020. Last commit: 01 Apr 2022.
- Applicable Qubes OS releases based on commit dates and supported releases: 4.0, 4.1
- Original author(s) (GitHub usernames): bakeromso, observinglynx, kakooloukia
- Original author(s) (forum usernames):
- Document license: GPLv2