Introduction
I found this interesting article about using wireguard’s integration with network namespaces to provide a simple but rock solid “killswitch” that prevents network leaks.
The idea is that you can create the wireguard device (wg0 here) in one network namespace(physical) and then move it to another(init) and it “remembers” the original namespace as the one to send ciphertext.
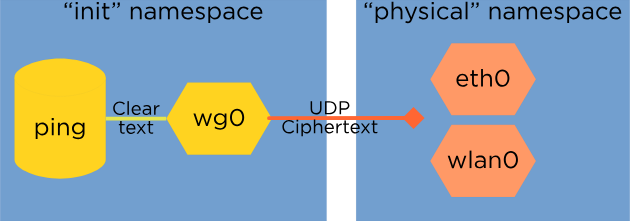
Now because the plaintext network devices are in another namespace, nothing other than the wireguard device can communicate with applications in the “init” namespace.
Here’s how I setup a vpn qube using this method.
Setup
Create a new qube providing network
Menu » Qubes Tools » Create Qubes VM:
- name: my-cool-vpn
- template:
fedora-42 - type:
AppVM - networking: sys-firewall
 Launch settings after creation
- advanced (tab) » Provides network access to other qubes
And then OK. Then the qube settings window should show up (proceed to the next step).
Enable service qubes-firewall
In the qube settings window enable the qubes-firewall service.
Acquire a wireguard config
Get a wireguard config for your vpn. Here is an example of a typical wg-quick config file. Comment out everything except the uncommented fields in the example. This is necessary because we are going to setup the wireguard device directly, rather than use wg-quick. Here I’m commenting out the Address, MTU and DNS fields.
[Interface]
#Address = 192.168.71.2/24,fdc9:3c6b:21c7:e6bd::2/64
PrivateKey = yAnz5TF+lXXJte14tji3zlMNq+hd2rYUIgJBgB3fBmk=
ListenPort = 51821
#MTU = 1320
#DNS = 88.66.44.23

[Peer]
PublicKey = TrMvSoP4jYQlY6RIzBgbssQqY3vxI2Pi+y71lOWWXX0=
PresharedKey = /UwcSPg38hW/D9Y3tcS1FOV0K1wuURMbS0sesJEP5ak=
Endpoint = 88.66.44.22:51820
AllowedIPs = 0.0.0.0/0,::/0
Put this file in /rw/config/wg0.conf.
Create setup_vpn.bash script
Next, create a shell script that implements the steps from the linked article. You’ll have to set the three variables at the top.
- PHYSICAL_IP: ; The address of
eth0in the vpn qube
$ ip add show eth0
2: eth0: <BROADCAST,MULTICAST,UP,LOWER_UP> mtu 1500 qdisc mq state UP group 1 qlen 1000
    link/ether 00:16:3e:5e:6c:00 brd ff:ff:ff:ff:ff:ff
    inet 10.137.0.17/32 scope global eth0
       valid_lft forever preferred_lft forever
    inet6 fe80::216:3eff:fe5e:6c00/64 scope link proto kernel_ll
       valid_lft forever preferred_lft forever
- PHYSICAL_ROUTE: The default route for the vpn qube
$ ip route
default via 10.138.32.193 dev eth0 onlink
- WG_IP: the ip from the commented out
Addressfield of your wireguard config
#!/bin/bash

set -eux

PHYSICAL_IP="10.137.0.17/32"
PHYSICAL_ROUTE="10.138.32.193"
WG_IP="192.168.72.2/32"

# create netns named "physical", move eth0 and create wg0
ip netns add physical
ip link set eth0 netns physical
ip -n physical link add wg0 type wireguard
# move wg0 to default netns
ip -n physical link set wg0 netns 1

# eth0 lost its configuration when we moved it to the
# physical namespace so reconfigure it
ip -n physical addr add "$PHYSICAL_IP" dev eth0
ip -n physical link set eth0 up
ip -n physical route add default via "$PHYSICAL_ROUTE" dev eth0 onlink

# setup wireguard
wg setconf wg0 /rw/config/wg0.conf
ip addr add "$WG_IP" dev wg0
ip link set wg0 up
ip route add default dev wg0
Place this file in /rw/config/setup_vpn.bash.
Call setup_vpn.bash
Add this line to the bottom of (the currently empty except for comments) /rw/config/qubes-firewall-user-script:
bash /rw/config/setup_vpn.bash
Now if you restart the vpn qube, you should see wireguard configured with wg show and qubes configured to use the vpn qubes for networking should be able to ping ip addresses. Getting DNS to work is our final step.
Fix DNS
Finally we need to fix DNS by replacing the DNS nat rules. This isn’t necessary for the killswitch, just to allow AppVMs using the vpn qubes from having to change their dns configuration.
Write this file to /rw/config/nftables.conf and set the two variables at the top:
virtualif: this is the same as thePHYSICAL_IPfrom thesetup_vpn.bashscriptvpndns1: this is the dns server commented out in your wireguard config. Alternatively, you can use any dns you want, eg8.8.8.8.
#!/usr/sbin/nft -f

# Set variables
define virtualif = 10.137.0.17/32
define vpndns1 = 88.66.44.23

# Flush existing rules
flush chain qubes dnat-dns

# Table for NAT and PR-QBS chain
table ip nat {
    chain PR-QBS {
        type nat hook prerouting priority -100; policy accept;
	ip daddr 10.139.1.1 udp dport 53 dnat to $vpndns1
	ip daddr 10.139.1.1 tcp dport 53 dnat to $vpndns1
    }
}

# Mangle table (for MSS clamping)
table ip mangle {
    chain forward {
        type filter hook forward priority 0; policy accept;
	tcp flags syn tcp option maxseg size set rt mtu;
    }
}
Configure nftables from the bottom of /rw/config/rc.local:
nft -f /rw/config/nftables.conf
All done!
Now if you restart your vpn qube, wireguard should be configured and qubes using it for networking should have network and dns access.
Caveats
I’m pretty familiar with Linux networking and networking in general but I’m new to Qubes.