Objective: Be able to visualize your configuration using qvm-ls-mermaid like this: qvm-ls-mermaid/examples/1.png at master · 3hhh/qvm-ls-mermaid · GitHub
, but without trusting it in dom0 ![]()
qvm-ls-mermaid is written by 3hhh/tripleh and can be installed in dom0. And while we don’t specifically distrust tripleh, we don’t necessarily trust him either. (Sorry @tripleh ! ![]() ).
).
The idea is that instead of doing a security review of each line of code in qvm-ls-mermaid, and blib and installing it in dom0, we isolate it by putting it in its own qube with read only access to the qubes configuration information, and no network access.
(If you disagree with being able to skip the security review for a code, please add your comments below)
Steps for creating the sys-admin-mermaid qube:
- Install these in your template:
- qubes-core-admin-client
- qubes-manager
- python3-qrexec
- python3-networkx
- Then create a new vm based on that template, with internet access enabled.
A CLI example could be (depending on your setup):
qvm-run debian-12 'sudo apt update'
qvm-run debian-12 'sudo apt install qubes-core-admin-client qubes-manager python3-qrexec'
qvm-run debian-12 'sudo apt install python3-networkx'
qvm-shutdown debian-12

qvm-create --template debian-12 --property netvm=sys-firewall-internet --label gray sys-admin-mermaid
Part 2: Install qvm-ls-mermaid
open a terminal in the new vm and run:
git clone --recurse-submodules https://github.com/3hhh/qvm-ls-mermaid.git
git clone --recurse-submodules https://github.com/3hhh/blib.git
Part 3: disable the networking.
A CLI example would be:
qvm-prefs sys-admin-mermaid netvm none
Part 4: Fix dependancy checks:
Still in the VMs terminal, add losetup to the users parth. One way is:
sudo ln -s /usr/sbin/losetup /usr/local/bin/
Next, create a “qvm-block” command.
sudo ln -s /usr/bin/qvm-device /usr/local/bin/qvm-block
Note: The need to do this (I.E. that /usr/bin/qvm-block link to /usr/bin/qvm-device is not automatically created) has been reported as a possible qubes-core-admin-client bug: qubes-core-admin-client missing /usr/bin/qvm-block? · Issue #8786 · QubesOS/qubes-issues · GitHub . If it is a bug, it’s possible it’s been solved by the time you read this and that this step is unnecessary)
Part 5: setup blib
(This currently needs to be run every time you start sys-admin-mermaid since it installs in /usr/lib)
cd ~/blib/; sudo ./installer install /usr/local/lib
Part 6 actually running it
Part 6a set up permissions for getting it in a automated way
You can set it up for a more automated version, by adding policies for the admin API in dom0. By putting
sys-admin-mermaid $adminvm allow,target=$adminvm
sys-admin-mermaid $anyvm allow,target=$adminvm
In the following files:
/etc/qubes-rpc/policy/admin.vm.List
/etc/qubes-rpc/policy/admin.vm.property.Get
/etc/qubes-rpc/policy/admin.vm.property.GetAll
/etc/qubes-rpc/policy/admin.property.List
/etc/qubes-rpc/policy/admin.property.Get
/etc/qubes-rpc/policy/admin.property.GetAll
/etc/qubes-rpc/policy/policy.List
Discussion points: Feel free to comment on this
Here are some possible points people may want to argue about at this point ![]()
- permissions are too generous and could be tightened
- permissions are too complicated for a end user. They could be made more generous by using a “global read only” permission, which should make it easier on the end user and its not networked anyway. some of the related discussions are at: Facilitate intuitive user access to qrexec RPC policies in the GUI · Issue #4721 · QubesOS/qubes-issues · GitHub Policy Manager GUI: Why, How, What?
- it uses files in
/etc/qubes-rpc/policy/and not in/etc/qubes/policy.d/( related: Phase out legacy qrexec policy files · Issue #8000 · QubesOS/qubes-issues · GitHub )
Part 6a: continued
Finally, inside the sys-admin-mermaid qube terminal, do:
cd ~/qvm-ls-mermaid
./qvm-ls-mermaid dom0 > mermaid/qvm-ls-mermaid.js
cd mermaid
./run
After a while, a web browser should pop up and display your qube setup similar to the example: qvm-ls-mermaid/examples/1.png at master · 3hhh/qvm-ls-mermaid · GitHub
Part 6b: If that worked, then make it do more
If the previous command worked, then try to add more features (like “show details of the VM” or “show what templates are used for what VMs”), via command line options to qvm-ls-mermaid
cd ~/qvm-ls-mermaid
./qvm-ls-mermaid dom0 -t -T -v -D > mermaid/qvm-ls-mermaid.js
cd mermaid
./run
(If this does not work, then it’s probably because you have qubes using your default-dvm)
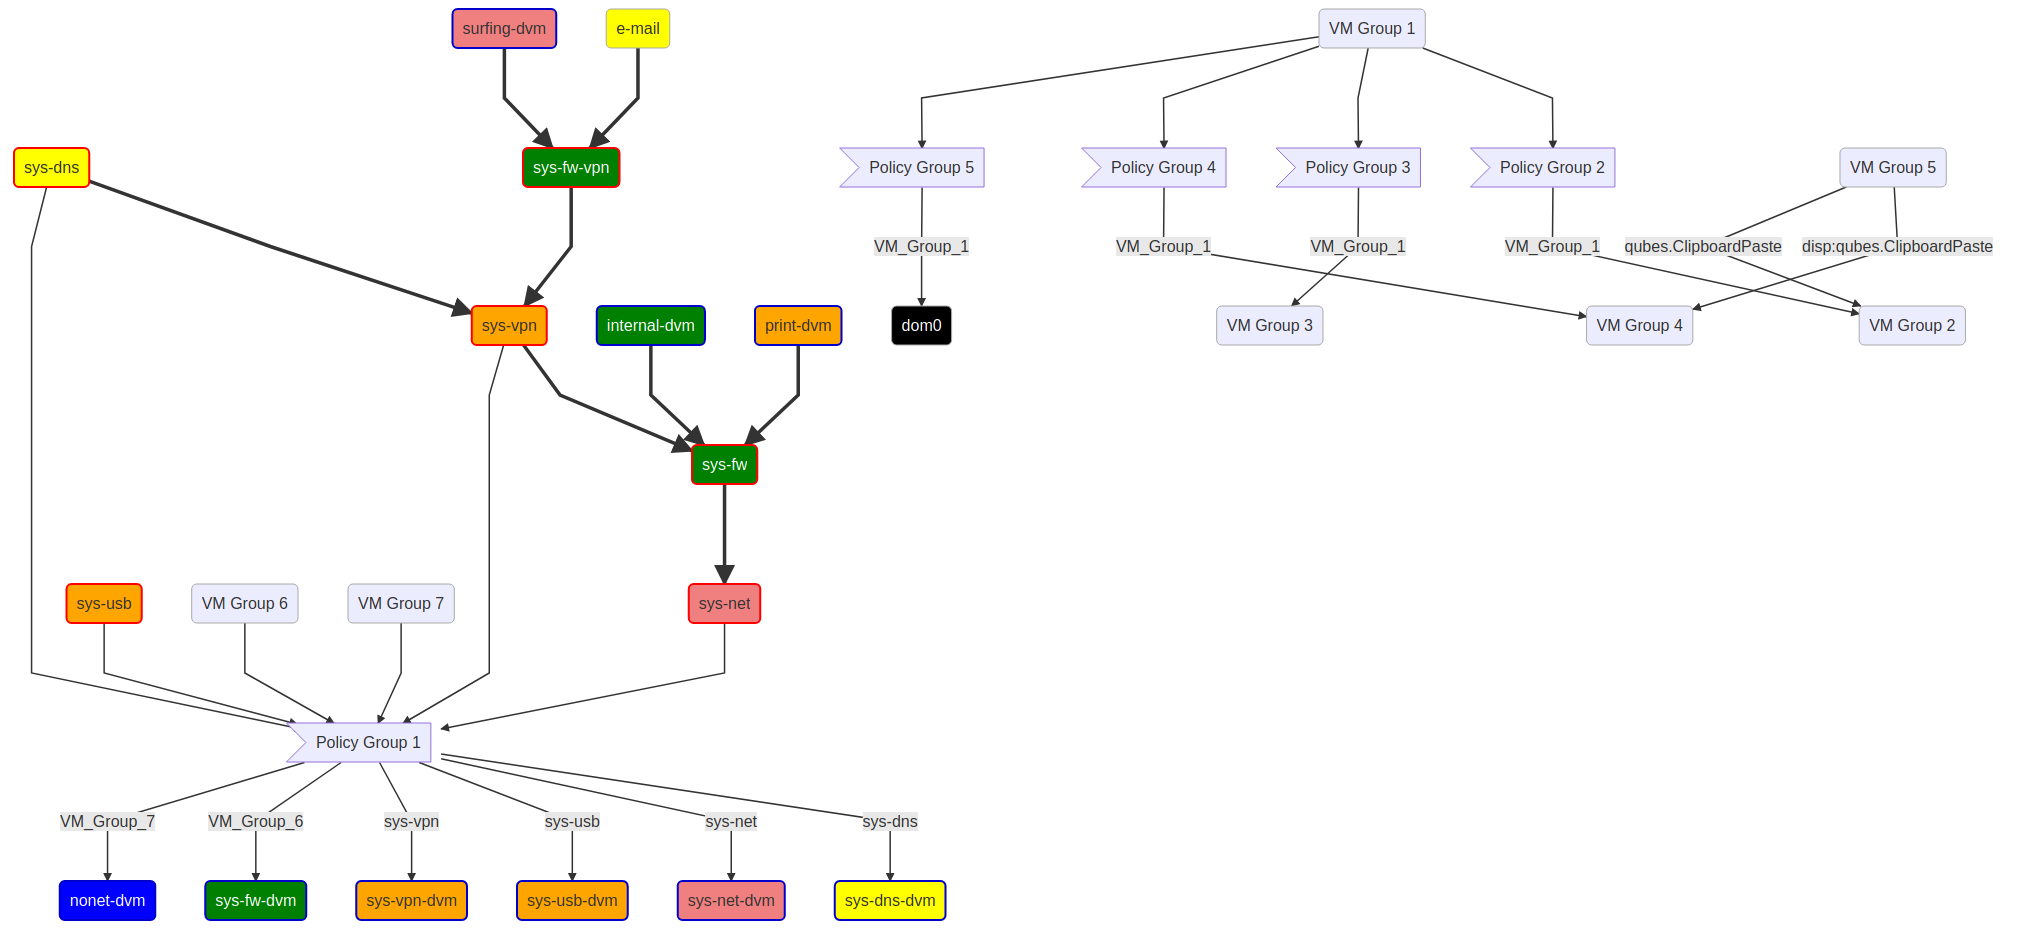
Part 6c: Hey, where are my policies???
You may notice that the qubes and arrows are being displayed like in the example, but things like “Policy Group 5” are missing.
Well in theory, we could set up permissions for it to show the policies too, then use the “-R” option for qvm-ls-mermaid, like:
cd ~/qvm-ls-mermaid
./qvm-ls-mermaid -R dom0 > mermaid/qvm-ls-mermaid.js
cd mermaid
./run
However, this will choke when qvm-ls-mermaid attempts to run:
qrexec-policy-graph --include-ask
returning:
Traceback (most recent call last):
  File "/usr/bin/qrexec-policy-graph", line 5, in <module>
    sys.exit(main())
  File "/usr/lib/python3/dist-packages/qrexec/tools/qrexec_policy_graph.py", line 125, in main
    system_info = utils.get_system_info()
  File "/usr/lib/python3/dist-packages/qrexec/utils.py", line 119, in get_system_info
    system_info = qubesd_call("dom0", "internal.GetSystemInfo")
  File "/usr/lib/python3/dist-packages/qrexec/utils.py", line 80, in qubesd_call
    client_socket.connect(socket_path)
FileNotFoundError: [Errno 2] No such file or directory )
It does not throw a “policy error” notification to the user, so I’m not sure if this is a policy problem, a bug, or something that’s not supposed to work.
Anyway, this is what the manual procedure is for. You can log into dom0 terminal and type:
qvm-ls --raw-data -O name,CLASS,label,netvm,provides_network,template,template_for_dispvms,virt_mode > qvmls.txt && qrexec-policy-graph --include-ask > qpol.txt
qvm-copy-to-vm sys-admin-mermaid qvmls.txt qpol.txt
Then go to the sys-admin-mermaid shell and run:
cd ~/qvm-ls-mermaid
( cat ~/QubesIncoming/dom0/qvmls.txt ; ./prune-policy-graph < ~/QubesIncoming/dom0/qpol.txt ) | ./qvm-ls-mermaid -R --vm > mermaid/qvm-ls-mermaid.js
cd mermaid ; ./run
And after a while you should see it open a browser which includes your policies!
Issues Left
Layout Issues:
The layout looks fine with a reasonable number of qubes, but if you have too many qubes the layout can start looking strange. (for a example of “too many” qubes, it looks quite strange with 110 qubes)
(and by “strange” I mean that when zoomed in enough to read the name of the 110 qubes, most qubes are in one big horizontal line going way beyond the edge of the screen)
If you have many qubes and need it to look better, one option might be to upgrade the mermaid library to a newer version that supports the new “elk” rendering engine, then edit your qvm-ls-mermaid.js file to use the new elk engine as described here: Flowcharts Syntax | Mermaid
Syntax Error Issues:
If you don’t see a graph, and instead it just says “syntax error” in the browser, the problem might be that you have “–” (I.E. double-hyphens) in your qube names. editing the qube names in the qvm-ls-mermaid.js file is one option to get rid of them)
Making it look prettier!:
If you want to change how it looks, you can edit the qvm-ls-mermaid.js flowchart description file using the syntax specified here: Flowcharts Syntax | Mermaid .
Tip: If you edit qvm-ls-mermaid.js, make sure you keep a original copy of your file so you can do a diff later when you need to remember what you changed.
Looking for comments on:
- The security concept of not needing a code review: I.E. this: The idea is that instead of doing a security review of each line of code in qvm-ls-mermaid, and blib and installing it in dom0, we isolate it by putting it in its own qube with read only access to the qubes configuration information, and no network access.
- qubes policy implementation details
- need to be tightened?
- Too complicated / need to be loosened?
- How should a end user who wants to visualize their system configuration and wants to install this, be presented with the policy needs for getting it to work? / maybe the qubes-policy-editor-gui ? (i have not seen this yet, just a comment that it’s bee written (see last comment in Facilitate intuitive user access to qrexec RPC policies in the GUI · Issue #4721 · QubesOS/qubes-issues · GitHub))
- Using /etc/qubes-rpc/policy/* vs using /etc/qubes/policy.d/*
- If you know how to get
qrexec-policy-graph --include-askto run from inside a qube! - This as a use case for Qubes-admin-API (I assume this is the kind of things qubes-admin-API was created for)
- Or if you just want acknowledgement that you made it all the way to the end of this post
