NetBSD qube

  1. Create a StandaloneVM with the default template.
  2. Replace vmlinuz with the netbsd-INSTALL_XEN3_DOMU kernel.
  3. During setup, choose to install on the xbd1 hard disk.
  4. Attach the CD to the VM.
  5. Configure the networking.
  6. Optionally enable SSHD during the post-install configuration.
  7. Replace the kernel with netbsd-XEN3_DOMU.
  8. The VM may fail to boot automatically, in which case you must explicitly specify xbd1a as the root device when prompted.

For further discussion, please see this thread and this guide.


This document was migrated from the qubes-community project
  • Page archive
  • First commit: 08 Dec 2020. Last commit: 08 Dec 2020.
  • Applicable Qubes OS releases based on commit dates and supported releases: 4.0
  • Original author(s) (GitHub usernames):
  • Original author(s) (forum usernames):
  • Document license: CC BY 4.0
How I got NetBSD-10.1 into Qubes 4.2 (outdated)

How I got NetBSD-10.1 into Qubes 4.2

The linked thread has instructions that explain how to install netbsd 7.x which is incredibly outdated. I have been banging my head against the wall trying to get netbsd 10.x installed. here is how i did it

disclaimer - im not an expert with netbsd or qubes, just a dude trying to learn and get stuff to work

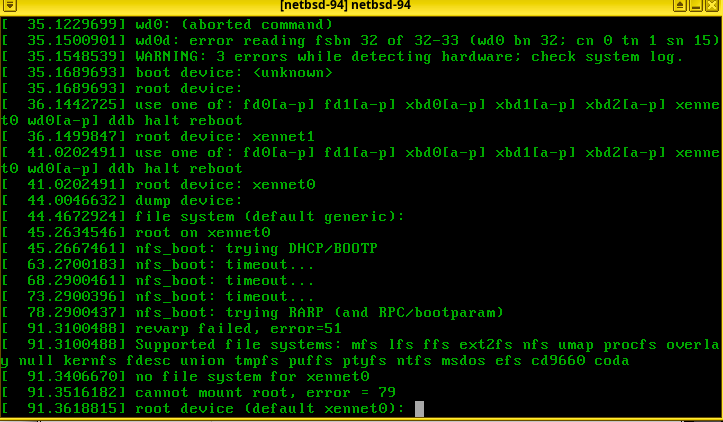
Unfortunately I could not get install NetBSD 10 directly into a fresh Standalone HVM. From what it looks like to me, the NetBSD team has changed their installer from something graphical in NetBSD 9 to something that reminds me of what I remember doing in OpenBSD. Along with those changes they seem to be treating Xen differently. In the installer I was not able to properly select the hard disk. And later on in this doc you will see that I could not get dhcpcd to auto configure the xennet0 network interface. Ill share some screenshots of this at the bottom.

I was only able to get NetBSD10 up and running as a Standalone HVM by installing NetBSD9 and then upgrading to 10

Step 1 Download NetBSD-9.4

In an AppVM (Daily for me)

Download NetBSD-9.4

curl https://cdn.netbsd.org/pub/NetBSD/NetBSD-9.4/amd64/installation/cdrom/boot.iso > ~/Downloads/netbsd-9.4.iso

Step 2 Create the NetBSD Qube

In Dom0

Create a Standalone HVM. It will not use an existing kernel, and what I understand the kernel will therefore be loaded by the iso.

qvm-create netbsd-94 --class StandaloneVM --label yellow
qvm-prefs netbsd-94 virt_mode hvm
qvm-prefs netbsd-94 kernel ''
qvm-prefs netbsd-94 kernelopts ''

Step 3 Install NetBSD-9.4

In Dom0

Start the netbsd-94 qube using the iso take note that I chose daily here so update it with whatever you chose for your appvm.

qvm-start netbsd-94 --cdrom=daily:/home/user/Downloads/netbsd-9.4.iso

In netbsd-94

Follow the prompts to install NetBSD

  1. Choose wd0 as the Available disk. Choose GPT - [0] and continue hitting enter
  2. User deafult partition sizes
  3. Use BIOS console
  4. Choose Full Installation
  5. I chose http instead of from cd-rom. I had some immediate errors for some reason when trying to install from cd.
    a. Make sure to select Configure Network. For me it created interface re0 and I just followed the steps to auto configure.

After waiting for everything to finish you should now have NetBSD-9.4 installed in a qube. You can choose to shutdown the qube and restart it.

Suggestion - Enable ssh from another qube

This will make life much easier than working in the tiny console screen qubes provides for the stadalone hvm. And we can copy/paste, screenshot, etc.

I am hiding it since it isnt really mandatory. Expand this guy below for what I did

Enabling SSH between netbsd-94 <> appvm

In netbsd-94

Create a user and enable sshd

# useradd -G wheel -m qubes
# passwd qubes

Next edit /etc/rc.conf Add these to the botom of the file

hostname=netbsd
sshd=YES

I rebooted at this point to be safe. You can try doing a service sshd start and it may be the same

In Dom0

Find the network information for the AppVM you want to ssh from

qvm-ls --network
NAME            STATE   NetVM           IP              IPBACK  GATEWAY
daily           Running sys-firewall    10.137.0.12     -       10.138.36.6
netbsd-94       Running sys-firewall    10.137.0.25     -       10.138.36.6

Make sure that both are on the same netvm, and I assume therefore that your qubes also have the same gateway. i dont know what will happen if they dont. Take note of the netvm (in my case sys-firewall)

In sys-firewall

In sys-firewall we want to enable networking from daily (10.137.0.12) to netbsd-94 (10.137.0.25). Make sure both are running

sudo nft add rule ip qubes custom-forward ip saddr 10.137.0.12 ip daddr 10.137.0.25 ct state new,established,related counter accept

In the AppVM

Now we can ssh from the appvm

ssh qubes@10.137.0.25

Step 4 - Prepare to Update to 10.0

Whether you are using ssh or the qube itself we will have to be root from here on. So you can run su if you choose to log in using the qubes user.

Next were gonna install sysupgrade which is the documented way to upgrade NetBSD.

Note The docs also suggest using sysinst, which comes native packaged with the operating system. sysinst will run postinstall and my experience with it when doing the major upgrade (9 → 10) encountered a bunch of errors

In Dom0

Back up the current netbsd-94 qube so we have something to fall back to if we mess up along the way.

qvm-clone netbsd-94 netbsd-94bkp

In netbsd-94

Install sysupgrade via pkg_add

# export PKG_PATH=https://cdn.netbsd.org/pub/pkgsrc/packages/NetBSD/$(uname -p)/$(uname -r | cut -d_ -f1)/All
# pkg_add sysupgrade

Perform the Upgrade

The netbsd guide explains how to do it. However we are going to have to make a couple of changes along the way for qubes

In netbsd-94

# sysupgrade fetch https://cdn.NetBSD.org/pub/NetBSD/NetBSD-10.0/amd64
# sysupgrade kernel
# sysupgrade modules
# reboot

At this point you may see an error the dhcpd has errors when you start up the qube again. When we upgraded the kernels and the modules to qubes 10, the networking broke. Something with qubes 10 changes how virtualization works, which is I guess why we cant just use the installer in the first place. We wont be able to ssh and we wont be able to do much of anything until we fix the networking so lets do it now.

If you check the /var/run/rc.log You may see something like this:

Starting dhcpcd.
re0: interface not found or invalid
/etc/rc.d/dhcpcd exited with code 1

There is probably a way to properly configure dhcpcd that I was struggling to find. I tried to follow their DHCP How To Guide with little luck. It was easier to just manually configure the interface.

If you run ifconfig now you will see something like this

xennet0: flags=0x8802<BROADCAST,SIMPLEX,MULTICAST> mtu 1500
        capabilities=3fc00<TCP4CSUM_Rx,TCP4CSUM_TX,UDP4CSUM_Rx,UDP4CSUM_TX>
        capabilities=3fc00<TCP6CSUM_Rx,TCP6CSUM_TX,UDP6CSUM_Rx,UDP6CSUM_TX>
        enabled=0
        ec_capabilites=5<VLAN_MTU,JUMBO_MTU>
        ec_enabled=0
        address: 00:16:3e:5e:6c:00

xennet0 is the network interface in a NetBSD domU machine so that makes sense. Dont know what changed between netbsd9 and 10 to finally recognize this. But anyways for now we can manually configure the interface. We are going to create /etc/ifconfig.xennet0 with the following

inet 10.137.0.25 netmask 255.252.0.0 broadcast 10.139.255.255
!route add default 10.138.36.6

Take note to update the ip address and default gateway.

How did I determine the netmask and broadcast???

Where did the netmask and broadcast values come from?
That is a good question that I wish I was better at answering. Essentially there needs to be a subnet wide enough to encompass both the ip address with is on 10.137.0.0/24, the gateway which is on 10.138.0.0/24 and the dns which is on 10.139.1.0/16.

How anyone sits and figures these out is beyond me, i would love to learn but get so confused by it all. I asked Mr. LLM to give me some values. Do they work for me? Yep. Are the the best thing? I highly doubt it.

Lastly, ensure that dhcpcd is disabled in /etc/rc.conf now that the interface is manually configured. Delete these lines if they exist

dhcpcd=YES
dhcpcd_flags="-qM re0"

On a reboot networking should work again. You can confirm with an ifconfig / ping 1.1.1.1 etc. If you chose to enable ssh, you may have to re-run that firewall command, I dont remember

In netbsd-94

Continue with the upgrade to NetBSD-10.0

# sysupgrade sets
# susupgrade etcupdate

Note As you run through this command above will be prompted whether you want to keep the old version or replace with the new of many files. Well we havent done anything really to the system so you gotta one by one choose to install the new version. I dont know of a way to force

After my upgrade, my qubes user got messed up. It somehow lost the wheel group, likely because I overrode /etc/passwd at this step. Maybe pay some more attention than I did here. I dont really know how to fix that user sorry.

# sysupgrade postinstall

When you run this you may see an error like this:

postinstall checks failed: makedev named opensslcertsrehash
To fix, run:
    sh /usr/sbin/postinstall -s /var/cache/sysupgrade/etc.tar.xz -s /var/cache/sysupgrade/xetc.tar.xz -d / fix makedev named opensslcertsrehash
Note that this may overwrite local changes.
sysupgrade: E: Some postinstall(8) checks have failed

so you want to run what it suggests to run. then you will hopefully get no errors this time.

# sysupgrade clean
# reboot

You did it! You now hopefully have a netbsd qube on 10.0

Upgrade to latest 10.x

Now we can run the auto upgrader. I chose 10.1 in the url

# sysupgrade auto https://cdn.NetBSD.org/pub/NetBSD/NetBSD-10.1/amd64

Same warning about overwriting some /etc files. Most havent been touched by us but dont be as lazy as I was.

Install pkgin

export PKG_PATH=https://cdn.netbsd.org/pub/pkgsrc/packages/NetBSD/$(uname -p)/$(uname -r | cut -d_ -f1)/All
pkg_add pkgin
pkgin update

confirm it works by trying something like pkgin install vim

Quirks

The one noticeable problem I have encountered since upgrade to NetBSD-10 has something to do with suspending my laptop. If my netbsd qube was running prior to suspension upon returning the qube is completely frozen. Restarting the qube does not fix it either. It then hangs during the boot process. I have only been able to resolve by restarting my entire laptop.

I havent been playing around with too much else yet. Just happy I got this up with networking configured.

Thanks for reading

Appendix

Quirk - Frozen NetBSD-10

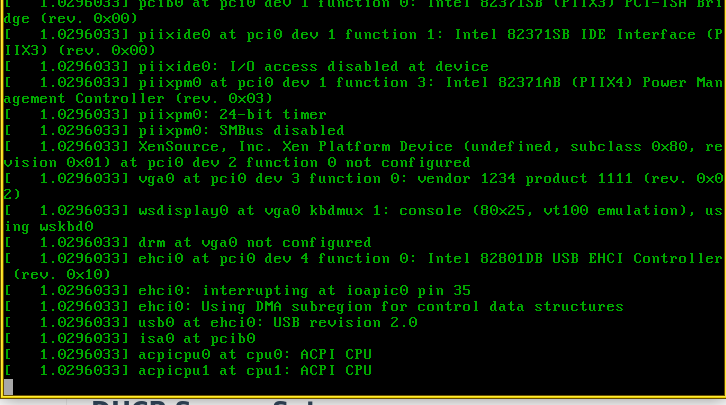
It consistently freezes on this step for me like I mentioned above. This goes for both the installed hvm and if I try to run the installer via cdrom. Always hangs on this ACPI CPU step and then it seems like the CPU spikes to 99% in my qube manager.

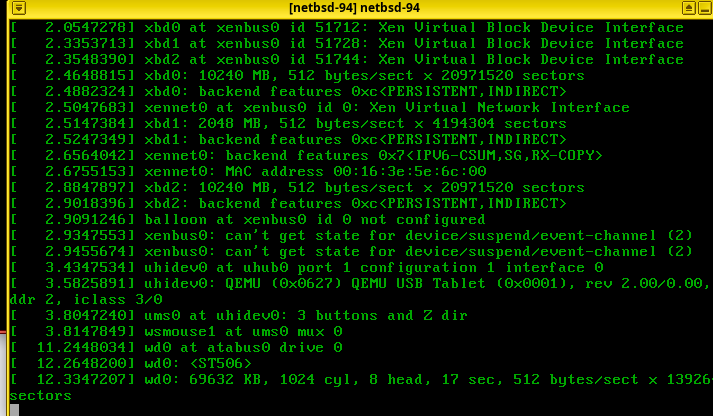
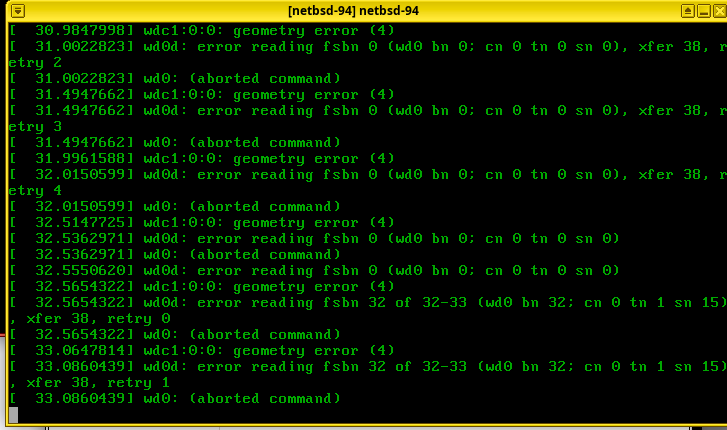
Why doesnt installing NetBSD-10 directly work?

I dont know… These are the screenshots of what happens for me. They definitely changed how NetBSD interacts with Xen based on what I had to do with the networking post upgrade. This seems to be a similar problem. From what I have tried to read and understand there should be a xennet disk that I can choose, but whenever I try I get errors. Here are the screenshots:

See this post for the final guide.

Doing some more research on how to actually get the NetBSD-10 installation cd to work in qubes (shoutout to mlelstv):

Doing some more research on how to actually get the NetBSD-10 installation cd to work in qubes (shoutout to mlelstv):

NetBSD Xen only recognizes CDs as Device 2

N.B. the vdev device for a cdrom device MUST be given as hdc, not hdb, as this alters how the emulated ATA devices attach. With hdc, an emulated CD drive will attach (and be usable), whereas with hdb, it will be seen incorrectly as a hard disk and will not be usable (and thus you will not be able to install from CD)

As mentioned above, the emulated CD drive must be set as device 2 (hdc a.k.a. xvdc) not 1 (hdb) or 3 (hdd a.k.a. xvdd). By default, the new VM will have its emulated CD drive as xvdd (device 3) and so will not work. To alter this, determine its vbd UUID and change userdevice to 2.

Source - NetBSD Xen Howto

So that was our problem… We need to try and mount the image specifically to xvdc

Problem - Qubes always uses xvdc for volatile storage

# Dom0
$ qvm-device block attach netbsd-10 daily:loop0 --persistent --option frontend-dev=xvdc --option read-only=yes --option devtype=cdrom
$ qvm-start netbsd-10
Start failed: XML error: target 'xvdc' duplicated for disk sources '/dev/mapper/qubes_dom0-vm--netbsd--10--volatile' and '/dev/loop0', see /var/log/libvirt/libxl/libxl-driver.log for details
  • xvdc – volatile.img, discarded at each VM restart – here is placed swap and temporal “/” modifications (see below)

Source -Qubes Template Implementation

Hopefully there is a way to configure what device a qube uses for volatile storage but I have a feeling it is gonna keep being painful

See this post for the final guide.

Ok i got it and it is beautiful :slight_smile:

Heres all of the steps again consolidated

Step 1 Download NetBSD-10.1

curl https://cdn.netbsd.org/pub/NetBSD/NetBSD-10.1/images/NetBSD-10.1-amd64.iso > NetBSB-10.1-amd64.iso

Step 2 Create the NetBSD-10 Qube

In Dom0

qvm-create netbsd-10 --class StandaloneVM --label yellow
qvm-prefs netbsd-10 virt_mode hvm
qvm-prefs netbsd-10 kernel ''
qvm-prefs netbsd-10 kernelopts ''

Step 3 Mount the iso

In the AppVM

sudo losetup -f --show NetBSD-10.1-amd64.iso
/dev/loop0

Step 4 Configure NetBSD to auto mount the iso

Normally you can boot from a cdrom using qvm-start <vm> --cdrom=... or qvm-start <vm> --hddisk=... but we need to do something special for netbsd

According to their docs:

N.B. the vdev device for a cdrom device MUST be given as hdc, not hdb, as this alters how the emulated ATA devices attach. With hdc, an emulated CD drive will attach (and be usable), whereas with hdb, it will be seen incorrectly as a hard disk and will not be usable (and thus you will not be able to install from CD)

As mentioned above, the emulated CD drive must be set as device 2 (hdc a.k.a. xvdc) not 1 (hdb) or 3 (hdd a.k.a. xvdd). By default, the new VM will have its emulated CD drive as xvdd (device 3) and so will not work. To alter this, determine its vbd UUID and change userdevice to 2.

Source - NetBSD Xen HowTo

So we need to mount the iso as xvdc

In Dom0

qvm-device block attach netbsd-10 daily:loop0 --persistent --option frontend-dev=xvdc --option read-only=yes --option devtype=cdrom

You can then confirm it with

BACKEND:DEVID  DESCRIPTION USED BY
daily:loop0 /home/user/Downloads/NetBSD-10.1-amd64.iso netbsd-10 (devtype=cdrom, frontend-dev=xvdc, read-only=yes)

Step 5 Alter the NetBSD-10 Qube’s xen.xml

One quirk here is the qubes by default uses xvdc for its volatile storage

  • xvdc – volatile.img, discarded at each VM restart – here is placed swap and temporal “/” modifications (see below)

Source - Qubes Tempalte Implementation

We need to alter that, and ideally just for the netbsd-10 qube.

In Dom0

sudo mkdir -p /usr/share/qubes/templates/libvirt/xen/by-name
sudo cp /usr/share/qubes/templates/libvirt/xen.xml /usr/share/qubes/templates/libvirt/xen/by-name/netbsd-10.xml
sudo vi /usr/share/qubes/templates/libvirt/xen/by-name/netbsd-10.xml

You need to edit that netbsd-10.xml to replace the reference of xvdc to something like xvdf. There was just one reference that looked like this

{% elif device.name == 'volatile' %}
  <target dev="xvdc" />

Source - Qubes libvirt

Step 6 Run the Installer

In Dom0

qvm-start netbsd-10

Look at the installer actually work in all its glory :')

You are going to just breeze through the installer at this point

  1. Choose xbd0 as the hard disk to install to
  2. Use default partition sizes
  3. Use BIOS console
  4. Choose Full Installation
  5. Install from CDROM
  6. Choose a root password
  7. I got a message saying I lacked a strong pseudo random number generator. I chose to enter manually and followed the instructions
  8. I chose to exit a this point and will take care of the rest post install.

Step 7 Clean up

In Dom0

We want to no longer use xvdf its safer to just go back to using the original config because there is logic in that template to auto increment the device name (I am assuming starting from xvdd)

Also we need to detach the iso that we marked as persistent earlier

qvm-shutdown netbsd-10
sudo rm /usr/share/qubes/templates/libvirt/xen/by-name/netbsd-10.xml
qvm-device block detach netbsd-10 daily:loop0

In AppVM

Lets detach the iso as well since we are done with it

sudo losetup -d /dev/loop0

Step 8 Configure NetBSD-10

Lets boot it up and configure some things. Also lets look at the network settings. We will need it to configure the netbsd xennet0 interface

In Dom0

qvm-start netbsd-10

qvm-ls --network
NAME            STATE   NetVM           IP              IPBACK  GATEWAY
daily           Running sys-firewall    10.137.0.12     -       10.138.36.6
netbsd-10       Running sys-firewall    10.137.0.25     -       10.138.36.6

In the netbsd-10 qube

Configure the Network

I still dont not how to get this to work with dhcpcd. For now we can manually configure the interface. We are going to create /etc/ifconfig.xennet0 with the following

inet 10.137.0.25 netmask 255.252.0.0 broadcast 10.139.255.255
!route add default 10.138.36.6

Take note to update the ip address and default gateway.

Determining the netbask and broadcast

How did I determine the netmask and broadcast???

Where did the netmask and broadcast values come from?
That is a good question that I wish I was better at answering. Essentially there needs to be a subnet wide enough to encompass both the ip address with is on 10.137.0.0/24, the gateway which is on 10.138.0.0/24 and the dns which is on 10.139.1.0/16.

How anyone sits and figures these out is beyond me, i would love to learn but get so confused by it all. I asked Mr. LLM to give me some values. Do they work for me? Yep. Are the the best thing? I highly doubt it.

Next we should configure the dns. You will have to open the qube settings to find your dns.

vi /etc/resolv.conf
nameserver 10.139.1.1
nameserver 10.139.1.2

On a reboot networking should work again. You can confirm with an ifconfig / ping 1.1.1.1 etc.

Suggestion Get SSH Working

Not necessary but nice to have

Get SSH Working

This will make life much easier than working in the tiny console screen qubes provides for the stadalone hvm. And we can copy/paste, screenshot, etc.

Enabling SSH between netbsd-10 <> appvm

In netbsd-10

Create a user and enable sshd

# useradd -G wheel -m qubes
# passwd qubes

Next edit /etc/rc.conf Add these to the bottom of the file

hostname=netbsd
sshd=YES

I rebooted at this point to be safe. You can try doing a service sshd start and it may be the same

In Dom0

Find the network information for the AppVM you want to ssh from

qvm-ls --network
NAME            STATE   NetVM           IP              IPBACK  GATEWAY
daily           Running sys-firewall    10.137.0.12     -       10.138.36.6
netbsd-10       Running sys-firewall    10.137.0.25     -       10.138.36.6

Make sure that both are on the same netvm, and I assume therefore that your qubes also have the same gateway. i dont know what will happen if they dont. Take note of the netvm (in my case sys-firewall)

In sys-firewall

In sys-firewall we want to enable networking from daily (10.137.0.12) to netbsd-10 (10.137.0.25). Make sure both are running

sudo nft add rule ip qubes custom-forward ip saddr 10.137.0.12 ip daddr 10.137.0.25 ct state new,established,related counter accept

In the AppVM

Now we can ssh from the appvm

ssh qubes@10.137.0.25

Configure pkgin

export PKG_PATH=https://cdn.netbsd.org/pub/pkgsrc/packages/NetBSD/$(uname -p)/$(uname -r | cut -d_ -f1)/All
pkg_add pkgin
pkgin update

Test it works by doing something like pkgin install vim

There you have it. NetBSD-10 finally

If any one wants a NetBSD template you can pull one from
https://qubes.3isec.org, or add the repository and use qvm-template

It’s a minimal install - add whatever sets you want. root has
password set to qubes, so you should change this immediately.

You can also create a user if you wish and use private storage as
normal, but you will need to do relevant work in the template.
I could configure this with scripts as with the openBSD template, but I
havent: it wasnt needed.

1 Like