Intro
Hello guys, this guide will explain how you can replace your existing sys-net with a much more hardened sys-net by using OpenBSD.
OpenBSD provides high-quality driver code, strong security features, good hardware support, low resource use, and a smaller attack surface compared to Linux. Using OpenBSD for sys-net adds important diversity to your network setup. For example, if there’s a major exploit in the Linux distribution, using OpenBSD alongside Linux means that an attacker would need to find two separate vulnerabilities to compromise the system.
Additionally, a standard Fedora template includes many packages that you might not need. While some might suggest using a minimal template, it’s worth asking: why not go further and use a more secure operating system? Choosing OpenBSD not only reduces potential risks but also strengthens the overall security of your network. This way, you can take advantage of a secure OS while avoiding unnecessary vulnerabilities.
Why OpenBSD?
In theory, you could use other BSD distributions like HardenedBSD (which is a fork of FreeBSD which doesn’t do well on security) or NetBSD, but OpenBSD is a better choice because it is security focused. It has well-reviewed driver code, high-quality code, smart ways to prevent attacks, great hardware support, uses fewer resources, and has a smaller attack surface compared to Linux.
Before we begin
I highly recommend that you familiarize yourself with basic configuration in OpenBSD. You’ll need to set up certain features, such as doas (an alternative to sudo). This will help you understand how it works, as it differs significantly from Linux.
There are some (outdated) guides available on the forum and GitHub, but they are unclear and miss important details and updates.
I’d like to give a special thanks to @palainp and @solene. They have been very helpful in setting this up, they supported me through many issues during the setup of this.
@palainp is one of the maintainers of the Qubes OS Mirage firewall, and I will create a separate guide on how to use it with for general use. He has helped me with setting up the OpenBSD sys-net and Mirage Firewall.
@solene is one of the document maintainers of openbsd and has helped me stricting the rulesets for the openbsd firewall.
This is one of my first guides, so please don’t hold back on your feedback. I’m still in the learning process of both creating guides and setting up something this advanced.
Setup the Qube
I used the following command to create the OpenBSD Qube as a standalone VM. While it’s possible to set it up as a template VM and create AppVMs from it, we will focus on the standalone VM for now.
qvm-create \
<name it as you want i'm using sys-net-openbsd) \
--standalone \
--property virt_mode=HVM \
--property kernel='' \
--label (give it a color as you want) \
After you have created the Qube go to the ‘Qube Manager’ and edit the following settings:
- Give it 30 gb of system storage
- Disable ‘Include in memory balancing’
- Set default disposable template to ‘(none)’
- Enable ‘Provides network’
- Set the Net qube to sys-firewall
Installation of OpenBSD
Launch a disposable VM and download your OpenBSD ISO file from this link:
https://www.openbsd.org/faq/faq4.html#Download
Install the install76.iso for amd64.
Once you’ve downloaded the ISO, be sure to verify it using the SHA256 file, which is also available from the same link.
Booting up
It’s important to mention that OpenBSD does not include certain network firmware in the installation ISO due to copyright and licensing restrictions. As a result, there are two ways to set up OpenBSD, and I will cover both methods.
First, we need to check if you need to install any firmware manually. To do this, attach your Ethernet or network controller to your standalone OpenBSD using the ‘Qube Manager’ in the ‘Devices’ tab. Then, return to the ‘Advanced’ tab and click on ‘Boot qube from CD-ROM.’ After that, choose ‘from file in qube,’ locate your disposable VM, and click on the ISO file.
Before you boot, make sure to shut down your original sys-net. You cannot boot OpenBSD if the controllers are attached while sys-net is still running.
Quote from OpenBSD:
For licensing reasons, some firmware cannot be directly distributed with OpenBSD. The fw_update tool will automatically download and install any missing firmware, but this requires a working internet connection.
Setting up OpenBSD
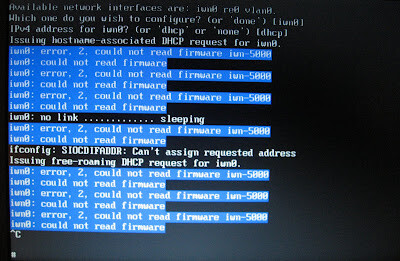
Once you’ve successfully booted up, take a close look at the boot logs. If you see something like what’s in the screenshot, you likely need a firmware. The error will show up after everything has fully loaded and you reach the setup screen. Please follow Setup Guide 2.
If you don’t see the same error or if you’re using an Ethernet cable for your internet connection, please follow Setup Guide 1.
Setup guide 1
Follow the setup guide after you have succesfully booted up.
- Press I.
- Select your keyboard layout.
- Choose your system hostname.
- Use the xnf0 network interface.
- Enter the IPv4 address provided by QubesOS, for example, 10.137.x.x (you can also find this in the ‘Qube Manager’).
- Set the netmask to 255.0.0.0.
- Skip IPv6.
- Configure additional interface with DHCP from your attach network controller for example em0
- Enter the gateway listed in the ‘Qube Manager.’
- Enter the DNS nameservers listed in the ‘Qube Manager.’
- Setup root password
- Don’t start sshd by default
- Go with the defaults for the next questions about X Window System
- Setup a user
- Go with the disk sd0
- Don’t encrypt the disk
- Go with MBR
- auto layout for the disk setup
- Follow the instructions to install the sets it’s on cd0
- You don’t need game76.tgz and x.tgz packages deselect them with -game* and -x*
- You can proceed without verification, but if you want, you can add the sha256.sig file to the ISO using Isomaster after downloading it from the OpenBSD site. However, we won’t cover that in this guide, so just choose ‘yes’ for now.
- Press done.
Setup guide 2
You need to install your firmware.
Access the shell by pressing S and enter halt -p. Once OpenBSD has shut down, return to the Qube Manager and go to the Devices tab. Remove the attached controller and ensure that your sys-firewall is still set as the net qube for OpenBSD. After that, boot back up (refer to the ‘booting up’ section if you need help).
Follow the setup guide after you have succesfully booted up.
- Press I.
- Select your keyboard layout.
- Choose your system hostname.
- Use the xnf0 network interface.
- Enter the IPv4 address provided by QubesOS, for example, 10.137.x.x (you can also find this in the ‘Qube Manager’).
- Set the netmask to 255.0.0.0.
- Skip IPv6.
- There’s no need to configure additional network interfaces; just enter ‘done.’
- Enter the gateway listed in the ‘Qube Manager.’
- Enter the DNS nameservers listed in the ‘Qube Manager.’
- Setup root password
- Don’t start sshd by default
- Go with the defaults for the next questions about X Window System
- Setup a user
- Go with the disk sd0
- Don’t encrypt the disk
- Go with MBR
- auto layout for the disk setup
- Follow the instructions to install the sets it’s on cd0
- You don’t need game76.tgz and x.tgz packages deselect them with -game* and -x*
- You can proceed without verification, but if you want, you can add the sha256.sig file to the ISO using Isomaster after downloading it from the OpenBSD site. However, we won’t cover that in this guide, so just choose ‘yes’ for now.
- Press done.
After rebooting and logging in, look up how to install the firmware for your network controller it should be straightforward. You can use the fw_update command to install the firmware for your network controller. Once you’ve done that, reattach the controller to your standalone OpenBSD and boot up again. Then, set up your controller. Some guides which should help.
OpenBSD FAQ: Installation Guide
OpenBSD FAQ: Networking
To check your network interfaces, run the command ifconfig. You should see several interfaces listed. The ones that we are interest in are xnf0, which is the virtual interface attached from sys-firewall that you configured during installation, and your network controller, such as iwn0. Make sure both interfaces are functioning properly by pinging 1.1.1.1 for xnf0 If the output is too long, you can redirect it to a file for easier viewing by using the command ifconfig > test This will allow you to scroll through the output more conveniently.
Network setup
We need to configure the network.
Set your net Qube to use sys-firewall as followed:
Set sys-firewall as n/a (no net qube)
Set sys-net-openbsd as sys-firewall
Set the APPvm as sys-firewall
sys-net-openbsd ← sys-firewall → appvm
Next, copy the sysctl.conf file from the /etc/examples directory:
cp /etc/examples/sysctl.conf /etc/
Then, edit the sysctl.conf file using vi and uncomment the following line:
net.inet.ip.forwarding=1
After making these changes, reboot your OpenBSD system.
Next, you will need to set up the firewall within OpenBSD using Packet Filter (PF). Open the /etc/pf.conf file with vi and make sure it looks like this:
Change 9.9.9.9 to your preferred DNS nameserver.
The firewall rules are a work in progress and are not yet fully strict.
# $OpenBSD: pf.conf, v 1.5.5 2017/12/03 20:40:04 sthen Exp $
#
# See pf.conf (5) and /etc/examples/pf.conf

set skip on lo

match in proto { udp tcp } from xnf0:network to any port domain rdr-to 9.9.9.9 port domain
pass in proto { udp tcp } from xnf0:network to any port domain rdr-to 9.9.9.9 port domain
match out on egress inet from xnf0:network to any nat-to egress
pass out on egress inet from xnf0:network to any nat-to (egress)

block return  # block stateless traffic
pass # establish keep-state

# By default, do not permit remote connections to X11
block return in on ! lo0 proto tcp to port 6000:6010

# Port build user does not need network
block return out log proto {tcp udp} user _pbuild
Apply the changes with pfctl -f /etc/pf.conf
Firewall Configuration
The sys-firewall requires specific configuration to effectively route traffic between Qubes. Unfortunately, I did not test this with sys-firewall. Instead, I went with qubes-mirage-firewall, which is relatively easy to set up. If anyone has successfully configured sys-firewall, please share your method so we can consider adding it to the guide.
Setup instructions from qubes-mirage-firewall on their GitHub
Configure firewall with OpenBSD-like netvm
OpenBSD is currently unable to be used as netvm, so if you want to use a BSD as your sys-net VM, you’ll need to set its netvm to qubes-mirage-firewall (see #146 for more information). That means you’ll have
AppVMs -> qubes-mirage-firewall <- OpenBSDwith the arrow standing for the netvm property setting.In that case you’ll have to tell qubes-mirage-firewall which AppVM client should be used as uplink:
qvm-prefs --set mirage-firewall -- kernelopts '--ipv4=X.X.X.X --ipv4-gw=Y.Y.Y.Y'with
X.X.X.Xthe IP address for mirage-firewall andY.Y.Y.Ythe IP address of your OpenBSD HVM.
Here are some resources for setting up sys-firewall and routing traffic successfully. However, please note that these resources may be outdated and likely require some rework:
Redirecting… (not outdated)
Integrate pfSense/OPNsense VM on QubesOS · Issue #1 · jcholsap/freemod · GitHub (outdated)
Your hardenend sys-net should now be functional! Test it by configuring sys-firewall as your net Qube and try pinging or browsing the internet.