(Note: This page concerns multi-factor authentication for logging into external services, not for logging into Qubes itself. For the latter, see here.)
Multi-factor authentication (MFA) today most commonly takes the form of a numerical code generated by a smartphone app or sent via SMS (text message) which the user must enter in addition to a password in order to log in to a website or other service.
One of the primary features of Qubes is that it allows us to create securely isolated VMs which can run arbitrary programs. (These VMs are securely isolated not only from each other but also, optionally, from the network.) This means that we can create a dedicated, network-isolated VM to function as a secure authenticator.
This guide will show you how to set up a VM which uses oathtool, an open-source one-time password tool, to generate authentication codes. This method presents several benefits over relying on a consumer smartphone app or SMS:
-
oathtoolincludes the time-based one-time password (TOTP) algorithm, which is the same algorithm used by Google Authenticator, one of the most commonly used authenticator apps. This means that we can useoathtoolas a complete open-source replacement for Google Authenticator (which became propriety (closed-source) in May 2013 after version 2.21). -
By keeping all of our authenticator data as plain text files in a dedicated VM, we have complete control over the secret keys used to generate our authentication tokens, and we can back up, copy, and transfer our authenticator data at will.
-
By creating a minimal environment in which to run
oathtoolfrom the command line, we can minimize our attack surface relative to most smartphone apps and SMS. Consumer smartphones are typically internet-facing devices which are increasingly targeted by malware. Most smartphones are bundled with proprietary software which allows service providers almost complete control over the device. Likewise, consumer SMS messages are often cleartext communications which can feasibly be intercepted and read by third parties. (In cases in which SMS messages are encrypted on the network by the service provider, the service provider itself still has full access, which means that the contents of such messages could be read by unscrupulous admins or turned over to government agencies.) -
Using
oathtoolin a dedicated, network-isolated Qubes VM allows us to achieve a unique combination of security and convenience. The strong isolation Qubes provides allows us to reap the full security benefits of MFA, while virtualization frees us from having to worry about finding and handling a second physical device.
Optional Preparation Steps
-
Start with a minimal template. In this example, we’ll use the minimal Fedora template. Get it if you haven’t already done so:
[user@dom0 ~]$ sudo qubes-dom0-update qubes-template-fedora-30-minimal -
Since we’ll be making some modifications, you may want to clone the minimal template:
[user@dom0 ~]$ qvm-clone fedora-30-minimal fedora-30-min-mfa -
To open a root shell on the minimal template (for details, see Passwordless Root), run the following command:
[user@dom0 ~]$ qvm-run -u root fedora-30-min-mfa xterm -
Since this is going to be a minimal environment in which we run
oathtoolfrom the command line, we’ll install only a couple of packages:[root@fedora-30-min-mfa ~]# dnf install oathtool vim-minimal [root@fedora-30-min-mfa ~]$ poweroff -
Create an AppVM and set it to use the TemplateVM we just created:
[user@dom0 ~]$ qvm-create -l black mfa [user@dom0 ~]$ qvm-prefs -s mfa template fedora-30-min-mfa -
Isolate the new AppVM from the network:
[user@dom0 ~]$ qvm-prefs -s mfa netvm none
Using the MFA AppVM
Now that we have an AppVM set up to use oathtool securely, let’s use it with an external service. This process will vary slightly from service to service but is largely the same.
-
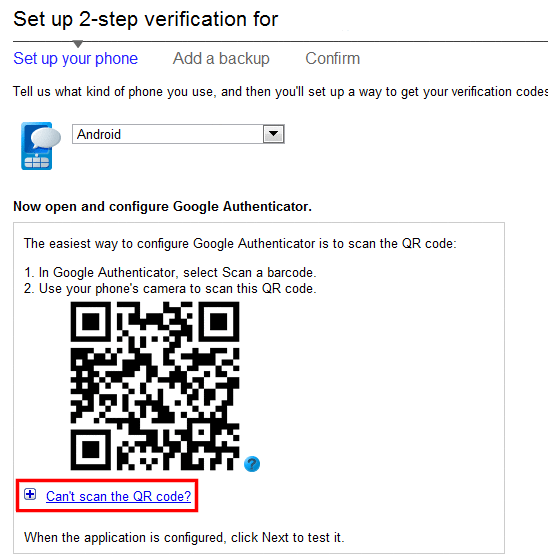
Proceed with setting up multi-factor authentication as you normally would. If you are prompted to scan a QR code, instead select the option (if available) to view the secret key as text:
You should then see the secret key as text:
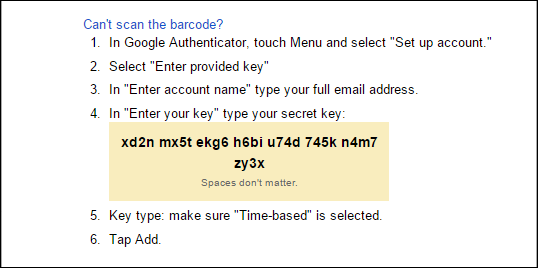
Note that the length and format of the secret key may vary by service:

-
In your MFA AppVM, you can now use
oathtoolto generate base32 TOTP authentication tokens just like Google Authenticator would. In this example, we’ll use the secret keyxd2n mx5t ekg6 h6bi u74d 745k n4m7 zy3xfrom the second image above (substitute your own):[user@mfa ~]$ oathtool --base32 --totp "xd2n mx5t ekg6 h6bi u74d 745k n4m7 zy3x" 279365The output is
279365. This is what you would enter when prompted for an authenticator code. (Note that this is a time-based one-time password, which means that your VM’s clock must be sufficiently accurate in order to generate a valid token. Qubes handles VM time syncing automatically, so you normally shouldn’t have to worry about this. As usual, the token will change after a short period of time.) -
To make this easier on ourselves in the future, we can create a simple shell script for each service we use. (The example service here is a Google account, using the example key from above. You’ll get a unique secret key from each service.) Create the script like so:
[user@mfa ~]$ > google
[user@mfa ~]$ vi google

#!/usr/bin/env bash
##My Google Account
##me@gmail.com
oathtool --base32 --totp "xd2n mx5t ekg6 h6bi u74d 745k n4m7 zy3x"

[user@mfa ~]$ chmod +x google
Since the secret key stored in the script never changes, we should never have to update this script, but we can easily do so if we ever want to.
-
Now, whenever Google prompts us for an authenticator code, all we have to do is this:
[user@mfa ~]$ ./google
640916
Done!
-
Now you can create scripts for any other TOTP-supporting services you use, and enjoy the security and ease of quickly generating authentication tokens right from your Qubes VM command-line:
[user@mfa ~]$ ./github
495272
[user@mfa ~]$ ./aws
396732
[user@mfa ~]$ ./facebook
851956
[user@mfa ~]$ ./dropbox
294106
[user@mfa ~]$ ./microsoft
295592
[user@mfa ~]$ ./slack
501731
[user@mfa ~]$ ./wordpress
914625
[user@mfa ~]$ ./tumblr
701463
For a more complete list of compatible services, see here.
Alternative - zbar & pass-otp
As an alternative, one can download a QR code, scan it with zbar and use the scan to create one time passwords with pass-otp.
Install the required tools. The following has been tested on a Fedora 36 template:
sudo dnf install -y zbar pass pass-otp
If you don’t have a GPG key, generate one now. You can skip this step if you have one - that is if OTP codes will be generated in the same Qube that is used for split-gpg. Nevertheless you may want to accomplish this in a Qube dedicated to something else, so we’ll cover this scenario with:
gpg --full-gen-key
Initialize the pass store (~/.password-store/)
pass init <YOUR_EMAIL>
Then scan a downloaded QR code with zbar
zbarimg -q QR.png
Now we’re ready to add it to pass. As an example let’s assume we’re trying to use it as an alternative to GitHub Authenticator app.
pass otp add github
You’ll be prompted to enter the otpauth:// URI. Copy it from the zbarimg output and paste.
You can now use the command pass otp github to get your one-time password. Depending on your GPG configuration, you may get prompted to enter a passphrase to unlock your OpenPGP secret key first.
This document was migrated from the qubes-community project
- Page archive
- First commit: 08 Dec 2020. Last commit: 19 Nov 2022.
- Applicable Qubes OS releases based on commit dates and supported releases: 4.0, 4.1
- Original author(s) (GitHub usernames): aronowski
- Original author(s) (forum usernames): @aronowski
- Document license: CC BY 4.0